
Arduino and ESP32-CAM Controlled Robotic Car with Bluetooth and Gas Detection
View and Edit Project In Cirkit Designer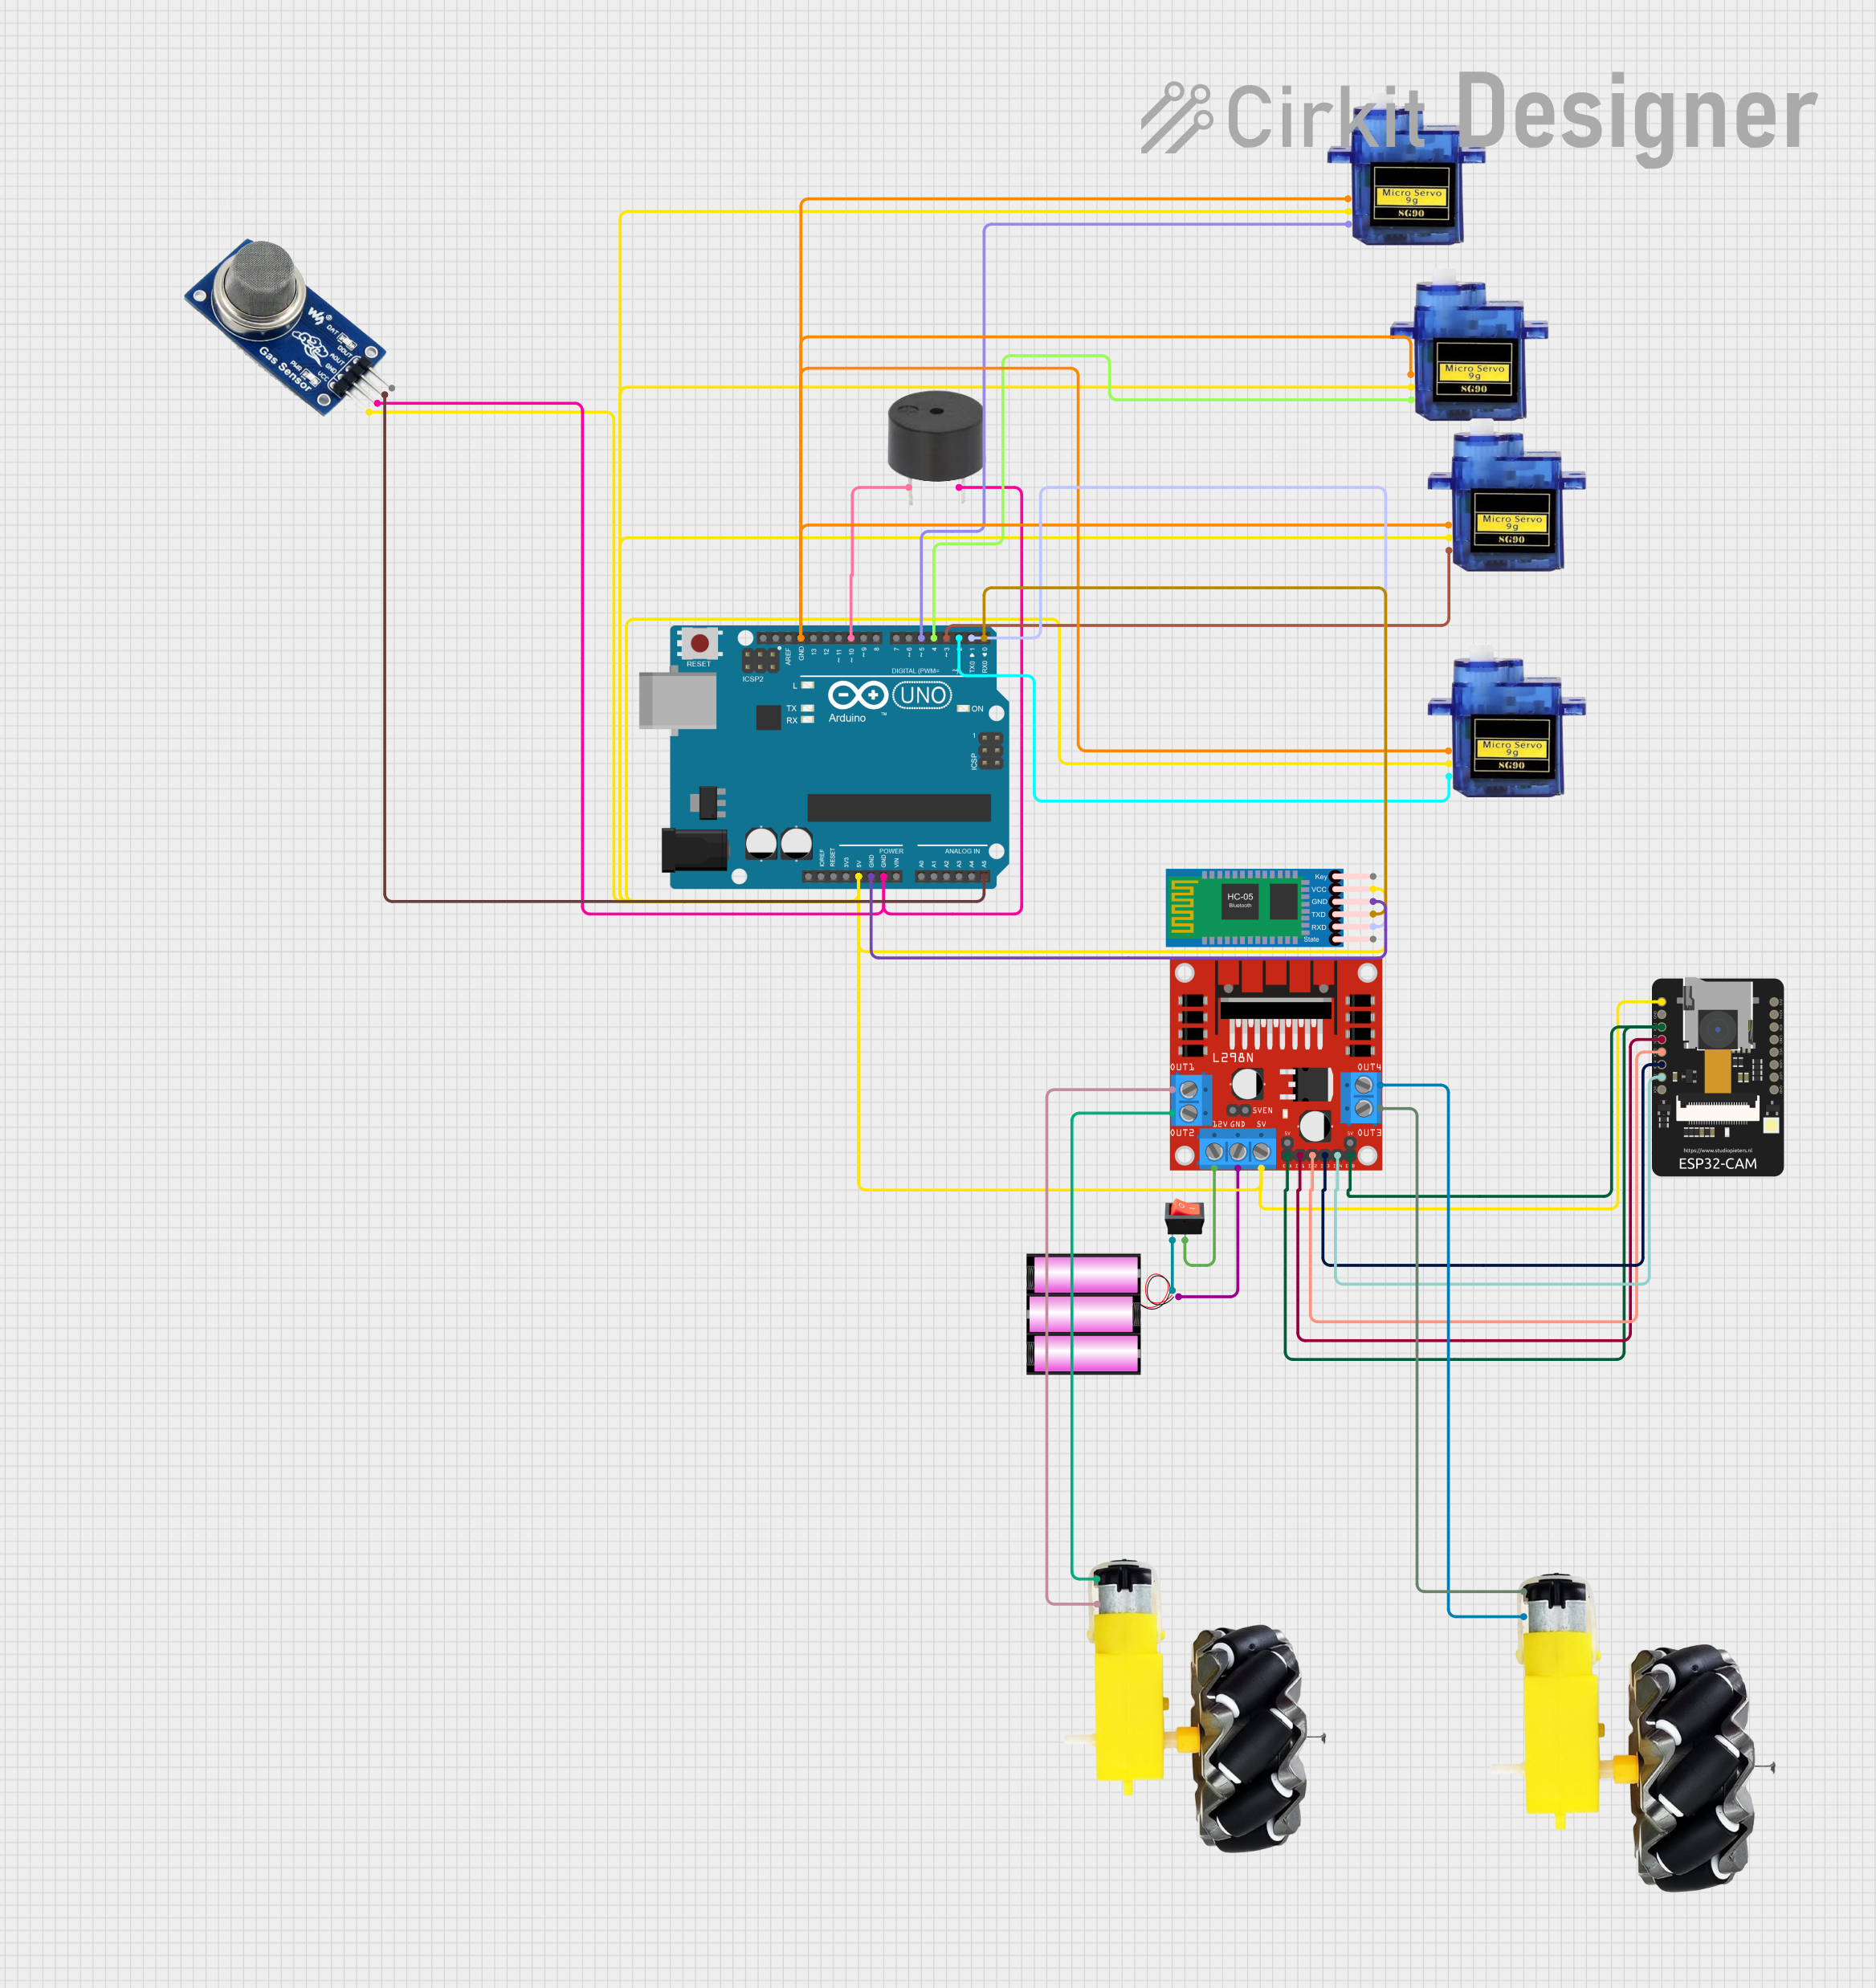
Circuit Documentation
Summary
This document provides a detailed overview of a circuit that includes various components such as an Arduino UNO, HC-05 Bluetooth Module, L298N DC motor driver, MQ2 gas sensor, buzzer, battery, motors, ESP32-CAM, rocker switch, and multiple micro servos. The circuit is designed to interface these components to perform specific tasks, with the Arduino UNO acting as the central microcontroller.
Component List
HC-05 Bluetooth Module
- Description: Bluetooth module for wireless communication.
- Pins: Key, VCC, GND, TXD, RXD, State
L298N DC Motor Driver
- Description: Dual H-Bridge motor driver for controlling DC motors.
- Pins: OUT1, OUT2, 12V, GND, 5V, OUT3, OUT4, 5V-ENA-JMP-I, 5V-ENA-JMP-O, +5V-J1, +5V-J2, ENA, IN1, IN2, IN3, IN4, ENB
MQ2 Gas Sensor
- Description: Gas sensor for detecting various gases.
- Pins: VCC, GND, AOUT, DOUT
Buzzer
- Description: Audio signaling device.
- Pins: PIN, GND
Battery 12V
- Description: Power source for the circuit.
- Pins: +, -
Motor and Wheels
- Description: DC motors with attached wheels.
- Pins: vcc, GND
ESP32-CAM
- Description: Camera module with Wi-Fi and Bluetooth capabilities.
- Pins: 5V, GND, IO12, IO13, IO15, IO14, IO2, IO4, VOT, VOR, VCC, IO0, IO16, 3V3
Rocker Switch
- Description: On/Off switch.
- Pins: output, input
Arduino UNO
- Description: Microcontroller board based on the ATmega328P.
- Pins: UNUSED, IOREF, Reset, 3.3V, 5V, GND, Vin, A0, A1, A2, A3, A4, A5, SCL, SDA, AREF, D13, D12, D11, D10, D9, D8, D7, D6, D5, D4, D3, D2, D1, D0
Micro Servo 9G
- Description: Small servo motor for precise control.
- Pins: GND, +5V, PWM
Wiring Details
HC-05 Bluetooth Module
- VCC connected to 5V of Arduino UNO
- GND connected to GND of Arduino UNO
- TXD connected to D0 of Arduino UNO
- RXD connected to D1 of Arduino UNO
L298N DC Motor Driver
- 5V connected to 5V of Arduino UNO
- GND connected to GND of battery
- 12V connected to output of rocker switch
- OUT1 connected to GND of motor and wheels
- OUT2 connected to vcc of motor and wheels
- OUT3 connected to vcc of motor and wheels
- OUT4 connected to GND of motor and wheels
- ENA connected to IO12 of ESP32-CAM
- ENB connected to IO12 of ESP32-CAM
- IN1 connected to IO13 of ESP32-CAM
- IN2 connected to IO15 of ESP32-CAM
- IN3 connected to IO14 of ESP32-CAM
- IN4 connected to IO2 of ESP32-CAM
MQ2 Gas Sensor
- VCC connected to 5V of Arduino UNO
- GND connected to GND of Arduino UNO
- AOUT connected to A5 of Arduino UNO
Buzzer
- PIN connected to D10 of Arduino UNO
- GND connected to GND of Arduino UNO
Battery 12V
- + connected to input of rocker switch
- - connected to GND of L298N DC motor driver
Motor and Wheels
- vcc connected to OUT2 and OUT3 of L298N DC motor driver
- GND connected to OUT1 and OUT4 of L298N DC motor driver
ESP32-CAM
- 5V connected to 5V of Arduino UNO
- GND connected to GND of Arduino UNO
- IO12 connected to ENA and ENB of L298N DC motor driver
- IO13 connected to IN1 of L298N DC motor driver
- IO15 connected to IN2 of L298N DC motor driver
- IO14 connected to IN3 of L298N DC motor driver
- IO2 connected to IN4 of L298N DC motor driver
Rocker Switch
- output connected to 12V of L298N DC motor driver
- input connected to + of battery
Arduino UNO
- 5V connected to 5V of various components
- GND connected to GND of various components
- A5 connected to AOUT of MQ2 gas sensor
- D10 connected to PIN of buzzer
- D5 connected to PWM of Micro Servo 9G
- D4 connected to PWM of Micro Servo 9G
- D3 connected to PWM of Micro Servo 9G
- D2 connected to PWM of Micro Servo 9G
- D1 connected to RXD of HC-05 Bluetooth Module
- D0 connected to TXD of HC-05 Bluetooth Module
Micro Servo 9G
- +5V connected to 5V of Arduino UNO
- GND connected to GND of Arduino UNO
- PWM connected to D5, D4, D3, D2 of Arduino UNO
Documented Code
Arduino UNO Code (sketch.ino)
void setup() {
  // put your setup code here, to run once:

}

void loop() {
  // put your main code here, to run repeatedly:

}
Additional Documentation (documentation.txt)
This document provides a comprehensive overview of the circuit, including the components used, their wiring details, and the code for the Arduino UNO.