
ESP32-Based Smart Monitoring System with Wi-Fi and Ethernet Connectivity
View and Edit Project In Cirkit Designer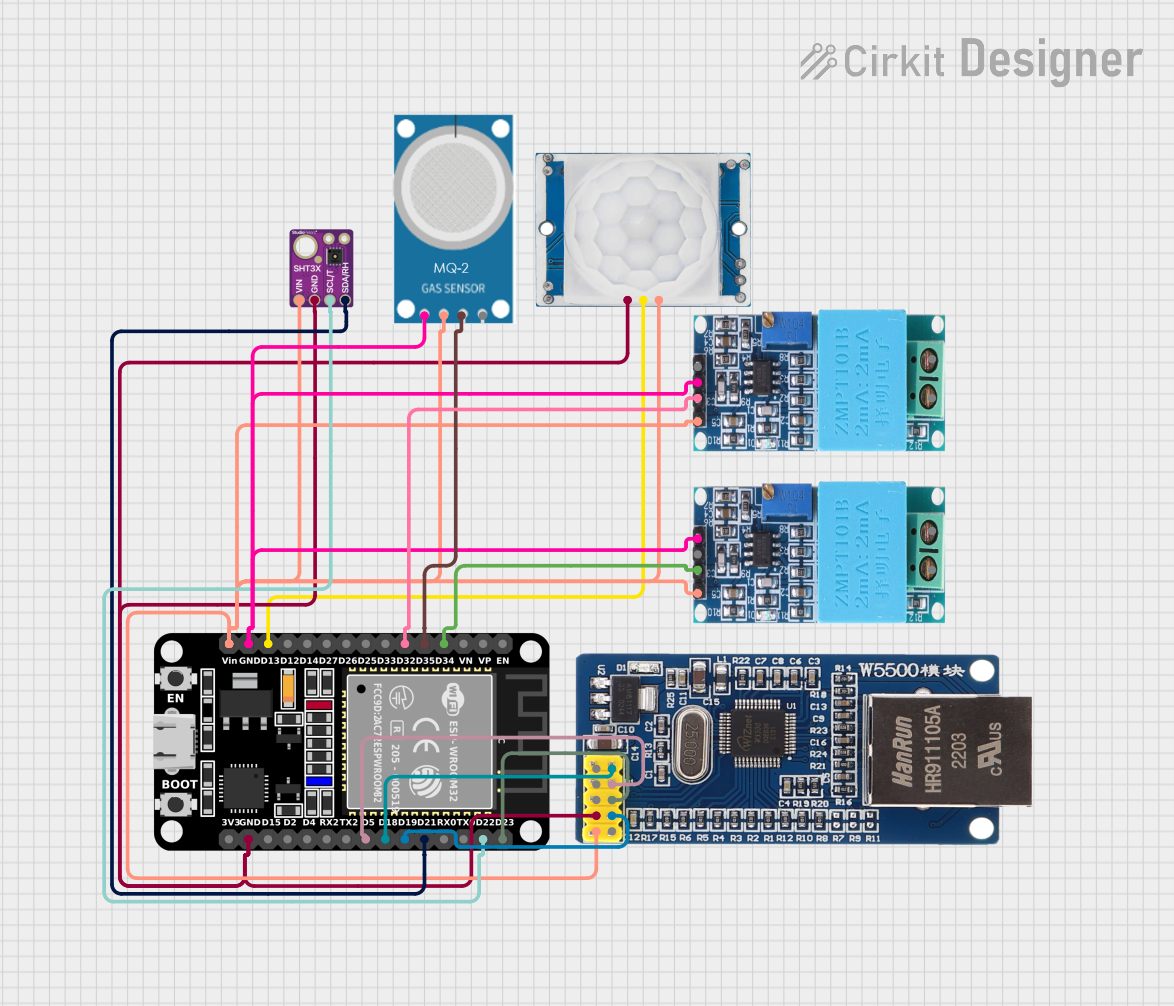
Circuit Documentation
Summary
This circuit is designed to create a smart monitoring system using an ESP32 microcontroller. The system integrates various sensors including a PIR motion sensor, a gas sensor (MQ-2), a temperature and humidity sensor (SHT31), and a voltage sensor (ZMPT101B). Additionally, it includes an Ethernet module (W5500) for network connectivity. The ESP32 collects data from these sensors and serves it via a web server.
Component List
ESP32 (30 pin)
- Description: A powerful microcontroller with built-in WiFi and Bluetooth capabilities.
- Pins: EN, VP, VN, D34, D35, D32, D33, D25, D26, D27, D14, D12, D13, GND, Vin, D23, D22, TX0, RX0, D21, D19, D18, D5, TX2, RX2, D4, D2, D15, 3V3
HC-SR501 PIR motion sensor
- Description: A motion sensor that detects movement using passive infrared technology.
- Pins: Output, Ground, Power Supply
SHT31
- Description: A temperature and humidity sensor.
- Pins: VCC, GND, SDA, SCL
MQ-2
- Description: A gas sensor that detects various gases including LPG, i-butane, propane, methane, alcohol, hydrogen, and smoke.
- Pins: GND, VCC, ANALOG, Digital
ZMPT101B
- Description: A voltage sensor module used for measuring AC voltage.
- Pins: OUT, GND, VCC, NEUTRO, FASE
Module Ethernet W5500
- Description: An Ethernet module based on the W5500 chip, used for network connectivity.
- Pins: NC, INT, RST, GND, 5V, SCK, SS, MOSI, MISO, 3.3V
Wiring Details
ESP32 (30 pin)
- D34 connected to OUT of ZMPT101B (Voltage Sensor)
- D35 connected to ANALOG of MQ-2 (Gas Sensor)
- D32 connected to OUT of ZMPT101B (Voltage Sensor)
- D13 connected to Output of HC-SR501 (PIR Motion Sensor)
- GND connected to:
- GND of ZMPT101B (Voltage Sensor)
- GND of MQ-2 (Gas Sensor)
- GND of ZMPT101B (Voltage Sensor)
- Vin connected to:
- VCC of SHT31 (Temperature and Humidity Sensor)
- VCC of ZMPT101B (Voltage Sensor)
- 5V of Module Ethernet W5500
- VCC of MQ-2 (Gas Sensor)
- VCC of ZMPT101B (Voltage Sensor)
- Power Supply of HC-SR501 (PIR Motion Sensor)
- D23 connected to MOSI of Module Ethernet W5500
- D22 connected to SCL of SHT31 (Temperature and Humidity Sensor)
- D21 connected to SDA of SHT31 (Temperature and Humidity Sensor)
- D19 connected to MISO of Module Ethernet W5500
- D18 connected to SCK of Module Ethernet W5500
- D5 connected to SS of Module Ethernet W5500
- GND connected to:
- GND of SHT31 (Temperature and Humidity Sensor)
- GND of Module Ethernet W5500
- Ground of HC-SR501 (PIR Motion Sensor)
HC-SR501 PIR motion sensor
- Output connected to D13 of ESP32
- Ground connected to GND of ESP32
- Power Supply connected to Vin of ESP32
SHT31
- VCC connected to Vin of ESP32
- GND connected to GND of ESP32
- SDA connected to D21 of ESP32
- SCL connected to D22 of ESP32
MQ-2
- GND connected to GND of ESP32
- VCC connected to Vin of ESP32
- ANALOG connected to D35 of ESP32
ZMPT101B
- OUT connected to D34 of ESP32
- GND connected to GND of ESP32
- VCC connected to Vin of ESP32
Module Ethernet W5500
- 5V connected to Vin of ESP32
- GND connected to GND of ESP32
- MOSI connected to D23 of ESP32
- MISO connected to D19 of ESP32
- SCK connected to D18 of ESP32
- SS connected to D5 of ESP32
Documented Code
#include <WiFi.h>
#include <ESPAsyncWebServer.h>
#include <Wire.h>
#include <Adafruit_Sensor.h>
#include <Adafruit_SHT31.h>
#include <SPI.h>
#include <Ethernet.h>
// اطلاعات شبکه WiFi خود را وارد کنید
const char* ssid = "YOUR_SSID";
const char* password = "YOUR_PASSWORD";
// پینهای متصل به سنسورها
const int mq2Pin = 34; // سنسور MQ2 به پین GPIO34 متصل شده است
const int motionPin = 13; // سنسور حرکت HC-SR501 به پین GPIO13 متصل است
// تعریف سنسور SHT31
Adafruit_SHT31 sht31 = Adafruit_SHT31();
// ایجاد شیء وب سرور (پورت 80)
AsyncWebServer server(80);
EthernetClient client;
IPAddress ip(192, 168, 1, 100); // آدرس IP برای اتصال با اترنت
void setup() {
// شروع ارتباط سریال برای مانیتورینگ
Serial.begin(115200);
// اتصال به شبکه WiFi
WiFi.begin(ssid, password);
while (WiFi.status() != WL_CONNECTED) {
delay(1000);
Serial.println("Connecting to WiFi...");
}
Serial.println("Connected to WiFi!");
Serial.println(WiFi.localIP());
// راهاندازی سنسور SHT31
if (!sht31.begin()) {
Serial.println("Couldn't find SHT31 sensor");
while (1);
}
// راهاندازی پینهای سنسورهای دیجیتال
pinMode(motionPin, INPUT);
// راهاندازی وب سرور
server.on("/", HTTP_GET, [](AsyncWebServerRequest *request){
int mq2Value = analogRead(mq2Pin); // خواندن مقدار آنالوگ از سنسور MQ2
float temperature = sht31.readTemperature(); // خواندن دما از سنسور SHT31
float humidity = sht31.readHumidity(); // خواندن رطوبت از سنسور SHT31
int motionDetected = digitalRead(motionPin); // خواندن وضعیت سنسور حرکت
// ساخت HTML برای نمایش دادهها
String html = "<html><body><h1>Smart Monitoring System</h1>";
html += "<p>MQ2 Sensor Value: " + String(mq2Value) + "</p>";
html += "<p>Temperature: " + String(temperature) + " °C</p>";
html += "<p>Humidity: " + String(humidity) + " %</p>";
html += "<p>Motion Detected: " + String(motionDetected) + "</p>";
html += "</body></html>";
request->send(200, "text/html", html); // ارسال HTML به مرورگر
});
// شروع وب سرور
server.begin();
}
void loop() {
// در اینجا نیازی به کد خاصی نیست چون سرور به طور مداوم در حال اجراست
}
This code initializes the ESP32, connects it to a WiFi network, sets up the sensors, and starts a web server that serves sensor data in an HTML format. The web server runs continuously, and no additional code is needed in the loop() function.