
Wi-Fi Controlled Smart Feeder with ESP-8266 and Ultrasonic Sensor
View and Edit Project In Cirkit Designer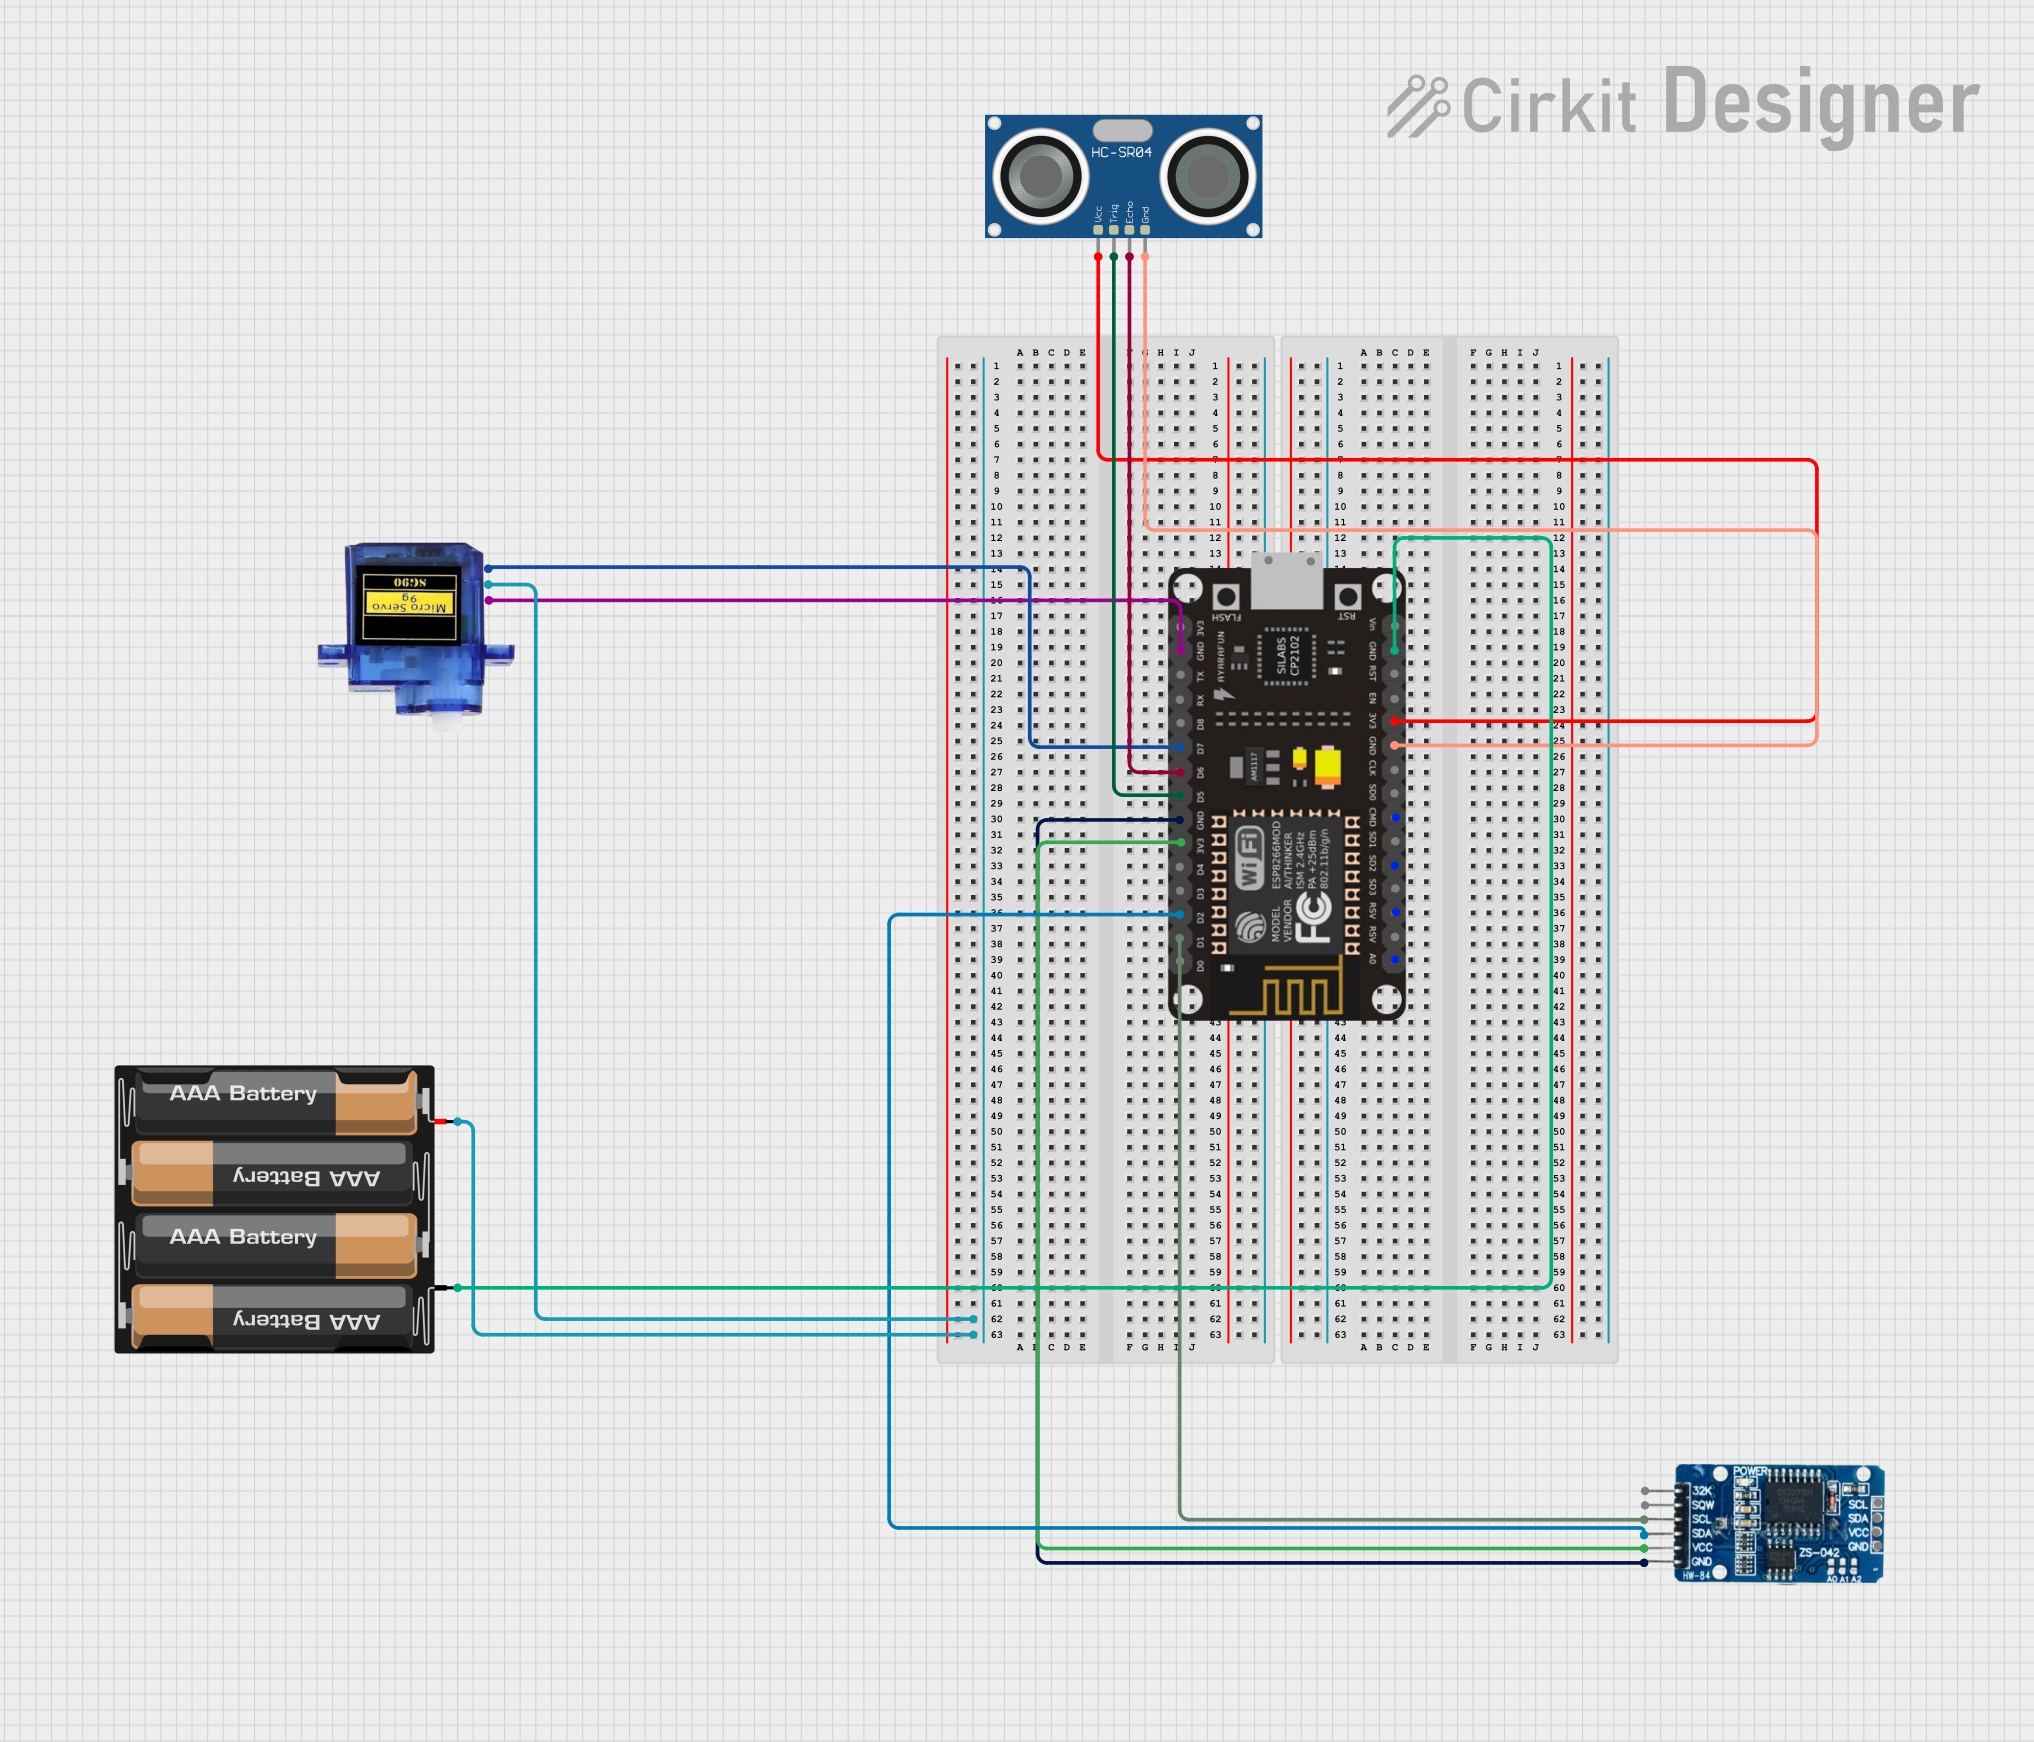
Circuit Documentation
Summary
This circuit is designed to control a feeding mechanism using an ESP-8266 microcontroller. It utilizes an HC-SR04 ultrasonic sensor to measure the distance to the food level, a DS3231 RTC module to keep track of time, and a micro servo to dispense food. The system is powered by a 4 x AAA battery mount.
Component List
ESP-8266 Controller
- Description: A Wi-Fi enabled microcontroller used to control the entire system.
- Pins: A0, RSV, SD3, SD5, SD1, CMD, D0, D1, D2, D3, D4, 3V3, GND, D5, D6, SD0, CLK, RST, EN, D7, D8, RX, TX, Vin, 5V
HC-SR04 Ultrasonic Sensor
- Description: An ultrasonic sensor used to measure the distance to the food level.
- Pins: VCC, TRIG, ECHO, GND
Micro servo 9G
- Description: A small servo motor used to dispense food.
- Pins: GND, +5V, PWM
RTC DS3231
- Description: A real-time clock module used to keep track of time.
- Pins: 32K, SQW, SCL, SDA, VCC, GND
4 x AAA Battery Mount
- Description: A battery holder for four AAA batteries to power the circuit.
- Pins: -, +
Wiring Details
ESP-8266 Controller
- D1 is connected to SCL of the RTC DS3231.
- D2 is connected to SDA of the RTC DS3231.
- 3V3 is connected to VCC of the RTC DS3231.
- GND is connected to GND of the RTC DS3231.
- D5 is connected to TRIG of the HC-SR04 Ultrasonic Sensor.
- D6 is connected to ECHO of the HC-SR04 Ultrasonic Sensor.
- GND is connected to - of the 4 x AAA Battery Mount.
- 3V3 is connected to VCC of the HC-SR04 Ultrasonic Sensor.
- GND is connected to GND of the HC-SR04 Ultrasonic Sensor.
- D7 is connected to PWM of the Micro servo 9G.
- GND is connected to GND of the Micro servo 9G.
HC-SR04 Ultrasonic Sensor
- TRIG is connected to D5 of the ESP-8266 Controller.
- ECHO is connected to D6 of the ESP-8266 Controller.
- VCC is connected to 3V3 of the ESP-8266 Controller.
- GND is connected to GND of the ESP-8266 Controller.
Micro servo 9G
- PWM is connected to D7 of the ESP-8266 Controller.
- GND is connected to GND of the ESP-8266 Controller.
- +5V is connected to + of the 4 x AAA Battery Mount.
RTC DS3231
- SCL is connected to D1 of the ESP-8266 Controller.
- SDA is connected to D2 of the ESP-8266 Controller.
- VCC is connected to 3V3 of the ESP-8266 Controller.
- GND is connected to GND of the ESP-8266 Controller.
4 x AAA Battery Mount
- - is connected to GND of the ESP-8266 Controller.
- + is connected to +5V of the Micro servo 9G.
Documented Code
#include <ESP8266WiFi.h>
#include <ESP8266WebServer.h>
#include <Wire.h>
#include <RTClib.h>
#include <Servo.h>

// Pin dan parameter
#define TRIG_PIN 14  // D5
#define ECHO_PIN 12  // D6
#define SERVO_PIN 13
#define DISTANCE_THRESHOLD_LOW 10
#define DISTANCE_THRESHOLD_HIGH 30

// Komponen
Servo myServo;
RTC_DS3231 rtc;
WiFiServer server(80);

// Maklumat WiFi
const char* ssid = "HUAWEI-B315-5A65";  // Gantikan dengan SSID anda
const char* password = "65646645";      // Gantikan dengan kata laluan WiFi anda

// Pemboleh ubah global
float duration_us, distance_cm;
String feedingTime = "08:00";  // Masa makan default

void setup() {
  Serial.begin(115200);
  Serial.println("Setup started...");

  // Sambung ke Wi-Fi
  WiFi.begin(ssid, password);
  Serial.println("Connecting to WiFi...");
  unsigned long startMillis = millis();
  while (WiFi.status() != WL_CONNECTED) {
    delay(1000);
    Serial.print(".");
    if (millis() - startMillis >= 10000) {  // Timeout selepas 10 saat
      Serial.println("\nWiFi connection failed!");
      return; // Berhenti jika WiFi gagal
    }
  }
  Serial.println("\nConnected to WiFi");
  Serial.print("IP Address: ");
  Serial.println(WiFi.localIP()); // Papar IP

  // Mulakan server
  server.begin();
  Serial.println("Server started");

  // RTC setup
  Wire.begin(4, 5);  // SDA, SCL
  if (!rtc.begin()) {
    Serial.println("Couldn't find RTC");
    while (1);
  } else {
    Serial.println("RTC initialized.");
  }

  if (rtc.lostPower()) {
    Serial.println("RTC kehilangan kuasa. Menetapkan semula masa...");
    rtc.adjust(DateTime(F(__DATE__), F(__TIME__)));  // Tetapkan RTC ke waktu kompilasi
  }

  // Servo setup
  myServo.attach(SERVO_PIN);
  myServo.write(0);
  Serial.println("Servo attached and initialized.");

  // Ultrasonic sensor setup
  pinMode(TRIG_PIN, OUTPUT);
  pinMode(ECHO_PIN, INPUT);
  Serial.println("Ultrasonic sensor pins configured.");
}

void loop() {
  WiFiClient client = server.available();
  if (client) {
    Serial.println("Client connected");
    String request = "";
    while (client.available()) {
      request += (char)client.read();
    }
    Serial.println("Client request: " + request);

    // Tangani permintaan feeding time
    handleFeedingTime(request);

    // Tangani permintaan status
    if (request.indexOf("GET /status") != -1) {
      handleStatusRequest(client);
    }

    delay(1);
    client.stop();
  }

  // Kawal pemakanan berdasarkan feeding time
  DateTime now = rtc.now();
  if (now.hour() == getHourFromTime(feedingTime) && now.minute() == getMinuteFromTime(feedingTime)) {
    dispenseFoodIfNeeded();
  }

  delay(1000);  // Kitaran loop setiap 1 saat
}

// Fungsi untuk mengendalikan feeding time
void handleFeedingTime(String request) {
  if (request.indexOf("GET /setFeedingTime?time=") != -1) {
    int startIndex = request.indexOf("time=") + 5;
    int endIndex = request.indexOf(" ", startIndex);
    if (endIndex == -1) {
      endIndex = request.length();
    }
    feedingTime = request.substring(startIndex, endIndex);
    Serial.println("Feeding time set to: " + feedingTime);
  }
}

// Fungsi untuk mengendalikan permintaan status
void handleStatusRequest(WiFiClient client) {
  digitalWrite(TRIG_PIN, LOW);
  delayMicroseconds(2);
  digitalWrite(TRIG_PIN, HIGH);
  delayMicroseconds(10);
  digitalWrite(TRIG_PIN, LOW);

  duration_us = pulseIn(ECHO_PIN, HIGH);
  distance_cm = (duration_us * 0.034) / 2;

  String foodStatus = "Low";
  if (distance_cm < DISTANCE_THRESHOLD_LOW) {
    foodStatus = "Full";
  }

  DateTime now = rtc.now();
  String response = "HTTP/1.1 200 OK\r\n";
  response += "Content-Type: text/plain\r\n";
  response += "Connection: close\r\n\r\n";
  response += "Distance: " + String(distance_cm) + " cm\n";
  response += "Food Status: " + foodStatus + "\n";
  response += "Time: " + String(now.hour()) + ":" + String