
Arduino UNO-Based Automated Plant Watering System with LCD Display
View and Edit Project In Cirkit Designer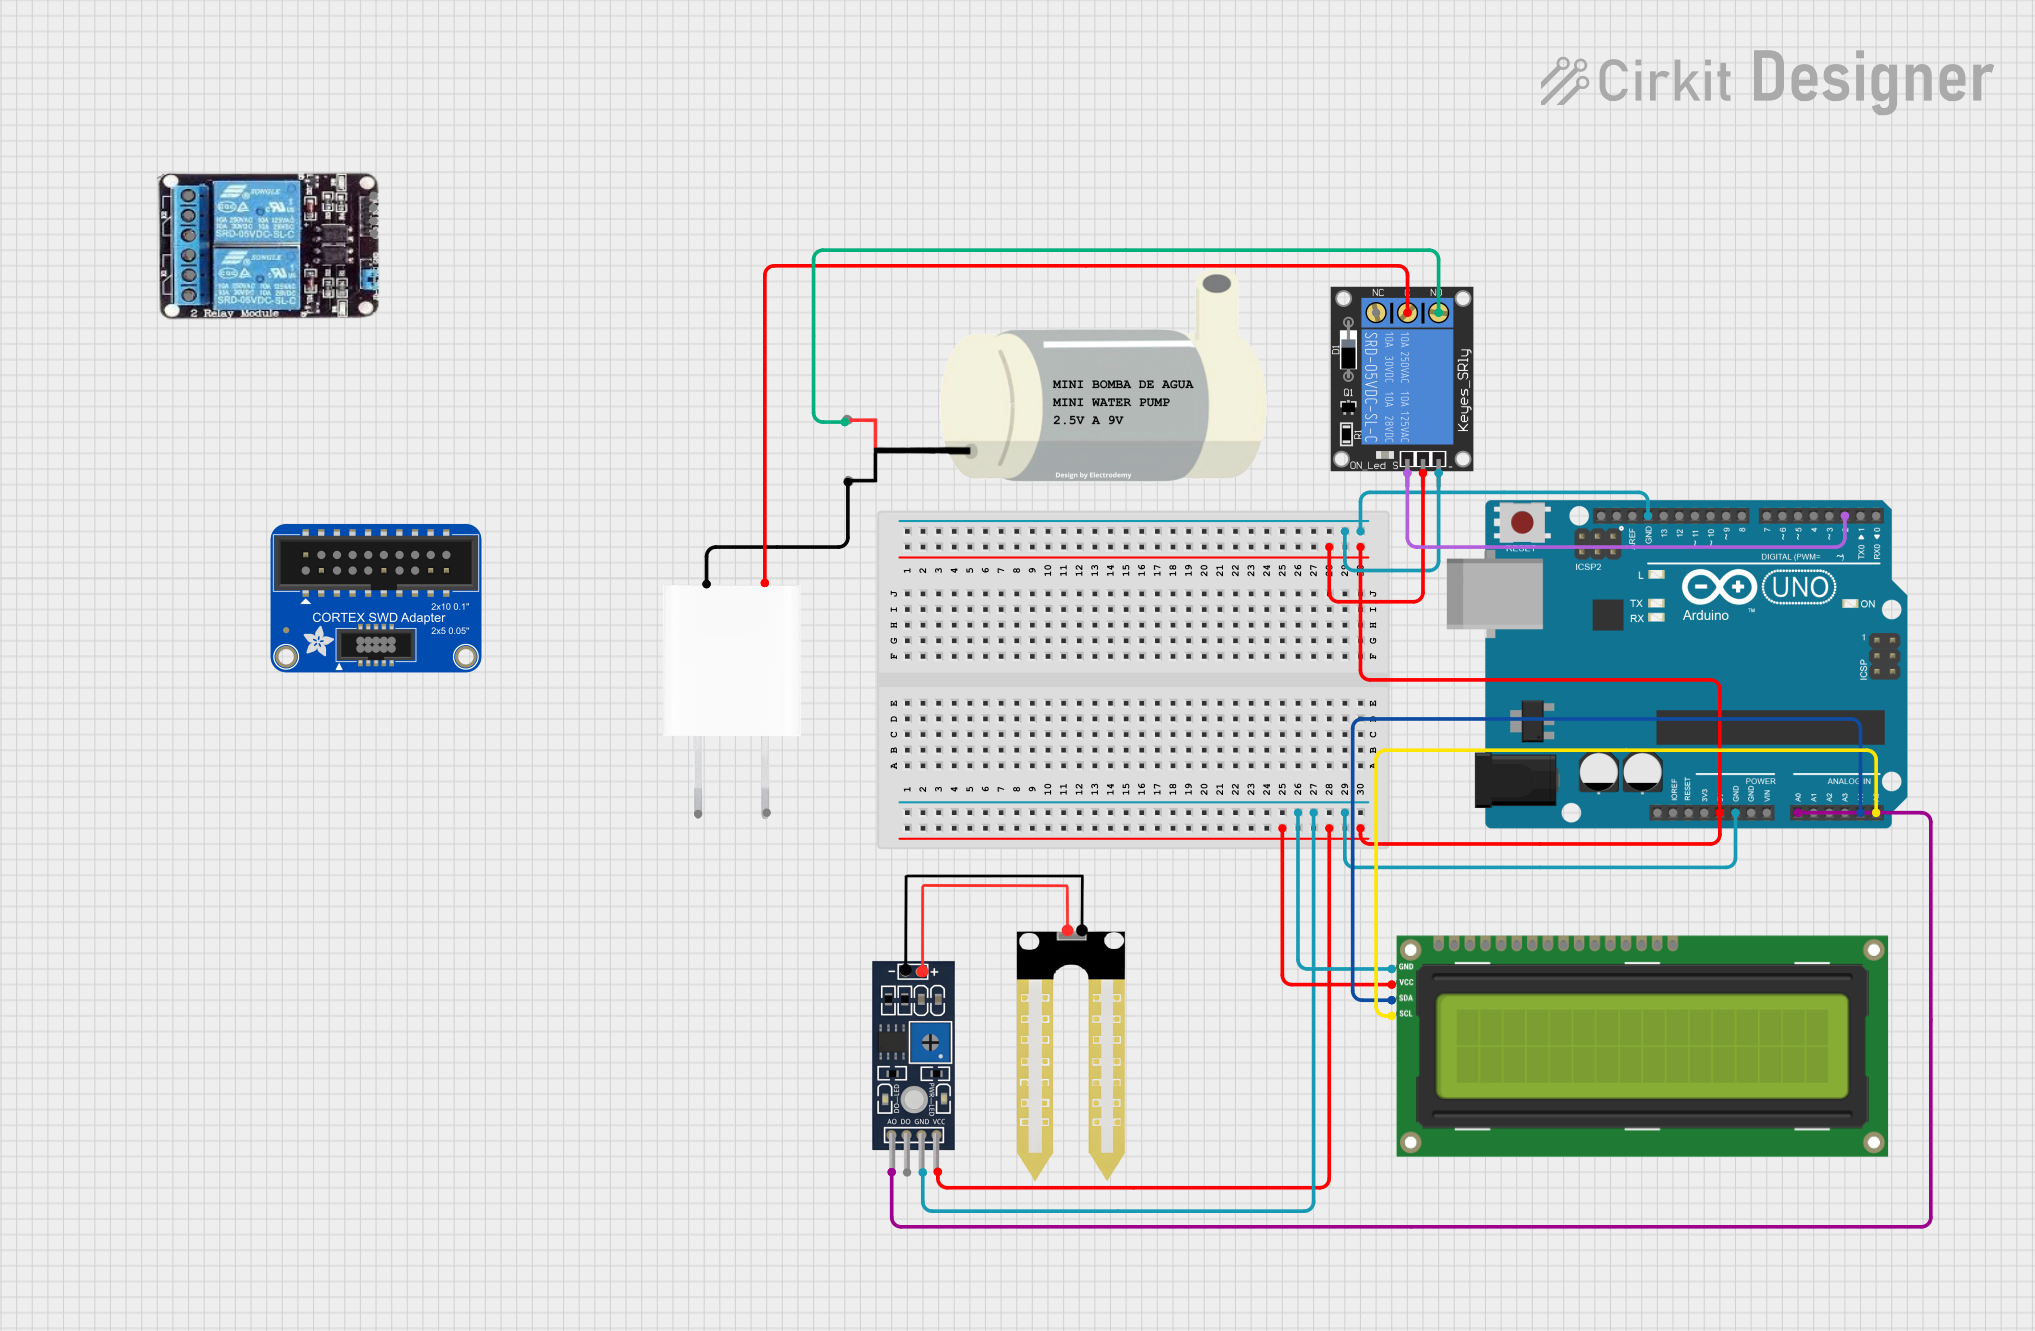
Circuit Documentation
Summary
This circuit is designed to monitor soil moisture levels and automatically water a plant when the soil is dry. It uses an Arduino UNO microcontroller to read data from a moisture sensor and control a water pump via a relay. An I2C LCD screen is used to display the moisture level and the status of the watering process.
Component List
Arduino UNO
- Description: A microcontroller board based on the ATmega328P.
- Pins: UNUSED, IOREF, Reset, 3.3V, 5V, GND, Vin, A0, A1, A2, A3, A4, A5, SCL, SDA, AREF, D13, D12, D11, D10, D9, D8, D7, D6, D5, D4, D3, D2, D1, D0
Humidity YL-69
- Description: A soil moisture sensor.
- Pins: A0, D0, GND, VCC
1-Channel Relay (5V 10A)
- Description: A relay module used to control the water pump.
- Pins: NC, signal, C, power, NO, ground
I2C LCD 16x2 Screen
- Description: A 16x2 character LCD screen with I2C interface.
- Pins: SCL, SDA, VCC (5V), GND, VDD, VO, RS, RW, E, D0, D1, D2, D3, D4, D5, D6, D7, BLA, BLK
Mini Water Pump
- Description: A small water pump used to water the plant.
- Pins: VCC, GND
5V Adapter
- Description: A power adapter providing 5V output.
- Pins: AC In 1, AC In 2, 5V, GND
Adafruit JTAG 2x10 to SWD 2x5
- Description: A JTAG to SWD adapter.
- Pins: RESET, NC, SW0, SWDCLK, SWDIO, GND, VCC
2ch relay
- Description: A 2-channel relay module.
- Pins: NC, COM, NO, VCC, IN2, IN1, GND
Wiring Details
Arduino UNO
- 5V connected to VCC (5V) of I2C LCD 16x2 Screen, VCC of Humidity YL-69, and power of 1-Channel Relay (5V 10A).
- GND connected to GND of I2C LCD 16x2 Screen, GND of Humidity YL-69, and ground of 1-Channel Relay (5V 10A).
- D2 connected to signal of 1-Channel Relay (5V 10A).
- A0 connected to A0 of Humidity YL-69.
- A4 connected to SDA of I2C LCD 16x2 Screen.
- A5 connected to SCL of I2C LCD 16x2 Screen.
Humidity YL-69
- VCC connected to 5V of Arduino UNO.
- GND connected to GND of Arduino UNO.
- A0 connected to A0 of Arduino UNO.
1-Channel Relay (5V 10A)
- power connected to 5V of Arduino UNO.
- ground connected to GND of Arduino UNO.
- signal connected to D2 of Arduino UNO.
- C connected to 5V of 5V Adapter.
- NO connected to VCC of Mini Water Pump.
I2C LCD 16x2 Screen
- VCC (5V) connected to 5V of Arduino UNO.
- GND connected to GND of Arduino UNO.
- SDA connected to A4 of Arduino UNO.
- SCL connected to A5 of Arduino UNO.
Mini Water Pump
- VCC connected to NO of 1-Channel Relay (5V 10A).
- GND connected to GND of 5V Adapter.
5V Adapter
- 5V connected to C of 1-Channel Relay (5V 10A).
- GND connected to GND of Mini Water Pump.
Code Documentation
#include <Wire.h>
#include <LiquidCrystal_I2C.h>

// Initialize the LCD with I2C address 0x27 and 16x2 dimensions
LiquidCrystal_I2C lcd(0x27, 16, 2);

int moisturePin = A0;     // Moisture sensor connected to A0
int relayPin = 7;         // Relay signal connected to digital pin 7
int moistureValue = 0;    // Variable to store moisture sensor value
int threshold = 500;      // Moisture level threshold (adjust as needed)

void setup() {
  // Initialize the LCD
  lcd.begin();
  lcd.backlight();

  // Initialize the relay pin as an output
  pinMode(relayPin, OUTPUT);

  // Ensure the relay is off initially
  digitalWrite(relayPin, HIGH); // Relay is LOW-active, so HIGH means OFF

  // Begin serial communication for debugging (optional)
  Serial.begin(9600);

  // Welcome message on the LCD
  lcd.setCursor(0, 0);
  lcd.print("Plant Monitor");
  delay(2000);
  lcd.clear();
}

void loop() {
  // Read moisture sensor value (analog)
  moistureValue = analogRead(moisturePin);

  // Display moisture level on the LCD
  lcd.setCursor(0, 0);
  lcd.print("Moisture: ");
  lcd.print(moistureValue);

  // Determine if soil is dry or wet
  if (moistureValue < threshold) {
    // Soil is dry, activate the water pump
    digitalWrite(relayPin, LOW);  // Turn ON the pump (relay is LOW-active)
    lcd.setCursor(0, 1);
    lcd.print("Watering Plant");
  } else {
    // Soil is wet, turn off the pump
    digitalWrite(relayPin, HIGH); // Turn OFF the pump
    lcd.setCursor(0, 1);
    lcd.print("Soil is Moist   ");
  }

  // Optional: print sensor values to Serial Monitor for debugging
  Serial.print("Moisture: ");
  Serial.println(moistureValue);

  // Small delay before next reading
  delay(1000);
}
This code initializes the LCD and sets up the relay and moisture sensor. In the loop function, it reads the moisture sensor value, displays it on the LCD, and controls the water pump based on the moisture level. The pump is activated when the soil is dry and deactivated when the soil is moist.