
Arduino UNO Based Ultrasonic Distance Measurement with Buzzer Indicator
View and Edit Project In Cirkit Designer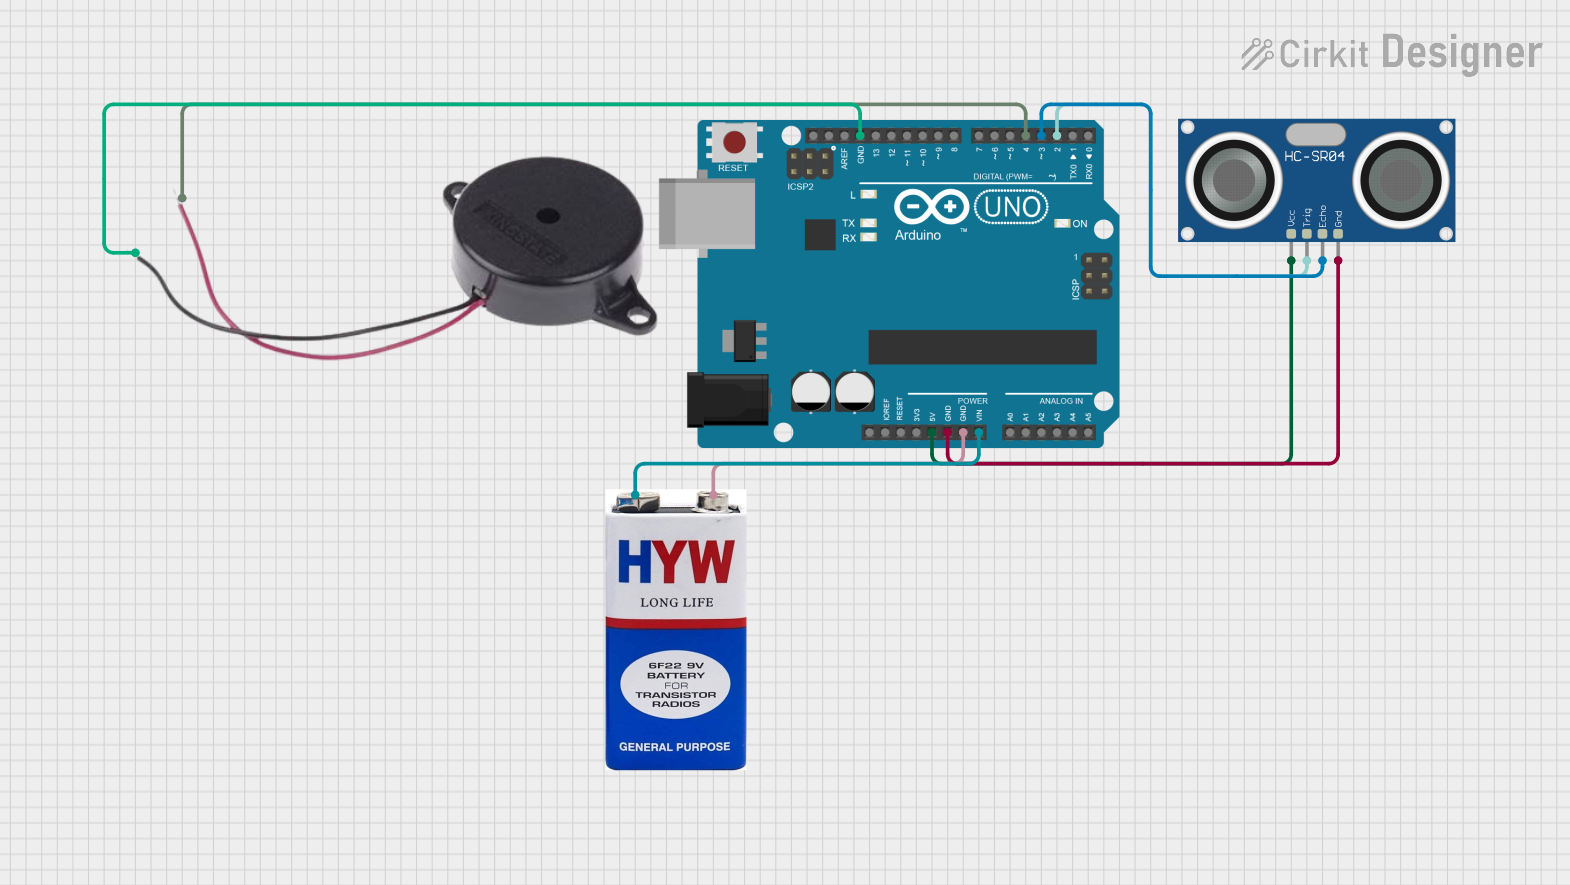
Circuit Documentation
Summary of the Circuit
This circuit is designed around the Arduino UNO microcontroller, which serves as the central processing unit for controlling a buzzer and interfacing with an HC-SR04 Ultrasonic Sensor. The circuit is powered by a 9V battery connected to the Arduino UNO. The HC-SR04 sensor is used to measure distances, and the buzzer is used to provide audible feedback. The Arduino UNO's digital pins are configured to control the buzzer and to communicate with the ultrasonic sensor.
Component List
Arduino UNO
- Description: A microcontroller board based on the ATmega328P.
- Pins: UNUSED, IOREF, Reset, 3.3V, 5V, GND, Vin, A0-A5, SCL, SDA, AREF, D0-D13.
Buzzer
- Description: An electromechanical component that produces sound.
- Pins: POSITIVE, NEGATIVE.
HC-SR04 Ultrasonic Sensor
- Description: A sensor that measures distance by emitting ultrasonic waves and measuring the time it takes for the echo to return.
- Pins: VCC, TRIG, ECHO, GND.
9V Battery
- Description: A standard 9V battery used to provide power to the circuit.
- Pins: + (positive terminal), - (negative terminal).
Wiring Details
Arduino UNO
- 5V connected to HC-SR04 Ultrasonic Sensor VCC.
- GND connected to:
- HC-SR04 Ultrasonic Sensor GND.
- Buzzer NEGATIVE.
- 9V Battery - (negative terminal).
- Vin connected to 9V Battery + (positive terminal).
- D4 connected to Buzzer POSITIVE.
- D3 connected to HC-SR04 Ultrasonic Sensor ECHO.
- D2 connected to HC-SR04 Ultrasonic Sensor TRIG.
Buzzer
- POSITIVE connected to Arduino UNO D4.
- NEGATIVE connected to Arduino UNO GND.
HC-SR04 Ultrasonic Sensor
- VCC connected to Arduino UNO 5V.
- TRIG connected to Arduino UNO D2.
- ECHO connected to Arduino UNO D3.
- GND connected to Arduino UNO GND.
9V Battery
- + connected to Arduino UNO Vin.
- - connected to Arduino UNO GND.
Documented Code
Arduino UNO Code (sketch.ino)
void setup() {
  // put your setup code here, to run once:

}

void loop() {
  // put your main code here, to run repeatedly:

}
Additional Notes
- The provided code is a template and does not contain any functional code for controlling the buzzer or reading data from the HC-SR04 Ultrasonic Sensor. The user is expected to fill in the setup and loop functions with the necessary code to initialize the sensor and buzzer and to implement the desired functionality.
- The
documentation.txtfile is empty and can be used to add additional notes or documentation related to the code or circuit operation.