
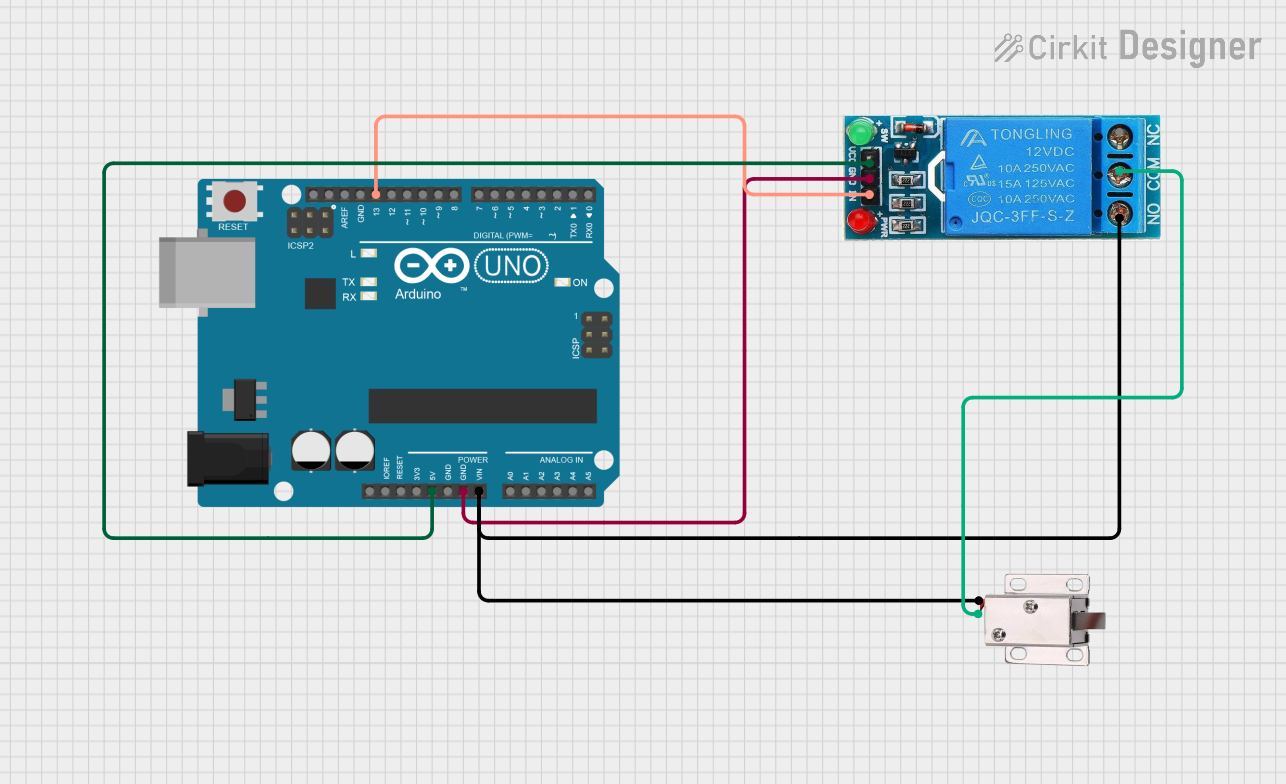
Circuit Documentation
Summary
This circuit involves an Arduino UNO microcontroller, a 12V single-channel relay, and a 12V solenoid lock. The Arduino UNO controls the relay, which in turn controls the solenoid lock. The circuit is designed to unlock the solenoid lock based on input received by the Arduino.
Component List
Arduino UNO
- Description: A microcontroller board based on the ATmega328P.
- Pins: UNUSED, IOREF, Reset, 3.3V, 5V, GND, Vin, A0, A1, A2, A3, A4, A5, SCL, SDA, AREF, D13, D12, D11, D10, D9, D8, D7, D6, D5, D4, D3, D2, D1, D0
12V Single Channel Relay
- Description: A relay module that allows a low-power microcontroller to control a high-power device.
- Pins: NC, COM, NO, IN, GND, VCC
12V Solenoid Lock
- Description: An electromechanical lock that can be controlled by a relay.
- Pins: VCC, GND
Wiring Details
Arduino UNO
- 5V: Connected to VCC of the 12V Single Channel Relay.
- GND: Connected to GND of the 12V Single Channel Relay.
- Vin: Connected to NO of the 12V Single Channel Relay and VCC of the 12V Solenoid Lock.
- D13: Connected to IN of the 12V Single Channel Relay.
12V Single Channel Relay
- VCC: Connected to 5V of the Arduino UNO.
- GND: Connected to GND of the Arduino UNO.
- NO: Connected to Vin of the Arduino UNO and VCC of the 12V Solenoid Lock.
- IN: Connected to D13 of the Arduino UNO.
- COM: Connected to GND of the 12V Solenoid Lock.
12V Solenoid Lock
- VCC: Connected to NO of the 12V Single Channel Relay and Vin of the Arduino UNO.
- GND: Connected to COM of the 12V Single Channel Relay.
Code Documentation
Arduino UNO Code
// IF you are unable to upload the file to Arduino then uncomment the "Adafruit_SSD1306.h"
// and "SimpleDHT.h"
//#include <Adafruit_SSD1306.h>
//#include <SimpleDHT.h>
#include <LiquidCrystal.h>

int data, flag = 2;

LiquidCrystal lcd(2,3,4,5,6,7);

void setup()
{
  pinMode(LED_BUILTIN, OUTPUT);
  Serial.begin(9600);
  digitalWrite(LED_BUILTIN, LOW);
  lcd.begin(16, 2);
  lcd.setCursor (0,0);
  lcd.print("                ");
  lcd.setCursor (0,1);
  lcd.print("                ");
}

void loop()
{
  while( Serial.available() )
  {
    data = Serial.read();

    if (data == '1')
    {
      flag = 1;
    }
    else if(data == '0')
    {
      flag = 0;
    }
  }
  if(flag == 1)
  {
    lcd.setCursor (0,0);
    lcd.print(" Welcome Boss!!  ");
    digitalWrite(LED_BUILTIN, HIGH);
  }
  else if (flag == 0)
  {
    lcd.setCursor (0,0);
    lcd.print("Face Unidentified  ");
    digitalWrite(LED_BUILTIN, LOW);
  }
}
This code initializes the Arduino UNO to control an LCD and an LED. It reads serial input to determine whether to display a welcome message and turn on the LED or display an unidentified message and turn off the LED. The relay is controlled via pin D13, which is set high or low based on the serial input.