
Arduino-Controlled Ultrasonic Water Level Indicator with LCD Display and Relay Switching
View and Edit Project In Cirkit Designer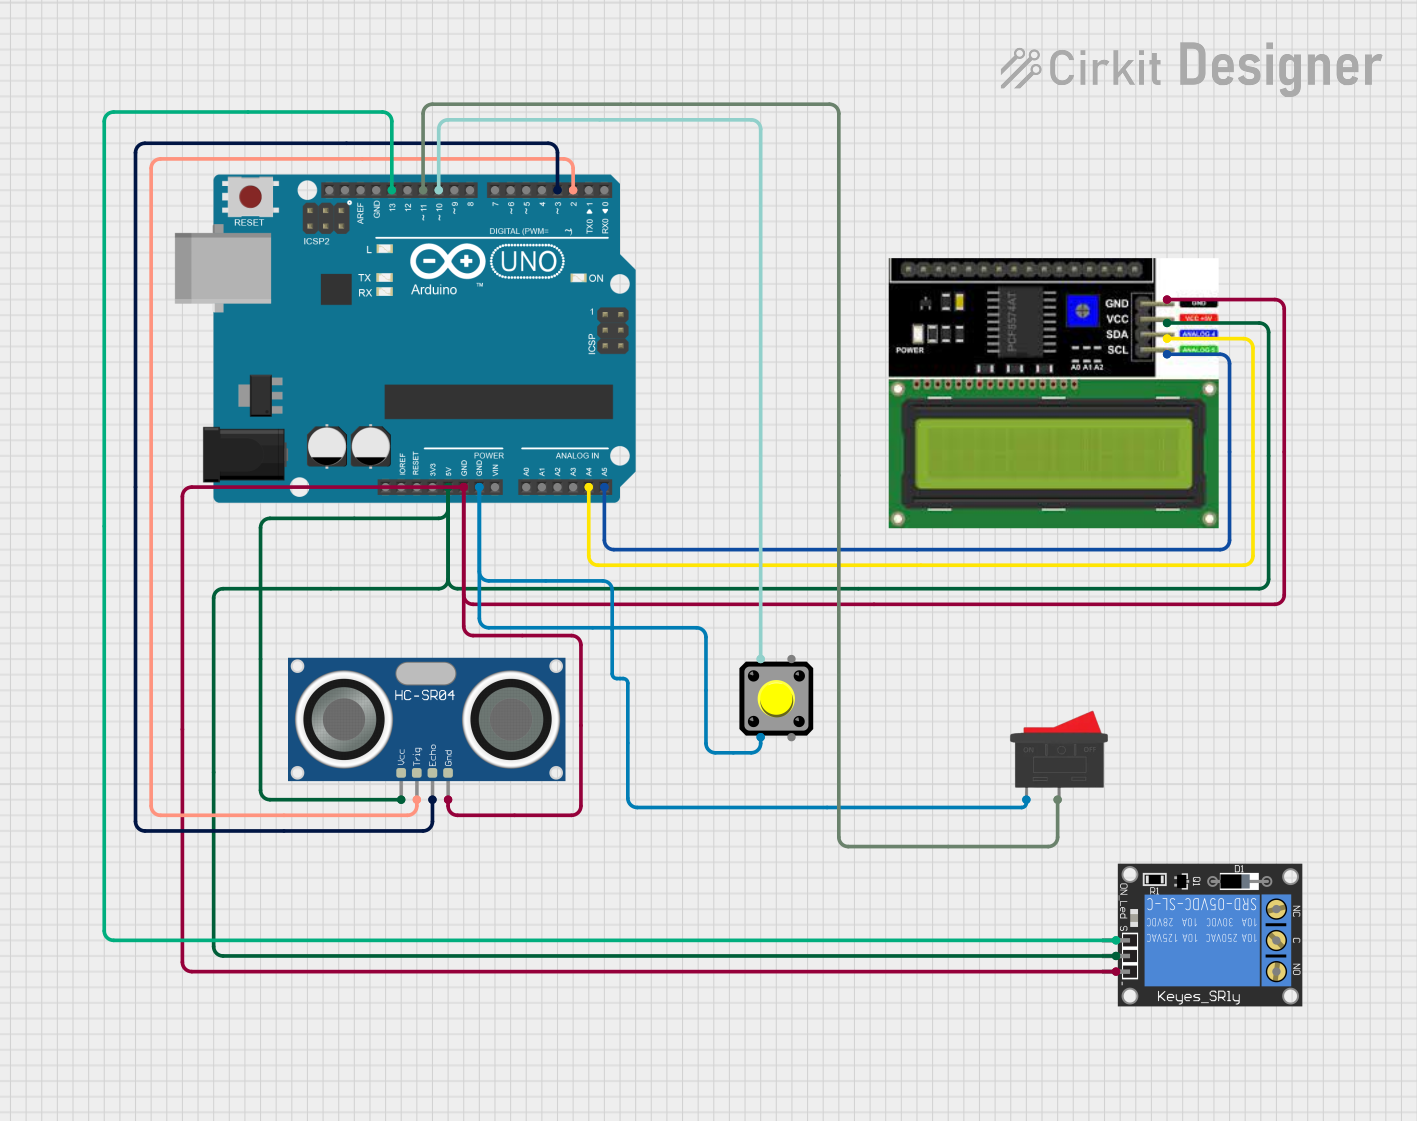
Circuit Documentation
Summary
This circuit is designed to monitor water levels using an HC-SR04 Ultrasonic Sensor and control a pump via a 1-Channel Relay based on the detected water level. The system's status and water level percentage are displayed on an LCD I2C Display. User interaction is facilitated through a Pushbutton and a Rocker Switch, allowing manual control over the pump and setting the water level threshold. The Arduino UNO serves as the central processing unit, running the embedded code to manage sensor readings, display updates, and relay control.
Component List
HC-SR04 Ultrasonic Sensor
- Description: A sensor that measures distance by emitting ultrasonic waves and measuring the time taken for the echo to return.
- Pins: VCC, TRIG, ECHO, GND
1-Channel Relay (5V 10A)
- Description: An electromechanical switch that allows a low-power signal to control a higher power circuit, in this case, a pump.
- Pins: NC, signal, C, power, NO, ground
LCD I2C Display
- Description: A liquid crystal display that communicates over the I2C protocol to show information to the user.
- Pins: GND, VCC, SDA, SCL
Arduino UNO
- Description: A microcontroller board based on the ATmega328P, used for controlling the logic of the circuit.
- Pins: UNUSED, IOREF, Reset, 3.3V, 5V, GND, Vin, A0-A5, SCL, SDA, AREF, D0-D13
Pushbutton
- Description: A simple switch mechanism for controlling some aspect of a machine or a process.
- Pins: Pin 1, Pin 2, Pin 3, Pin 4
Rocker Switch
- Description: A switch that rocks back and forth when pressed, connecting one side to the power supply and the other to the ground or another point in the circuit.
- Pins: 1, 2
Wiring Details
HC-SR04 Ultrasonic Sensor
- VCC connected to 5V power supply
- TRIG connected to Arduino UNO pin D2
- ECHO connected to Arduino UNO pin D3
- GND connected to common ground
1-Channel Relay (5V 10A)
- power connected to 5V power supply
- signal connected to Arduino UNO pin D13
- ground connected to common ground
LCD I2C Display
- GND connected to common ground
- VCC connected to 5V power supply
- SDA connected to Arduino UNO pin A4
- SCL connected to Arduino UNO pin A5
Arduino UNO
- 5V and GND pins used for power distribution
- D2 and D3 used for HC-SR04 Ultrasonic Sensor
- D10 and D11 used for Pushbutton and Rocker Switch inputs
- D13 used for controlling the 1-Channel Relay signal
- A4 and A5 used for I2C communication with LCD Display
Pushbutton
- Pin 1 connected to Arduino UNO pin D10
- Pin 2 connected to common ground
Rocker Switch
- Pin 1 connected to common ground
- Pin 2 connected to Arduino UNO pin D11
Documented Code
#include <EEPROM.h>
#include <Wire.h>
#include <LiquidCrystal_I2C.h>

LiquidCrystal_I2C lcd(0x27, 16, 2);

long duration, inches;
int set_val, percentage;
bool state, pump;

void setup() {

  lcd.begin();
  lcd.print("WATER LEVEL:");
  lcd.setCursor(0, 1);
  lcd.print("PUMP:OFF MANUAL");

  pinMode(2, OUTPUT);
  pinMode(3, INPUT);
  pinMode(10, INPUT_PULLUP);
  pinMode(11, INPUT_PULLUP);
  pinMode(13, OUTPUT);

  set_val = EEPROM.read(0);
  if (set_val > 20) set_val = 20;
}

void loop() {
  digitalWrite(2, HIGH);
  delayMicroseconds(10);
  digitalWrite(2, LOW);
  duration = pulseIn(3, HIGH);
  inches = microsecondsToInches(duration);

  percentage = (set_val - inches) * 110 / set_val;

  lcd.setCursor(12, 0);
  if (percentage < 0) percentage = 0;
  lcd.print(percentage);
  lcd.print("%   ");

  if (percentage < 30 & digitalRead(11)) pump = 1;
  if (percentage > 85) pump = 0;
  digitalWrite(13, !pump);

  lcd.setCursor(5, 1);
  if (pump == 1) lcd.print("ON ");
  else if (pump == 0) lcd.print("OFF");

  lcd.setCursor(9, 1);
  if (!digitalRead(11)) lcd.print("MANUAL ");
  lcd.print("AUTO   ");

  if (!digitalRead(10) & !state & digitalRead(11)) {
    state = 1;
    set_val = inches;
    EEPROM.write(0, set_val);
  }

  if (!digitalRead(10) & !state & !digitalRead(11)) {
    state = 1;
    pump = !pump;
  }

  if (digitalRead(10)) state = 0;

  delay(500);
}

long microsecondsToInches(long microseconds) {
  return microseconds / 29 / 2;
}
This code is responsible for initializing the LCD display and setting up the pins for the ultrasonic sensor, pushbutton, rocker switch, and relay. It reads the water level using the ultrasonic sensor, calculates the percentage of water level, and displays it on the LCD. The relay is controlled based on the water level and the state of the rocker switch, allowing for manual or automatic pump control. The pushbutton is used to set the water level threshold and toggle the pump manually. The EEPROM is used to store the threshold value even after the Arduino is powered off.