Arduino UNO with DHT11 Temperature and Humidity Sensor
Circuit Documentation
Summary
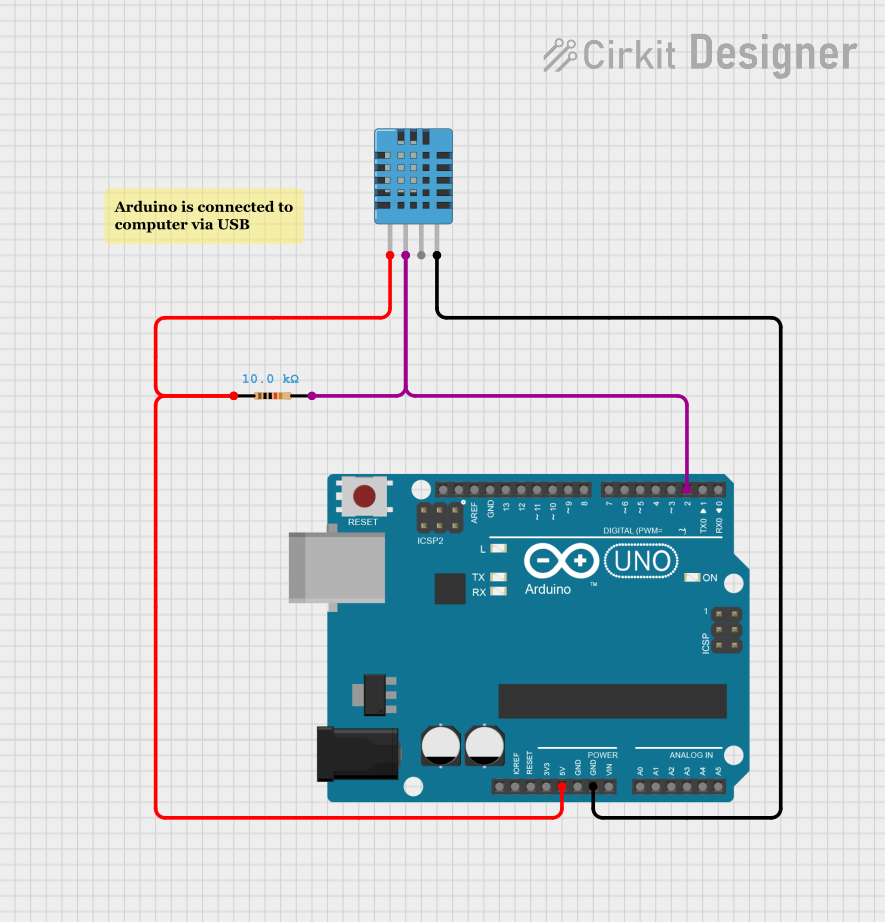
This circuit integrates a DHT11 Humidity and Temperature Sensor with an Arduino UNO microcontroller. The purpose of the circuit is to measure ambient temperature and humidity, and output the readings to a serial monitor. A 10k Ohm resistor is used as a pull-up for the data line of the DHT11 sensor.
Component List
DHT11 Humidity and Temperature Sensor
- Description: A sensor that measures ambient humidity and temperature.
- Pins: VDD, DATA, NULL, GND
Arduino UNO
- Description: A microcontroller board based on the ATmega328P.
- Pins: UNUSED, IOREF, Reset, 3.3V, 5V, GND, Vin, A0-A5, SCL, SDA, AREF, D0-D13
Resistor
- Description: A passive two-terminal electrical component that implements electrical resistance as a circuit element.
- Value: 10,000 Ohms (10k Ohm)
Comment
- Description: A placeholder for additional notes or comments within the circuit design.
Wiring Details
DHT11 Humidity and Temperature Sensor
- VDD: Connected to the 5V output of the Arduino UNO.
- DATA: Connected to digital pin D2 of the Arduino UNO through a 10k Ohm resistor.
- GND: Connected to the ground (GND) pin of the Arduino UNO.
Arduino UNO
- 5V: Provides power to the DHT11 sensor.
- D2: Receives data from the DHT11 sensor.
- GND: Common ground for the circuit.
Resistor (10k Ohm)
- One end: Connected to the DATA pin of the DHT11 sensor.
- Other end: Connected to digital pin D2 of the Arduino UNO.
Documented Code
The following code is written for the Arduino UNO to interface with the DHT11 sensor. It initializes the sensor, reads temperature and humidity data, and prints the values to the serial monitor.
/**
 * This example demonstrates how to collect temperature and humidity measurements
 * from the Adafruit DHT11 sensor. Measurements are printed out to the serial monitor.
 *
 * - Make sure to first install the following libraries through the Arduino Library Manager:
 *   - DHT Sensor Library (by Adafruit)
 *   - Adafruit Unified Sensor (by Adafruit)
 * - When you open the serial monitor to view measurements from the DHT11, make sure
 *   that you select 9600 baud so that the serial monitor can receive data from the Arduino.
 *
 * This example was originally written by Adafruit Industries LLC.
 */

#include <Adafruit_Sensor.h>
#include <DHT.h>
#include <DHT_U.h>

#define DHTPIN 2     // Digital pin connected to the DHT sensor

// Uncomment the type of sensor in use:
#define DHTTYPE    DHT11     // DHT 11

DHT_Unified dht(DHTPIN, DHTTYPE);

uint32_t delayMS;

void setup() {
  Serial.begin(9600);
  // Initialize device.
  dht.begin();
  Serial.println(F("DHTxx Unified Sensor Example"));
  // Print temperature sensor details.
  sensor_t sensor;
  dht.temperature().getSensor(&sensor);
  Serial.println(F("------------------------------------"));
  Serial.println(F("Temperature Sensor"));
  Serial.print  (F("Sensor Type: ")); Serial.println(sensor.name);
  Serial.print  (F("Driver Ver:  ")); Serial.println(sensor.version);
  Serial.print  (F("Unique ID:   ")); Serial.println(sensor.sensor_id);
  Serial.print  (F("Max Value:   ")); Serial.print(sensor.max_value); Serial.println(F("°C"));
  Serial.print  (F("Min Value:   ")); Serial.print(sensor.min_value); Serial.println(F("°C"));
  Serial.print  (F("Resolution:  ")); Serial.print(sensor.resolution); Serial.println(F("°C"));
  Serial.println(F("------------------------------------"));
  // Print humidity sensor details.
  dht.humidity().getSensor(&sensor);
  Serial.println(F("Humidity Sensor"));
  Serial.print  (F("Sensor Type: ")); Serial.println(sensor.name);
  Serial.print  (F("Driver Ver:  ")); Serial.println(sensor.version);
  Serial.print  (F("Unique ID:   ")); Serial.println(sensor.sensor_id);
  Serial.print  (F("Max Value:   ")); Serial.print(sensor.max_value); Serial.println(F("%"));
  Serial.print  (F("Min Value:   ")); Serial.print(sensor.min_value); Serial.println(F("%"));
  Serial.print  (F("Resolution:  ")); Serial.print(sensor.resolution); Serial.println(F("%"));
  Serial.println(F("------------------------------------"));
  // Set delay between sensor readings based on sensor details.
  delayMS = sensor.min_delay / 1000;
}

void loop() {
  // Delay between measurements.
  delay(delayMS);
  // Get temperature event and print its value.
  sensors_event_t event;
  dht.temperature().getEvent(&event);
  if (isnan(event.temperature)) {
    Serial.println(F("Error reading temperature!"));
  }
  else {
    Serial.print(F("Temperature: "));
    Serial.print(event.temperature);
    Serial.println(F("°C"));
  }
  // Get humidity event and print its value.
  dht.humidity().getEvent(&event);
  if (isnan(event.relative_humidity)) {
    Serial.println(F("Error reading humidity!"));
  }
  else {
    Serial.print(F("Humidity: "));
    Serial.print(event.relative_humidity);
    Serial.println(F("%"));
  }
}
This code is designed to be uploaded to the Arduino UNO microcontroller. It requires the Adafruit DHT Sensor Library and the Adafruit Unified Sensor Library, which can be installed through the Arduino Library Manager. The serial monitor baud rate should be set to 9600 to match the Serial.begin(9600); configuration in the code.