Cirkit Designer
Your all-in-one circuit design IDE
Home /
Component Documentation
How to Use Adafruit Crickit for Circuit Playground Express: Examples, Pinouts, and Specs
Introduction
The Adafruit Crickit for Circuit Playground Express is an innovative robotics platform designed to bring life to your projects. It acts as an add-on to the Circuit Playground Express, enabling control over motors, servos, solenoids, and other electronic components. This versatile board is perfect for hobbyists, educators, and students looking to explore the world of robotics and interactive projects.
Explore Projects Built with Adafruit Crickit for Circuit Playground Express
Adafruit Circuit Playground Bluefruit and Crickit-Based Smart RGB LED and Temperature Monitoring System
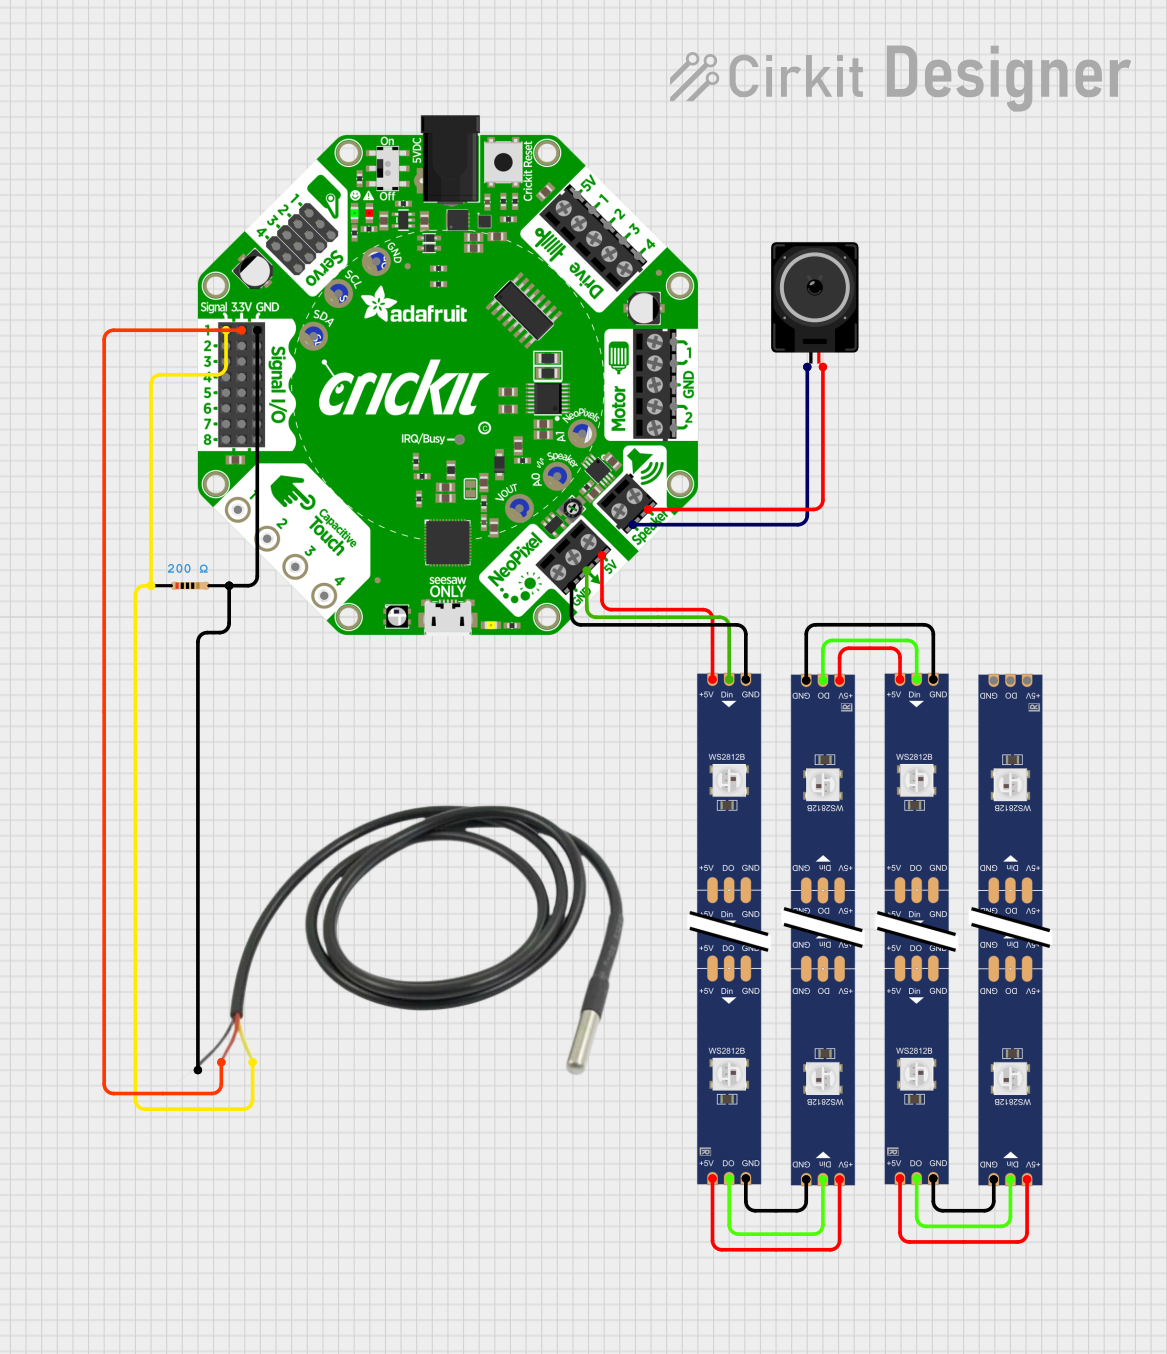
This circuit integrates an Adafruit Circuit Playground Bluefruit with an Adafruit Crickit for Circuit Playground Express to control a temperature sensor, a loudspeaker, and a series of WS2812 RGB LED strips. The Crickit board reads temperature data, drives the loudspeaker, and controls the LED strips to create visual effects based on the sensor input.
Adafruit Circuit Playground-Based Interactive Control System with Pushbutton and Slide Potentiometers
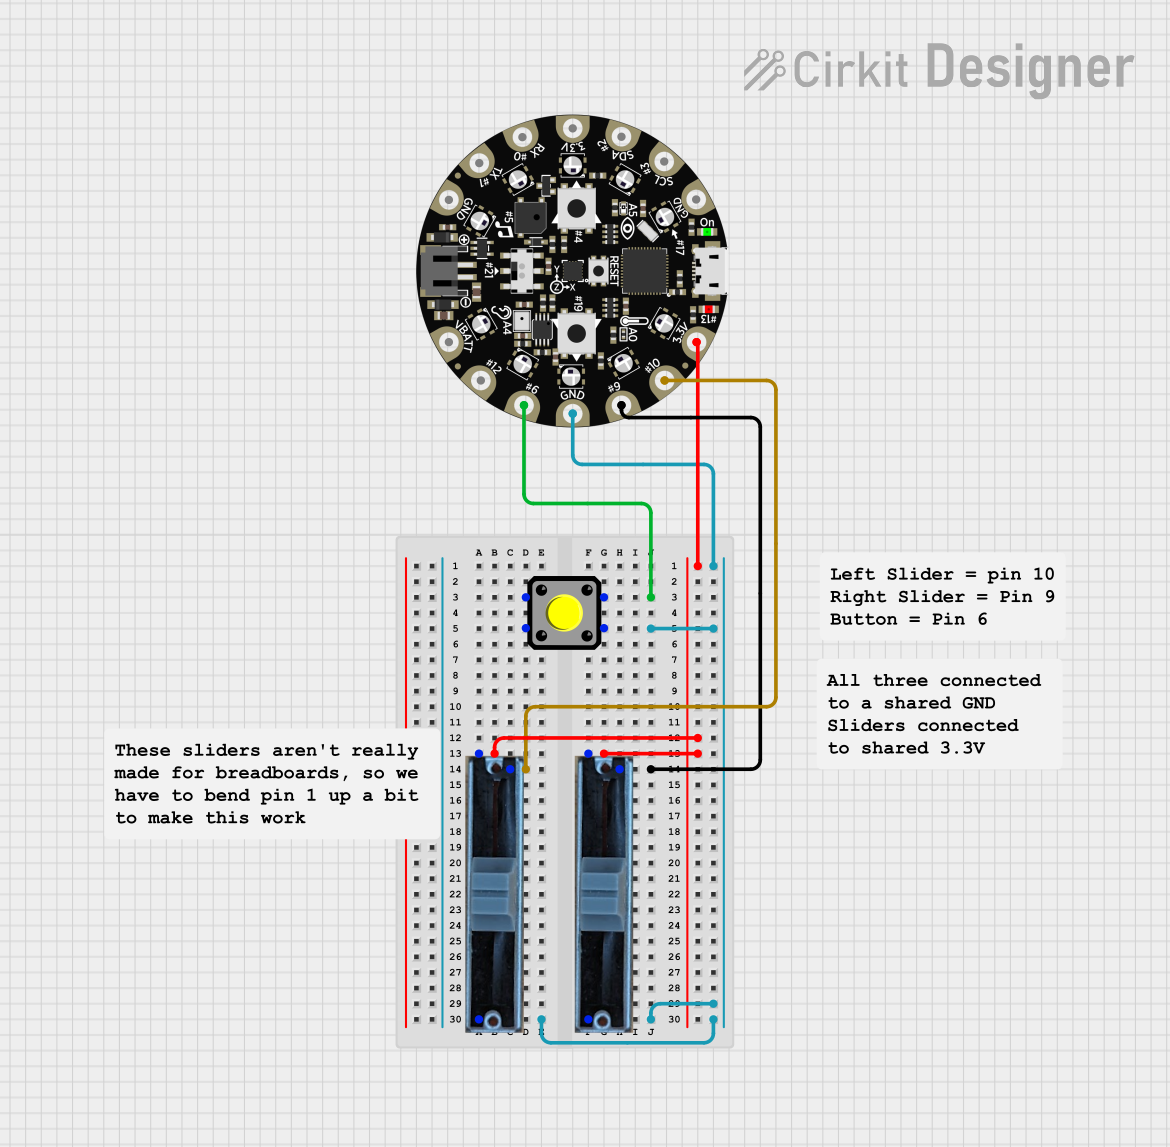
This circuit features an Adafruit Circuit Playground Dev Edition microcontroller interfaced with a pushbutton and two slide potentiometers. The pushbutton is connected to digital pin D6, while the potentiometers provide analog input to pins D9 and D10, allowing for variable control inputs.
Adafruit Crickit Controlled Robotics Platform with Micro:bit
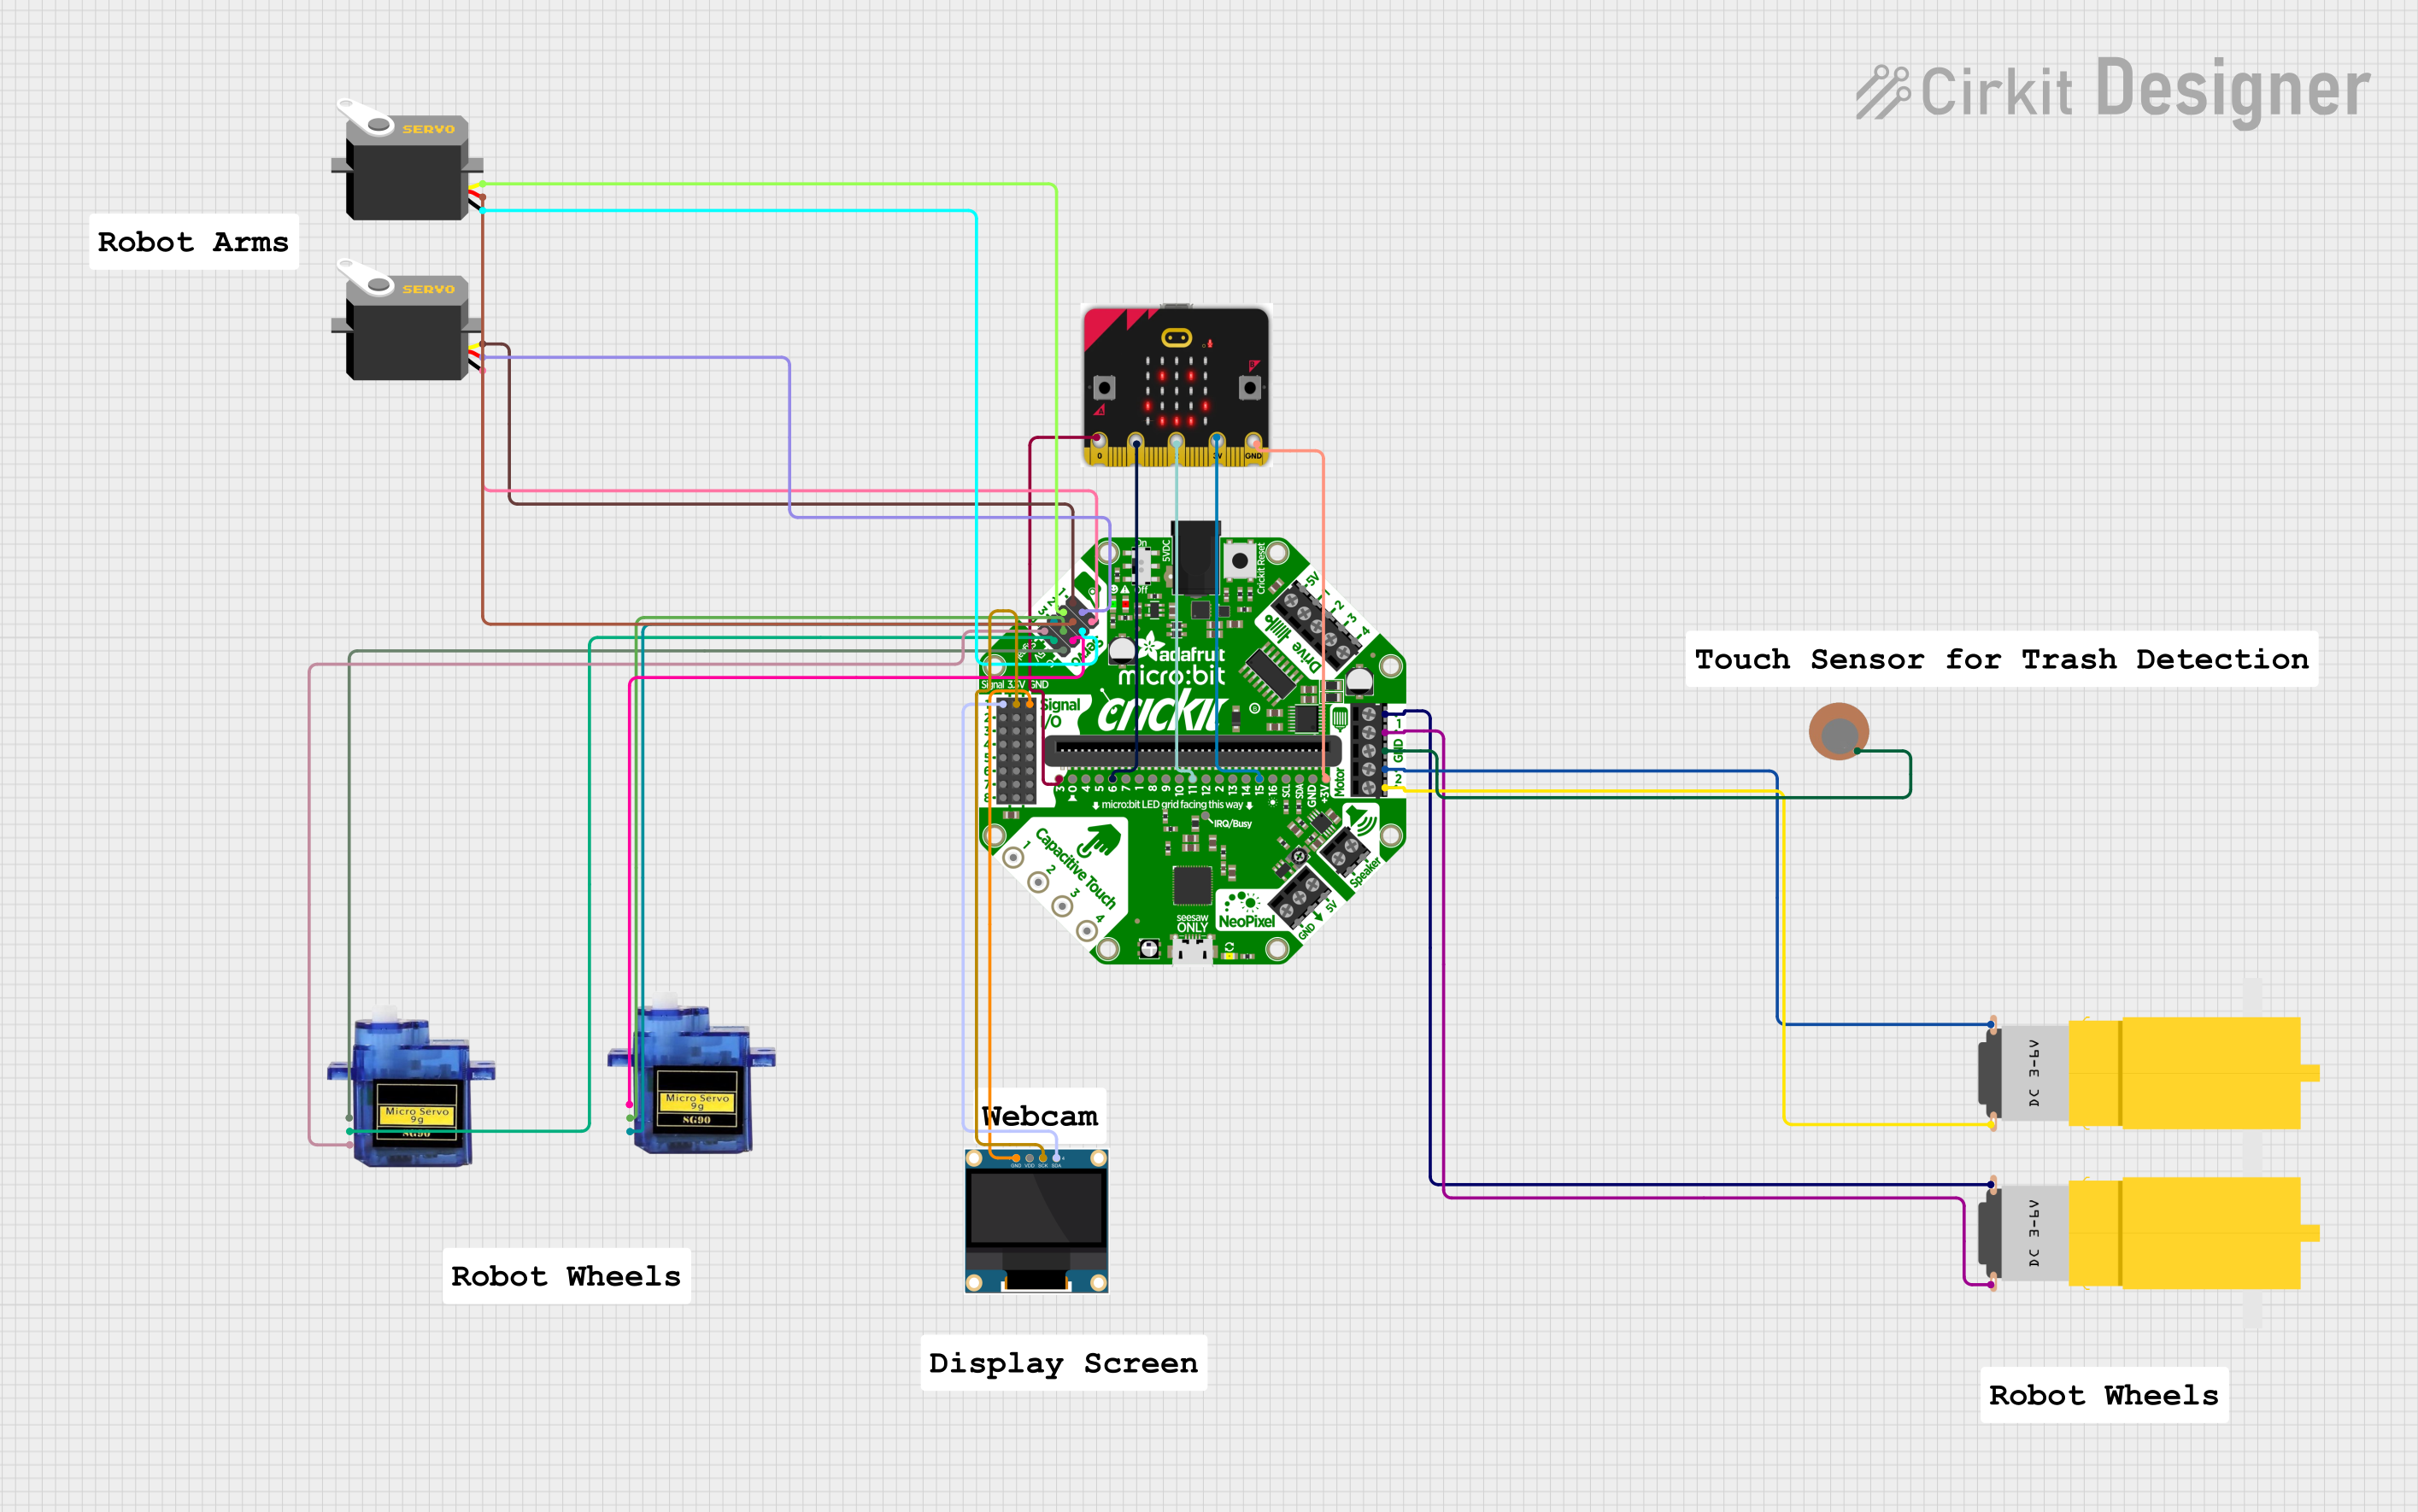
This circuit is designed to control multiple motors and servos using an Adafruit Crickit for microbit as the main controller, interfaced with a micro bit microcontroller. It includes two yellow hobby gear motors, two 9G micro servos, and two standard servos, all powered and controlled by the Crickit board. Additionally, there is a 0.96" OLED display for output and a piezo sensor, likely for input, connected to the Crickit, which is programmed via the micro bit.
Battery-Powered Smart Light with Proximity Sensor and OLED Display using Adafruit QT Py RP2040

This circuit is a portable, battery-powered system featuring an Adafruit QT Py RP2040 microcontroller that interfaces with an OLED display, a proximity sensor, an accelerometer, and an RGB LED strip. The system is powered by a lithium-ion battery with a step-up boost converter to provide 5V for the LED strip, and it includes a toggle switch for power control. The microcontroller communicates with the sensors and display via I2C.
Explore Projects Built with Adafruit Crickit for Circuit Playground Express
Adafruit Circuit Playground Bluefruit and Crickit-Based Smart RGB LED and Temperature Monitoring System
This circuit integrates an Adafruit Circuit Playground Bluefruit with an Adafruit Crickit for Circuit Playground Express to control a temperature sensor, a loudspeaker, and a series of WS2812 RGB LED strips. The Crickit board reads temperature data, drives the loudspeaker, and controls the LED strips to create visual effects based on the sensor input.
Adafruit Circuit Playground-Based Interactive Control System with Pushbutton and Slide Potentiometers
This circuit features an Adafruit Circuit Playground Dev Edition microcontroller interfaced with a pushbutton and two slide potentiometers. The pushbutton is connected to digital pin D6, while the potentiometers provide analog input to pins D9 and D10, allowing for variable control inputs.
Adafruit Crickit Controlled Robotics Platform with Micro:bit
This circuit is designed to control multiple motors and servos using an Adafruit Crickit for microbit as the main controller, interfaced with a micro bit microcontroller. It includes two yellow hobby gear motors, two 9G micro servos, and two standard servos, all powered and controlled by the Crickit board. Additionally, there is a 0.96" OLED display for output and a piezo sensor, likely for input, connected to the Crickit, which is programmed via the micro bit.
Battery-Powered Smart Light with Proximity Sensor and OLED Display using Adafruit QT Py RP2040
This circuit is a portable, battery-powered system featuring an Adafruit QT Py RP2040 microcontroller that interfaces with an OLED display, a proximity sensor, an accelerometer, and an RGB LED strip. The system is powered by a lithium-ion battery with a step-up boost converter to provide 5V for the LED strip, and it includes a toggle switch for power control. The microcontroller communicates with the sensors and display via I2C.
Common Applications and Use Cases
- Educational robotics
- Interactive art installations
- Prototyping DIY projects
- Home automation systems
- Hobbyist robotics
Technical Specifications
Key Technical Details
- Operating Voltage: 3.3V to 5V
- Logic Voltage: 3.3V
- Motor Drivers: 4 full H-Bridge motor drivers
- Servo Control: 8 channels for hobby servos
- I/O Pins: Multiple digital and analog pins
- Connectivity: I2C, digital, and analog signals
- Dimensions: 94.9mm x 69.6mm x 12.7mm
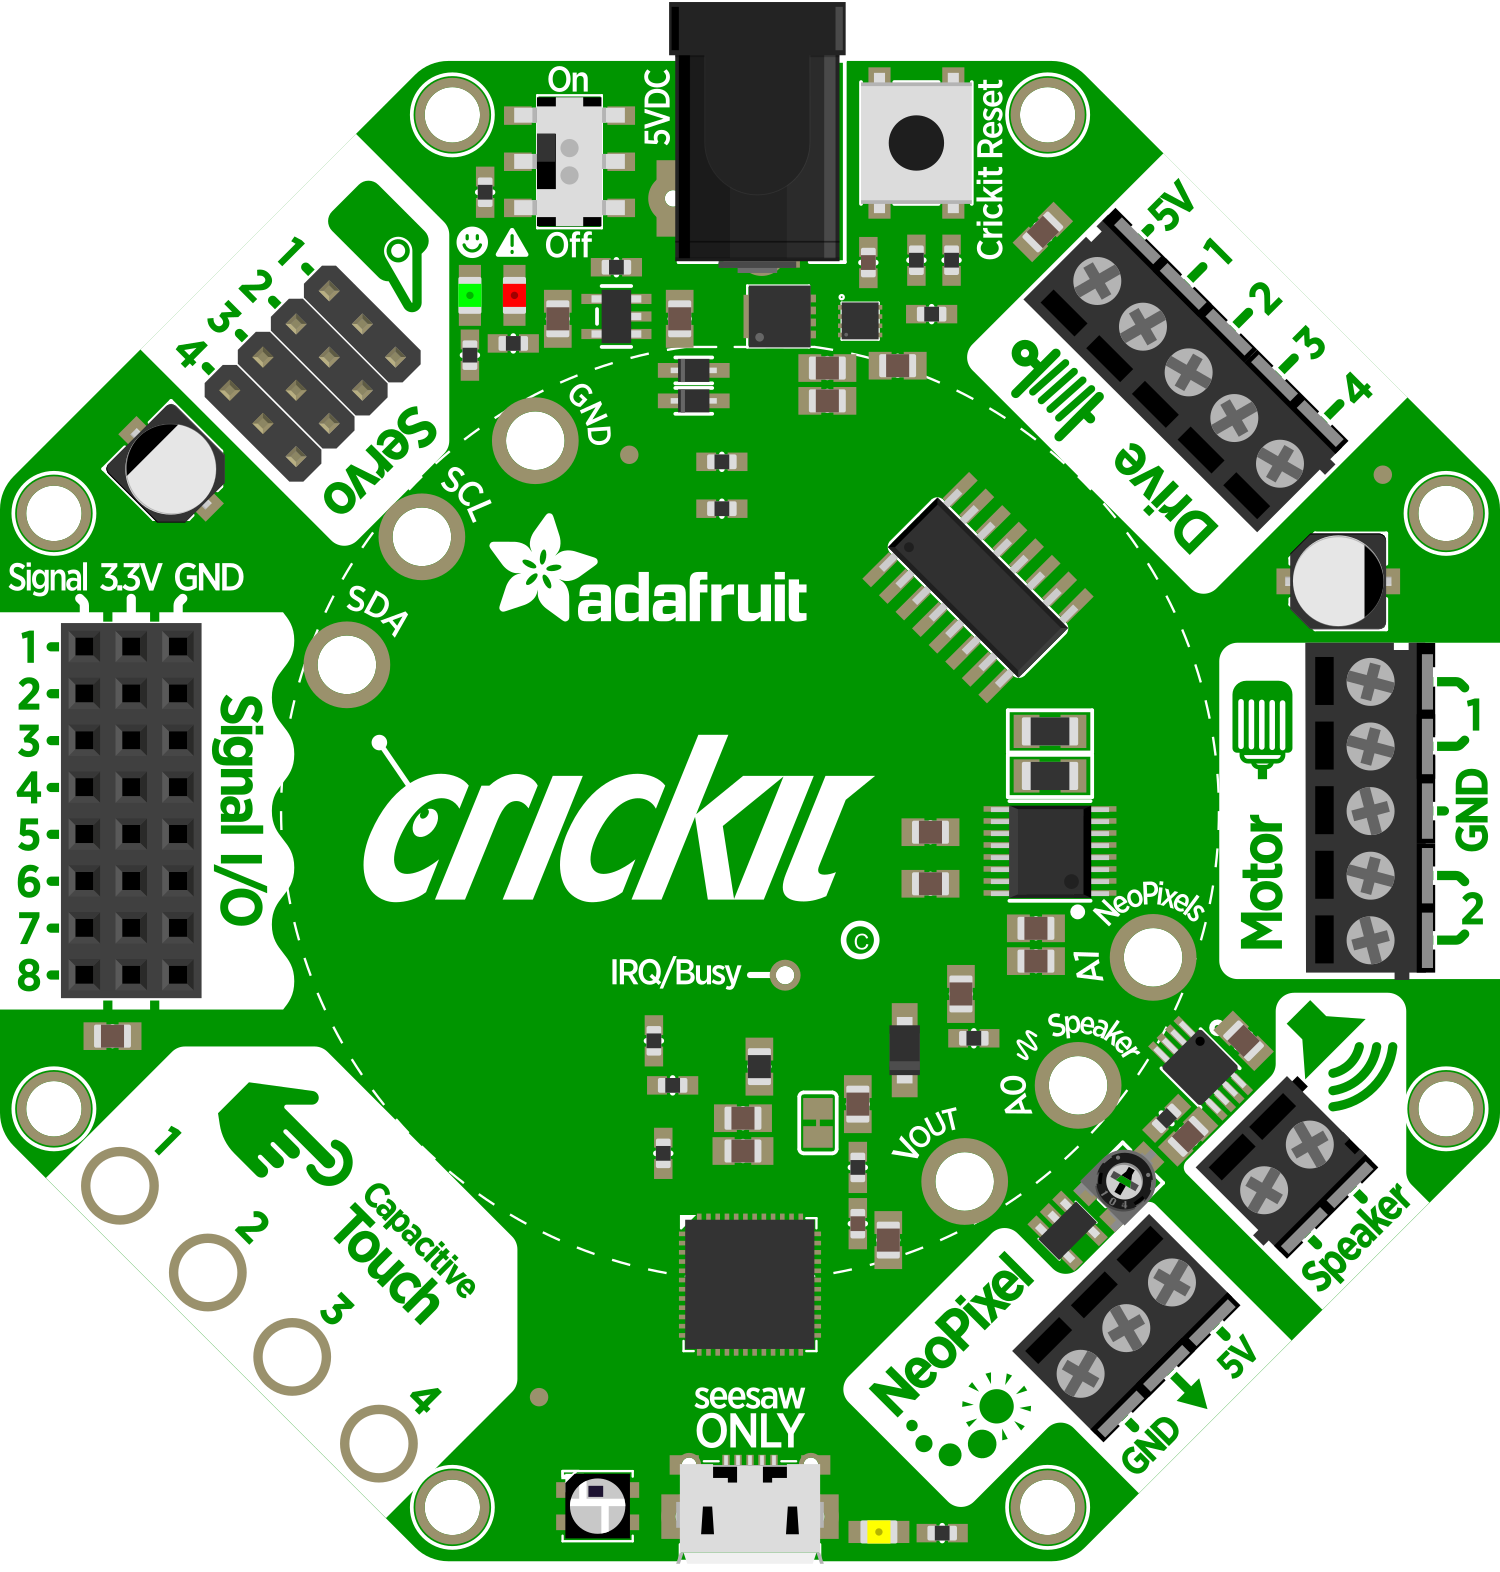
Pin Configuration and Descriptions
| Pin Number | Function | Description |
|---|---|---|
| 1 | GND | Ground |
| 2 | VOUT | Voltage output, connected to the power supply |
| 3-6 | Motor Outputs | Connect to DC motors or other inductive loads |
| 7-14 | Servo Outputs | Connect to up to 8 hobby servo motors |
| A1-A7 | Analog Inputs | Analog sensor inputs |
| D1-D7 | Digital I/O | Digital input/output pins |
| SDA, SCL | I2C Data & Clock | I2C communication for sensors and other devices |
Usage Instructions
How to Use the Component in a Circuit
- Powering the Crickit: Connect a suitable power supply to the Crickit's power jack. Ensure the voltage is within the recommended range.
- Connecting the Circuit Playground Express: Attach the Circuit Playground Express to the Crickit board using the built-in connector.
- Wiring Components: Connect motors, servos, and sensors to their respective pins on the Crickit board.
- Programming: Use the Adafruit MakeCode Editor, CircuitPython, or Arduino IDE to program the Circuit Playground Express.
Important Considerations and Best Practices
- Always disconnect the power supply before making or altering connections.
- Double-check wiring to prevent shorts or incorrect connections.
- Use external power when driving multiple or high-power motors to avoid overloading the Circuit Playground Express.
- Ensure that the power supply can handle the current requirements of all connected components.
Troubleshooting and FAQs
Common Issues
- Motors not running: Check power supply and wiring connections. Ensure that the code is correctly uploaded and running.
- Servos jittering: This can be due to an inadequate power supply. Make sure the power supply can handle the current draw of the servos.
- Unresponsive board: Ensure that the Circuit Playground Express is properly seated and that the firmware is up to date.
Solutions and Tips for Troubleshooting
- Verify that all connections are secure and correct.
- Use a multimeter to check for continuity and proper voltages at various points in the circuit.
- Review and test your code with simple examples to isolate the issue.
- Consult the Adafruit forums and support channels for assistance.
Example Code for Arduino UNO
#include <Adafruit_Crickit.h>

// Create the Crickit object
Adafruit_Crickit crickit;

void setup() {
  // Initialize the Crickit
  crickit.begin();

  // Set up a servo on channel 1
  crickit.servo1.setMinMax(500, 2500); // Set the min and max pulse length
  crickit.servo1.attach(1); // Attach servo on channel 1
}

void loop() {
  // Sweep the servo from 0 to 180 degrees
  for (int angle = 0; angle <= 180; angle++) {
    crickit.servo1.write(angle);
    delay(15);
  }
  // Sweep the servo back from 180 to 0 degrees
  for (int angle = 180; angle >= 0; angle--) {
    crickit.servo1.write(angle);
    delay(15);
  }
}
Note: The above code is an example of how to control a servo motor using the Adafruit Crickit with an Arduino UNO. Make sure to install the Adafruit Crickit library before uploading the code to your board.