Cirkit Designer Logo
Cirkit Designer
Your all-in-one circuit design IDE
Home / 
Component Documentation

How to Use Gesture Recognition Sensor PAJ7620: Examples, Pinouts, and Specs

Image of Gesture Recognition Sensor PAJ7620
Cirkit Designer LogoDesign with Gesture Recognition Sensor PAJ7620 in Cirkit Designer

Introduction

The Gesture Recognition Sensor PAJ7620U2 by PixArt Imaging is a compact and versatile sensor capable of detecting a wide range of hand gestures. This sensor uses infrared technology to recognize movements and is ideal for interactive projects, including gesture-controlled lights, games, robotics, and other innovative applications. Its ability to interpret human hand gestures adds a layer of interactivity and accessibility to electronic projects.

Explore Projects Built with Gesture Recognition Sensor PAJ7620

Use Cirkit Designer to design, explore, and prototype these projects online. Some projects support real-time simulation. Click "Open Project" to start designing instantly!
Arduino UNO Gesture-Controlled Snake Game with OLED Display
Image of Arduino: A project utilizing Gesture Recognition Sensor PAJ7620 in a practical application
This circuit is a gesture-controlled snake game using an Arduino UNO, a PAJ7620 gesture recognition sensor, and a 0.96" OLED display. The Arduino UNO processes gesture inputs from the PAJ7620 sensor to control the snake's movement, and the game is displayed on the OLED screen.
Cirkit Designer LogoOpen Project in Cirkit Designer
Gesture and Sound Controlled Relay Switching with Arduino Nano
Image of 4 load controll using hand gesture and sound controll..: A project utilizing Gesture Recognition Sensor PAJ7620 in a practical application
This circuit features an Arduino Nano microcontroller interfaced with an APDS-9960 RGB and Gesture Sensor for gesture detection and a KY-038 sound sensor for clap detection. It controls a 4-channel relay module to toggle power to connected loads, such as bulbs and fans, based on gesture and clap inputs. The code provided enables gesture recognition and clap detection to toggle the state of the relays, which in turn control the power to the loads.
Cirkit Designer LogoOpen Project in Cirkit Designer
Arduino Mega 2560 Biometric Security System with Wi-Fi Connectivity
Image of Health Monitoring Device (Collab): A project utilizing Gesture Recognition Sensor PAJ7620 in a practical application
This is a multi-functional sensor system controlled by an Arduino Mega 2560, designed to read biometric data from a pulse oximeter and an infrared thermometer, authenticate using a fingerprint scanner, display information on an OLED screen, and transmit data wirelessly via an ESP8266 module. User inputs can be received through two pushbuttons, and the system's power distribution is managed through common ground and voltage supply nets.
Cirkit Designer LogoOpen Project in Cirkit Designer
Arduino Nano-Controlled Lighting System with Gesture and Sound Interaction
Image of 4 load controll using hand gesture and sound controll: A project utilizing Gesture Recognition Sensor PAJ7620 in a practical application
This circuit features an Arduino Nano microcontroller interfaced with an APDS-9960 RGB and Gesture Sensor for color and gesture detection, and a KY-038 microphone module for sound detection. The Arduino controls a 4-channel relay module, which in turn switches four AC bulbs on and off. The 12V power supply is used to power the relay module, and the bulbs are connected to the normally open (N.O.) contacts of the relays, allowing the Arduino to control the lighting based on sensor inputs.
Cirkit Designer LogoOpen Project in Cirkit Designer

Explore Projects Built with Gesture Recognition Sensor PAJ7620

Use Cirkit Designer to design, explore, and prototype these projects online. Some projects support real-time simulation. Click "Open Project" to start designing instantly!
Image of Arduino: A project utilizing Gesture Recognition Sensor PAJ7620 in a practical application
Arduino UNO Gesture-Controlled Snake Game with OLED Display
This circuit is a gesture-controlled snake game using an Arduino UNO, a PAJ7620 gesture recognition sensor, and a 0.96" OLED display. The Arduino UNO processes gesture inputs from the PAJ7620 sensor to control the snake's movement, and the game is displayed on the OLED screen.
Cirkit Designer LogoOpen Project in Cirkit Designer
Image of 4 load controll using hand gesture and sound controll..: A project utilizing Gesture Recognition Sensor PAJ7620 in a practical application
Gesture and Sound Controlled Relay Switching with Arduino Nano
This circuit features an Arduino Nano microcontroller interfaced with an APDS-9960 RGB and Gesture Sensor for gesture detection and a KY-038 sound sensor for clap detection. It controls a 4-channel relay module to toggle power to connected loads, such as bulbs and fans, based on gesture and clap inputs. The code provided enables gesture recognition and clap detection to toggle the state of the relays, which in turn control the power to the loads.
Cirkit Designer LogoOpen Project in Cirkit Designer
Image of Health Monitoring Device (Collab): A project utilizing Gesture Recognition Sensor PAJ7620 in a practical application
Arduino Mega 2560 Biometric Security System with Wi-Fi Connectivity
This is a multi-functional sensor system controlled by an Arduino Mega 2560, designed to read biometric data from a pulse oximeter and an infrared thermometer, authenticate using a fingerprint scanner, display information on an OLED screen, and transmit data wirelessly via an ESP8266 module. User inputs can be received through two pushbuttons, and the system's power distribution is managed through common ground and voltage supply nets.
Cirkit Designer LogoOpen Project in Cirkit Designer
Image of 4 load controll using hand gesture and sound controll: A project utilizing Gesture Recognition Sensor PAJ7620 in a practical application
Arduino Nano-Controlled Lighting System with Gesture and Sound Interaction
This circuit features an Arduino Nano microcontroller interfaced with an APDS-9960 RGB and Gesture Sensor for color and gesture detection, and a KY-038 microphone module for sound detection. The Arduino controls a 4-channel relay module, which in turn switches four AC bulbs on and off. The 12V power supply is used to power the relay module, and the bulbs are connected to the normally open (N.O.) contacts of the relays, allowing the Arduino to control the lighting based on sensor inputs.
Cirkit Designer LogoOpen Project in Cirkit Designer

Technical Specifications

Key Technical Details

  • Operating Voltage: 2.8V to 3.3V
  • Interface: I2C (up to 400 kHz)
  • Operating Current: 23 mA (typical)
  • Ambient Light Immunity: < 100k Lux
  • Gesture Detection Distance: 5 to 15 cm
  • Ambient Temperature Range: -40°C to +85°C
  • Recognition Angle: 60° typical
  • Gesture Speed: 60°/s to 600°/s
  • Dimensions: 20.0 mm x 10.5 mm x 3.8 mm (LxWxH)

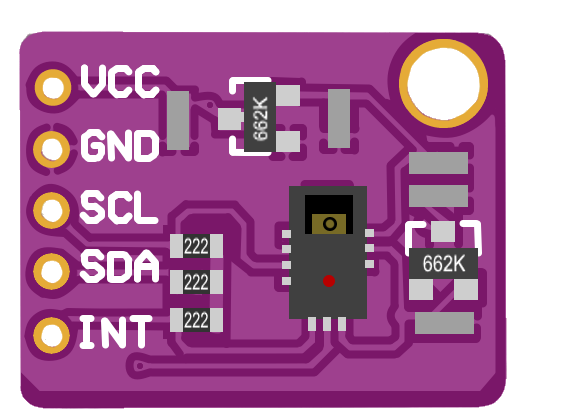
Pin Configuration and Descriptions

Pin Number Pin Name Description
1 VCC Power supply (2.8V to 3.3V)
2 GND Ground
3 SCL I2C Serial Clock Line
4 SDA I2C Serial Data Line
5 INT Interrupt (active low)

Usage Instructions

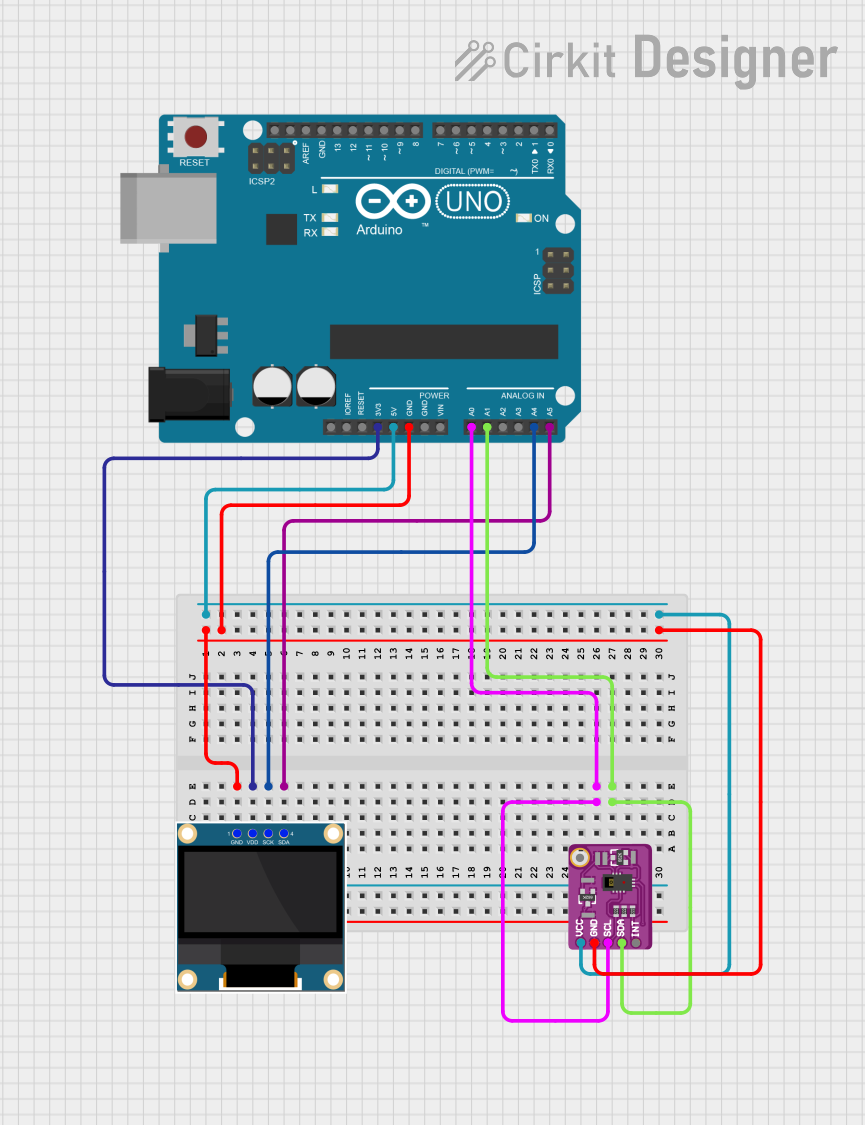
Integration with a Circuit

  1. Power Supply: Connect the VCC pin to a 3.3V source and the GND pin to the ground of your circuit.
  2. I2C Communication: Connect the SCL and SDA pins to the corresponding I2C clock and data lines on your microcontroller (e.g., Arduino UNO).
  3. Interrupts: The INT pin can be connected to a digital input pin on your microcontroller to handle gesture detection interrupts.

Best Practices

  • Ensure that the power supply is stable and within the specified voltage range to prevent damage.
  • Use pull-up resistors on the I2C lines if they are not already present on the microcontroller board.
  • Avoid exposing the sensor to direct sunlight or strong light sources to prevent interference.
  • Keep the sensor's surface clean and unobstructed during use.

Example Code for Arduino UNO

#include <Wire.h>
#include "PAJ7620U2.h"

// Define the interrupt pin (connect PAJ7620U2 INT pin to this pin on Arduino)
#define GESTURE_INTERRUPT_PIN 2

PAJ7620U2 gestureSensor;

void setup() {
  Serial.begin(9600);
  Wire.begin();
  
  // Initialize gesture sensor
  if (gestureSensor.begin() == false) {
    Serial.println("PAJ7620U2 init failed!");
    while (1);
  }
  Serial.println("PAJ7620U2 init successful.");
  
  // Attach interrupt to the INT pin
  pinMode(GESTURE_INTERRUPT_PIN, INPUT);
  attachInterrupt(digitalPinToInterrupt(GESTURE_INTERRUPT_PIN), gestureDetected, FALLING);
}

void loop() {
  // Main loop can perform other tasks while waiting for gesture interrupts
  delay(100);
}

void gestureDetected() {
  uint8_t gesture = gestureSensor.readGesture();
  switch (gesture) {
    case GESTURE_UP:
      Serial.println("Up gesture detected");
      break;
    case GESTURE_DOWN:
      Serial.println("Down gesture detected");
      break;
    // Add cases for other gestures...
    default:
      break;
  }
}

Troubleshooting and FAQs

Common Issues

  • No response from the sensor: Check the wiring, especially the I2C connections and power supply. Ensure that the correct I2C address is used in the code.
  • Inaccurate gesture recognition: Ensure that the sensor is not being affected by direct sunlight or other strong light sources. Adjust the sensor's orientation and ensure it is clean and unobstructed.
  • Intermittent functionality: Verify that the interrupt pin is correctly configured and that there are no loose connections.

FAQs

Q: Can the PAJ7620U2 sensor work with 5V systems? A: The sensor is rated for 3.3V operation. Use a level shifter or voltage regulator when interfacing with 5V systems.

Q: How many gestures can the PAJ7620U2 recognize? A: The PAJ7620U2 can recognize 9 basic gestures, including up, down, left, right, forward, backward, clockwise, counterclockwise, and wave.

Q: Is it possible to adjust the sensitivity or range of the sensor? A: The sensor's parameters can be adjusted through its registers. Refer to the PAJ7620U2 datasheet for detailed register information.

Q: What should I do if the sensor is not detecting gestures consistently? A: Ensure that the sensor is placed within the recommended detection distance (5 to 15 cm) from the hand gesture. Also, check for any sources of interference and adjust the sensor's position accordingly.

For further assistance, consult the PAJ7620U2 datasheet or contact PixArt Imaging support.