How to Use ReSpeaker 2-Mics Pi HAT V2.0: Examples, Pinouts, and Specs
Introduction
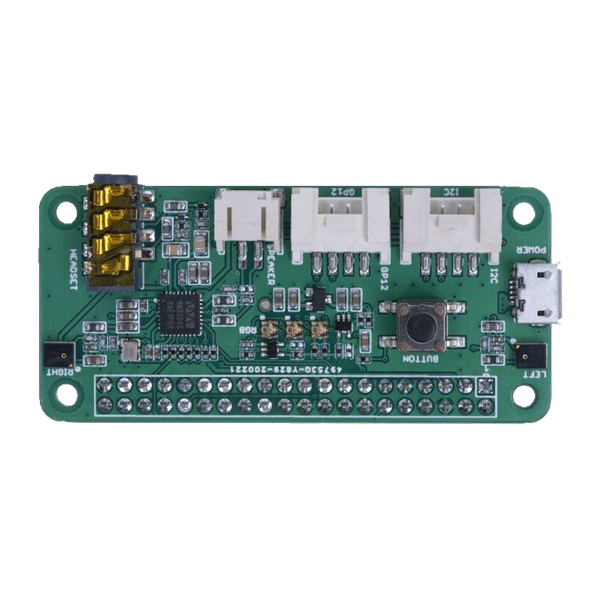
The ReSpeaker 2-Mics Pi HAT V2.0 by Seeed is a hardware add-on designed for the Raspberry Pi. It features two high-quality microphones, enabling voice recognition, audio processing, and sound interaction capabilities. This HAT (Hardware Attached on Top) is ideal for projects that require sound input, such as voice-controlled assistants, audio recording, and speech-to-text applications.
Explore Projects Built with ReSpeaker 2-Mics Pi HAT V2.0


Explore Projects Built with ReSpeaker 2-Mics Pi HAT V2.0
Common Applications and Use Cases
- Voice-controlled smart assistants (e.g., DIY Alexa or Google Assistant)
- Speech-to-text transcription systems
- Audio recording and processing
- Sound localization and noise reduction
- Interactive IoT devices with voice input
Technical Specifications
The following table outlines the key technical details of the ReSpeaker 2-Mics Pi HAT V2.0:
| Specification | Details |
|---|---|
| Microphone Type | Two MEMS microphones |
| Audio Codec | AC108 (4-channel ADC with I2S interface) |
| Power Supply | 5V (via Raspberry Pi GPIO header) |
| GPIO Compatibility | 40-pin Raspberry Pi GPIO header |
| Dimensions | 65mm x 30mm |
| Supported Raspberry Pi Models | Raspberry Pi 4, 3B+, 3B, 2B, Zero, Zero W |
| Operating Temperature | -20°C to 70°C |
| Communication Interface | I2S (Inter-IC Sound) |
Pin Configuration and Descriptions
The ReSpeaker 2-Mics Pi HAT V2.0 connects directly to the Raspberry Pi's 40-pin GPIO header. Below is the pin configuration:
| Pin | Name | Description |
|---|---|---|
| 1 | 5V | Power supply for the HAT |
| 2 | 3.3V | Power supply for logic circuits |
| 3 | I2C SDA | I2C data line for communication |
| 5 | I2C SCL | I2C clock line for communication |
| 12 | I2S BCLK | Bit clock for I2S audio data |
| 35 | I2S LRCLK | Left-right clock for I2S audio data |
| 40 | I2S DIN | Data input for I2S audio |
| Other | GPIO Pins | General-purpose pins available for custom use |
Usage Instructions
How to Use the Component in a Circuit
- Attach the HAT to the Raspberry Pi: Align the 40-pin GPIO header of the HAT with the Raspberry Pi's GPIO pins and press gently to secure the connection.
- Install Required Software:
- Boot up your Raspberry Pi and ensure it is connected to the internet.
- Open a terminal and run the following commands to install the necessary drivers and libraries:
sudo apt-get update sudo apt-get install git git clone https://github.com/respeaker/seeed-voicecard.git cd seeed-voicecard sudo ./install.sh - Reboot the Raspberry Pi after installation:
sudo reboot
- Test the Microphones:
- After rebooting, verify that the microphones are working by recording audio:
arecord -D hw:1,0 -f cd -c2 test.wav - Play back the recorded audio:
aplay test.wav
- After rebooting, verify that the microphones are working by recording audio:
Important Considerations and Best Practices
- Ensure the HAT is securely connected to the Raspberry Pi to avoid communication issues.
- Use a high-quality power supply for the Raspberry Pi to prevent voltage drops that may affect the HAT's performance.
- Avoid placing the HAT in environments with excessive noise or vibration for optimal microphone performance.
- If using the HAT for voice recognition, consider implementing noise reduction algorithms for better accuracy.
Example Code for Raspberry Pi
Below is an example Python script to capture audio using the ReSpeaker 2-Mics Pi HAT V2.0 and process it with the pyaudio library:
import pyaudio
import wave
Configuration for audio recording
FORMAT = pyaudio.paInt16 # 16-bit audio format CHANNELS = 2 # Stereo recording (2 microphones) RATE = 16000 # Sampling rate in Hz CHUNK = 1024 # Buffer size RECORD_SECONDS = 5 # Duration of recording in seconds OUTPUT_FILE = "output.wav" # Output file name
Initialize PyAudio
audio = pyaudio.PyAudio()
Open audio stream
stream = audio.open(format=FORMAT, channels=CHANNELS, rate=RATE, input=True, frames_per_buffer=CHUNK)
print("Recording...")
frames = []
Record audio in chunks
for i in range(0, int(RATE / CHUNK * RECORD_SECONDS)): data = stream.read(CHUNK) frames.append(data)
print("Recording complete.")
Stop and close the stream
stream.stop_stream() stream.close() audio.terminate()
Save the recorded audio to a file
with wave.open(OUTPUT_FILE, 'wb') as wf: wf.setnchannels(CHANNELS) wf.setsampwidth(audio.get_sample_size(FORMAT)) wf.setframerate(RATE) wf.writeframes(b''.join(frames))
print(f"Audio saved to {OUTPUT_FILE}")
Troubleshooting and FAQs
Common Issues and Solutions
Microphones Not Detected:
- Ensure the HAT is properly connected to the Raspberry Pi's GPIO header.
- Verify that the drivers are installed correctly by running:
If the microphones are not listed, reinstall the drivers.arecord -l
Poor Audio Quality:
- Check for background noise or interference in the environment.
- Use a higher-quality power supply to reduce electrical noise.
I2S Communication Errors:
- Ensure the Raspberry Pi's I2S interface is enabled in the configuration file:
sudo raspi-config
- Ensure the Raspberry Pi's I2S interface is enabled in the configuration file:
Audio Playback Issues:
- Verify that the correct audio output device is selected. Use the following command to list available devices:
aplay -l
- Verify that the correct audio output device is selected. Use the following command to list available devices:
FAQs
Q: Can I use this HAT with Raspberry Pi Zero?
A: Yes, the ReSpeaker 2-Mics Pi HAT V2.0 is compatible with the Raspberry Pi Zero and Zero W.
Q: Does this HAT support noise cancellation?
A: The HAT itself does not perform noise cancellation, but you can implement software-based noise reduction using libraries like pyaudio or speech_recognition.
Q: Can I use this HAT for real-time voice recognition?
A: Yes, the HAT is suitable for real-time voice recognition when paired with appropriate software, such as Google Speech-to-Text or Amazon Alexa SDK.
Q: How do I update the firmware?
A: The HAT does not require firmware updates, as it relies on the Raspberry Pi's software for functionality. Ensure your drivers and libraries are up to date.