How to Use MPPT SCC 60A 12v-48v: Examples, Pinouts, and Specs
Introduction
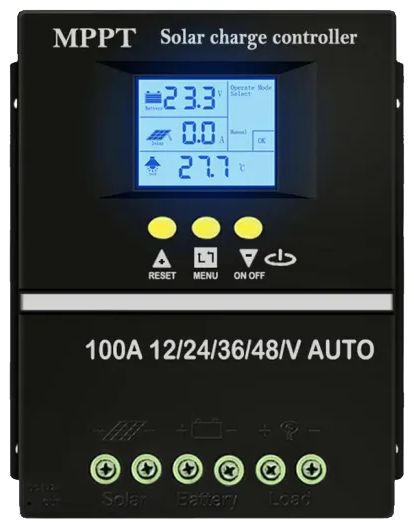
The MPPT SCC 60A 12v-48v by PowMr is a high-performance Maximum Power Point Tracking (MPPT) solar charge controller. It is designed to maximize the efficiency of solar energy systems by dynamically adjusting the operating point of solar panels to deliver the maximum possible power to the connected batteries. This controller supports a wide range of system voltages (12V, 24V, 36V, and 48V) and can handle up to 60A of charging current, making it suitable for medium to large solar installations.
Explore Projects Built with MPPT SCC 60A 12v-48v


Explore Projects Built with MPPT SCC 60A 12v-48v
Common Applications and Use Cases
- Solar-powered homes and off-grid systems
- RVs, boats, and mobile solar setups
- Industrial solar energy systems
- Battery charging for renewable energy storage
- Hybrid solar systems with backup power
Technical Specifications
Below are the key technical details of the MPPT SCC 60A 12v-48v:
| Parameter | Value |
|---|---|
| Manufacturer | PowMr |
| Model | MPPT |
| Maximum Charging Current | 60A |
| System Voltage | 12V / 24V / 36V / 48V (Auto) |
| Maximum PV Input Voltage | 150V DC |
| Battery Type Compatibility | Lead-acid, AGM, Gel, Lithium-ion |
| Efficiency | ≥ 99% (MPPT tracking efficiency) |
| Operating Temperature Range | -20°C to +60°C |
| Communication Interface | RS485, optional Bluetooth module |
| Display | LCD screen |
| Protection Features | Overcharge, over-discharge, |
| short circuit, reverse polarity |
Pin Configuration and Descriptions
The MPPT SCC 60A has several input/output terminals and communication ports. Below is a description of the key connections:
| Pin/Port | Description |
|---|---|
| PV+ / PV- | Solar panel input terminals (positive and negative) |
| BAT+ / BAT- | Battery connection terminals (positive and negative) |
| LOAD+ / LOAD- | Output terminals for DC load connection |
| RS485 Port | Communication port for monitoring and configuration |
| Temperature Sensor | Port for connecting an external temperature sensor for battery temperature |
| Grounding Terminal | Terminal for grounding the charge controller |
Usage Instructions
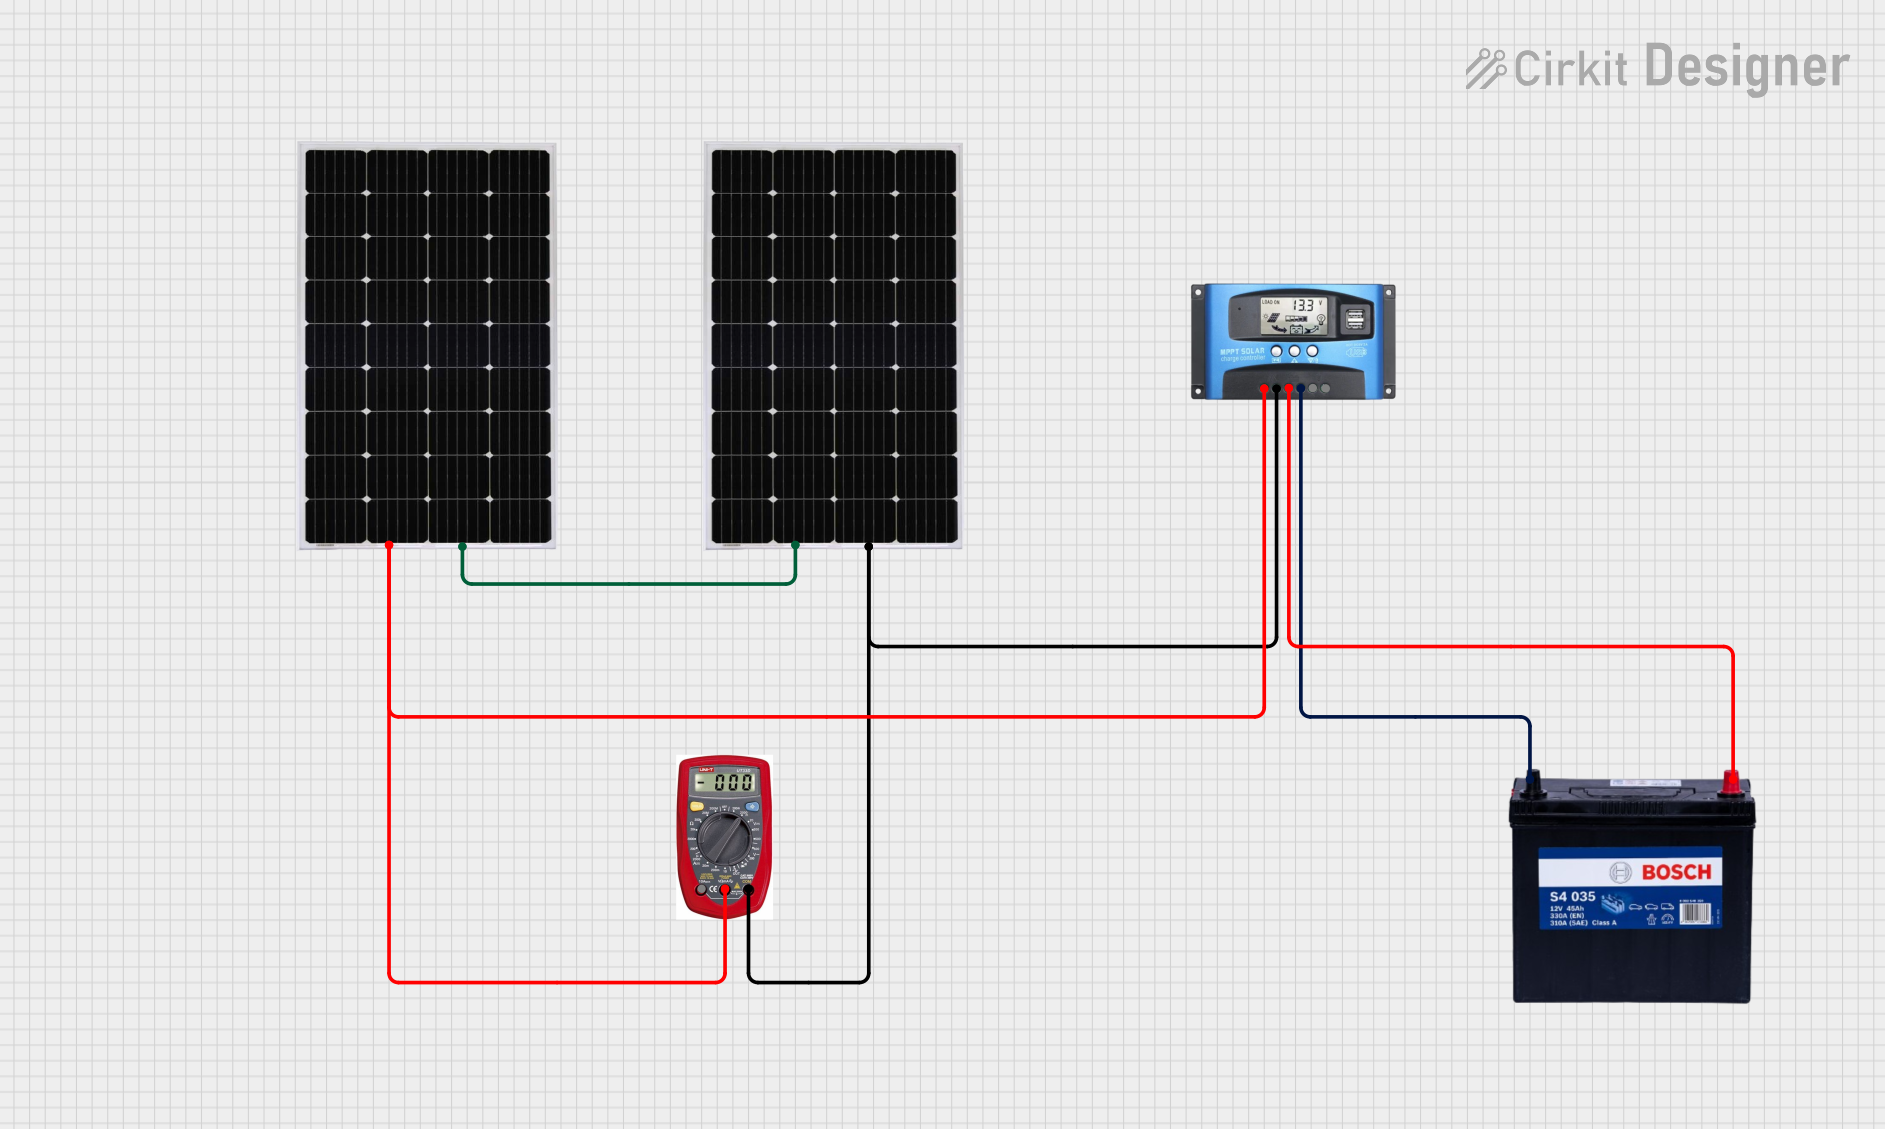
How to Use the MPPT SCC 60A in a Circuit
- Connect the Battery First: Always connect the battery to the charge controller before connecting the solar panels. This ensures the controller detects the correct system voltage.
- Connect the battery's positive terminal to the BAT+ terminal and the negative terminal to the BAT- terminal.
- Connect the Solar Panels: After the battery is connected, connect the solar panel's positive and negative terminals to the PV+ and PV- terminals, respectively.
- Optional Load Connection: If you wish to power a DC load directly, connect the load's positive and negative terminals to the LOAD+ and LOAD- terminals.
- Temperature Sensor: For optimal battery charging, connect the external temperature sensor to the designated port.
- Power On: Once all connections are secure, the controller will power on and display system information on the LCD screen.
Important Considerations and Best Practices
- System Voltage Detection: The controller automatically detects the system voltage (12V, 24V, 36V, or 48V) based on the connected battery. Ensure the battery voltage matches the system requirements.
- PV Input Voltage: Ensure the open-circuit voltage (Voc) of the solar panels does not exceed 150V DC.
- Battery Type Settings: Configure the battery type (e.g., Lead-acid, Lithium-ion) using the controller's menu or via the RS485 interface.
- Ventilation: Install the controller in a well-ventilated area to prevent overheating.
- Grounding: Properly ground the controller to ensure safety and reduce electrical noise.
Arduino UNO Integration Example
The MPPT SCC 60A can be monitored using an Arduino UNO via the RS485 communication interface. Below is an example code snippet for reading data from the controller:
#include <SoftwareSerial.h>

// Define RS485 communication pins
#define RX_PIN 10  // Arduino RX pin connected to RS485 module TX
#define TX_PIN 11  // Arduino TX pin connected to RS485 module RX

SoftwareSerial rs485(RX_PIN, TX_PIN);

void setup() {
  Serial.begin(9600); // Initialize Serial Monitor
  rs485.begin(9600);  // Initialize RS485 communication

  Serial.println("MPPT SCC 60A Monitoring Started");
}

void loop() {
  // Send a request to the MPPT controller (example Modbus request)
  byte request[] = {0x01, 0x03, 0x00, 0x00, 0x00, 0x02, 0xC4, 0x0B};
  rs485.write(request, sizeof(request));

  delay(100); // Wait for response

  // Read response from the controller
  while (rs485.available()) {
    byte response = rs485.read();
    Serial.print(response, HEX);
    Serial.print(" ");
  }
  Serial.println();

  delay(1000); // Wait before sending the next request
}
Note: The above code assumes the use of an RS485-to-TTL module for communication between the Arduino and the MPPT controller. Modify the Modbus request as needed based on the controller's communication protocol.
Troubleshooting and FAQs
Common Issues and Solutions
Controller Does Not Power On
- Cause: Battery is not connected or improperly connected.
- Solution: Ensure the battery is securely connected to the BAT+ and BAT- terminals.
No Charging from Solar Panels
- Cause: Solar panel voltage is too low or connections are loose.
- Solution: Verify the solar panel's open-circuit voltage (Voc) and ensure proper connections to the PV+ and PV- terminals.
Overheating
- Cause: Poor ventilation or excessive ambient temperature.
- Solution: Install the controller in a well-ventilated area and ensure it is not exposed to direct sunlight.
Incorrect Battery Voltage Detection
- Cause: Battery was not connected before the solar panels.
- Solution: Disconnect all inputs, reconnect the battery first, and then reconnect the solar panels.
FAQs
Q: Can I use this controller with lithium-ion batteries?
- A: Yes, the MPPT SCC 60A supports lithium-ion batteries. Ensure you configure the correct battery type in the settings.
Q: What happens if the PV input voltage exceeds 150V?
- A: The controller may shut down or become damaged. Always ensure the solar panel's open-circuit voltage (Voc) is within the specified range.
Q: Can I monitor the controller remotely?
- A: Yes, the controller supports RS485 communication and can be paired with an optional Bluetooth module for remote monitoring.
Q: Is it safe to connect the load directly to the battery instead of the LOAD terminals?
- A: While possible, it is recommended to use the LOAD terminals for better protection and monitoring.
This concludes the documentation for the MPPT SCC 60A 12v-48v by PowMr.