How to Use Pixhawk Px4 Front: Examples, Pinouts, and Specs
Introduction
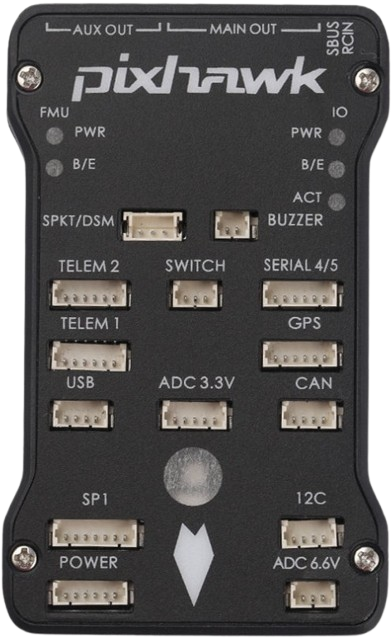
The Pixhawk Px4 Front, manufactured by 3D Robotics (Part ID: PX4), is a state-of-the-art flight control hardware designed for drones and other unmanned vehicles. It provides advanced processing capabilities, high-precision sensors, and robust connectivity options, making it ideal for autonomous navigation and control. This component is widely used in applications such as aerial photography, surveying, delivery drones, and research in robotics.
Explore Projects Built with Pixhawk Px4 Front

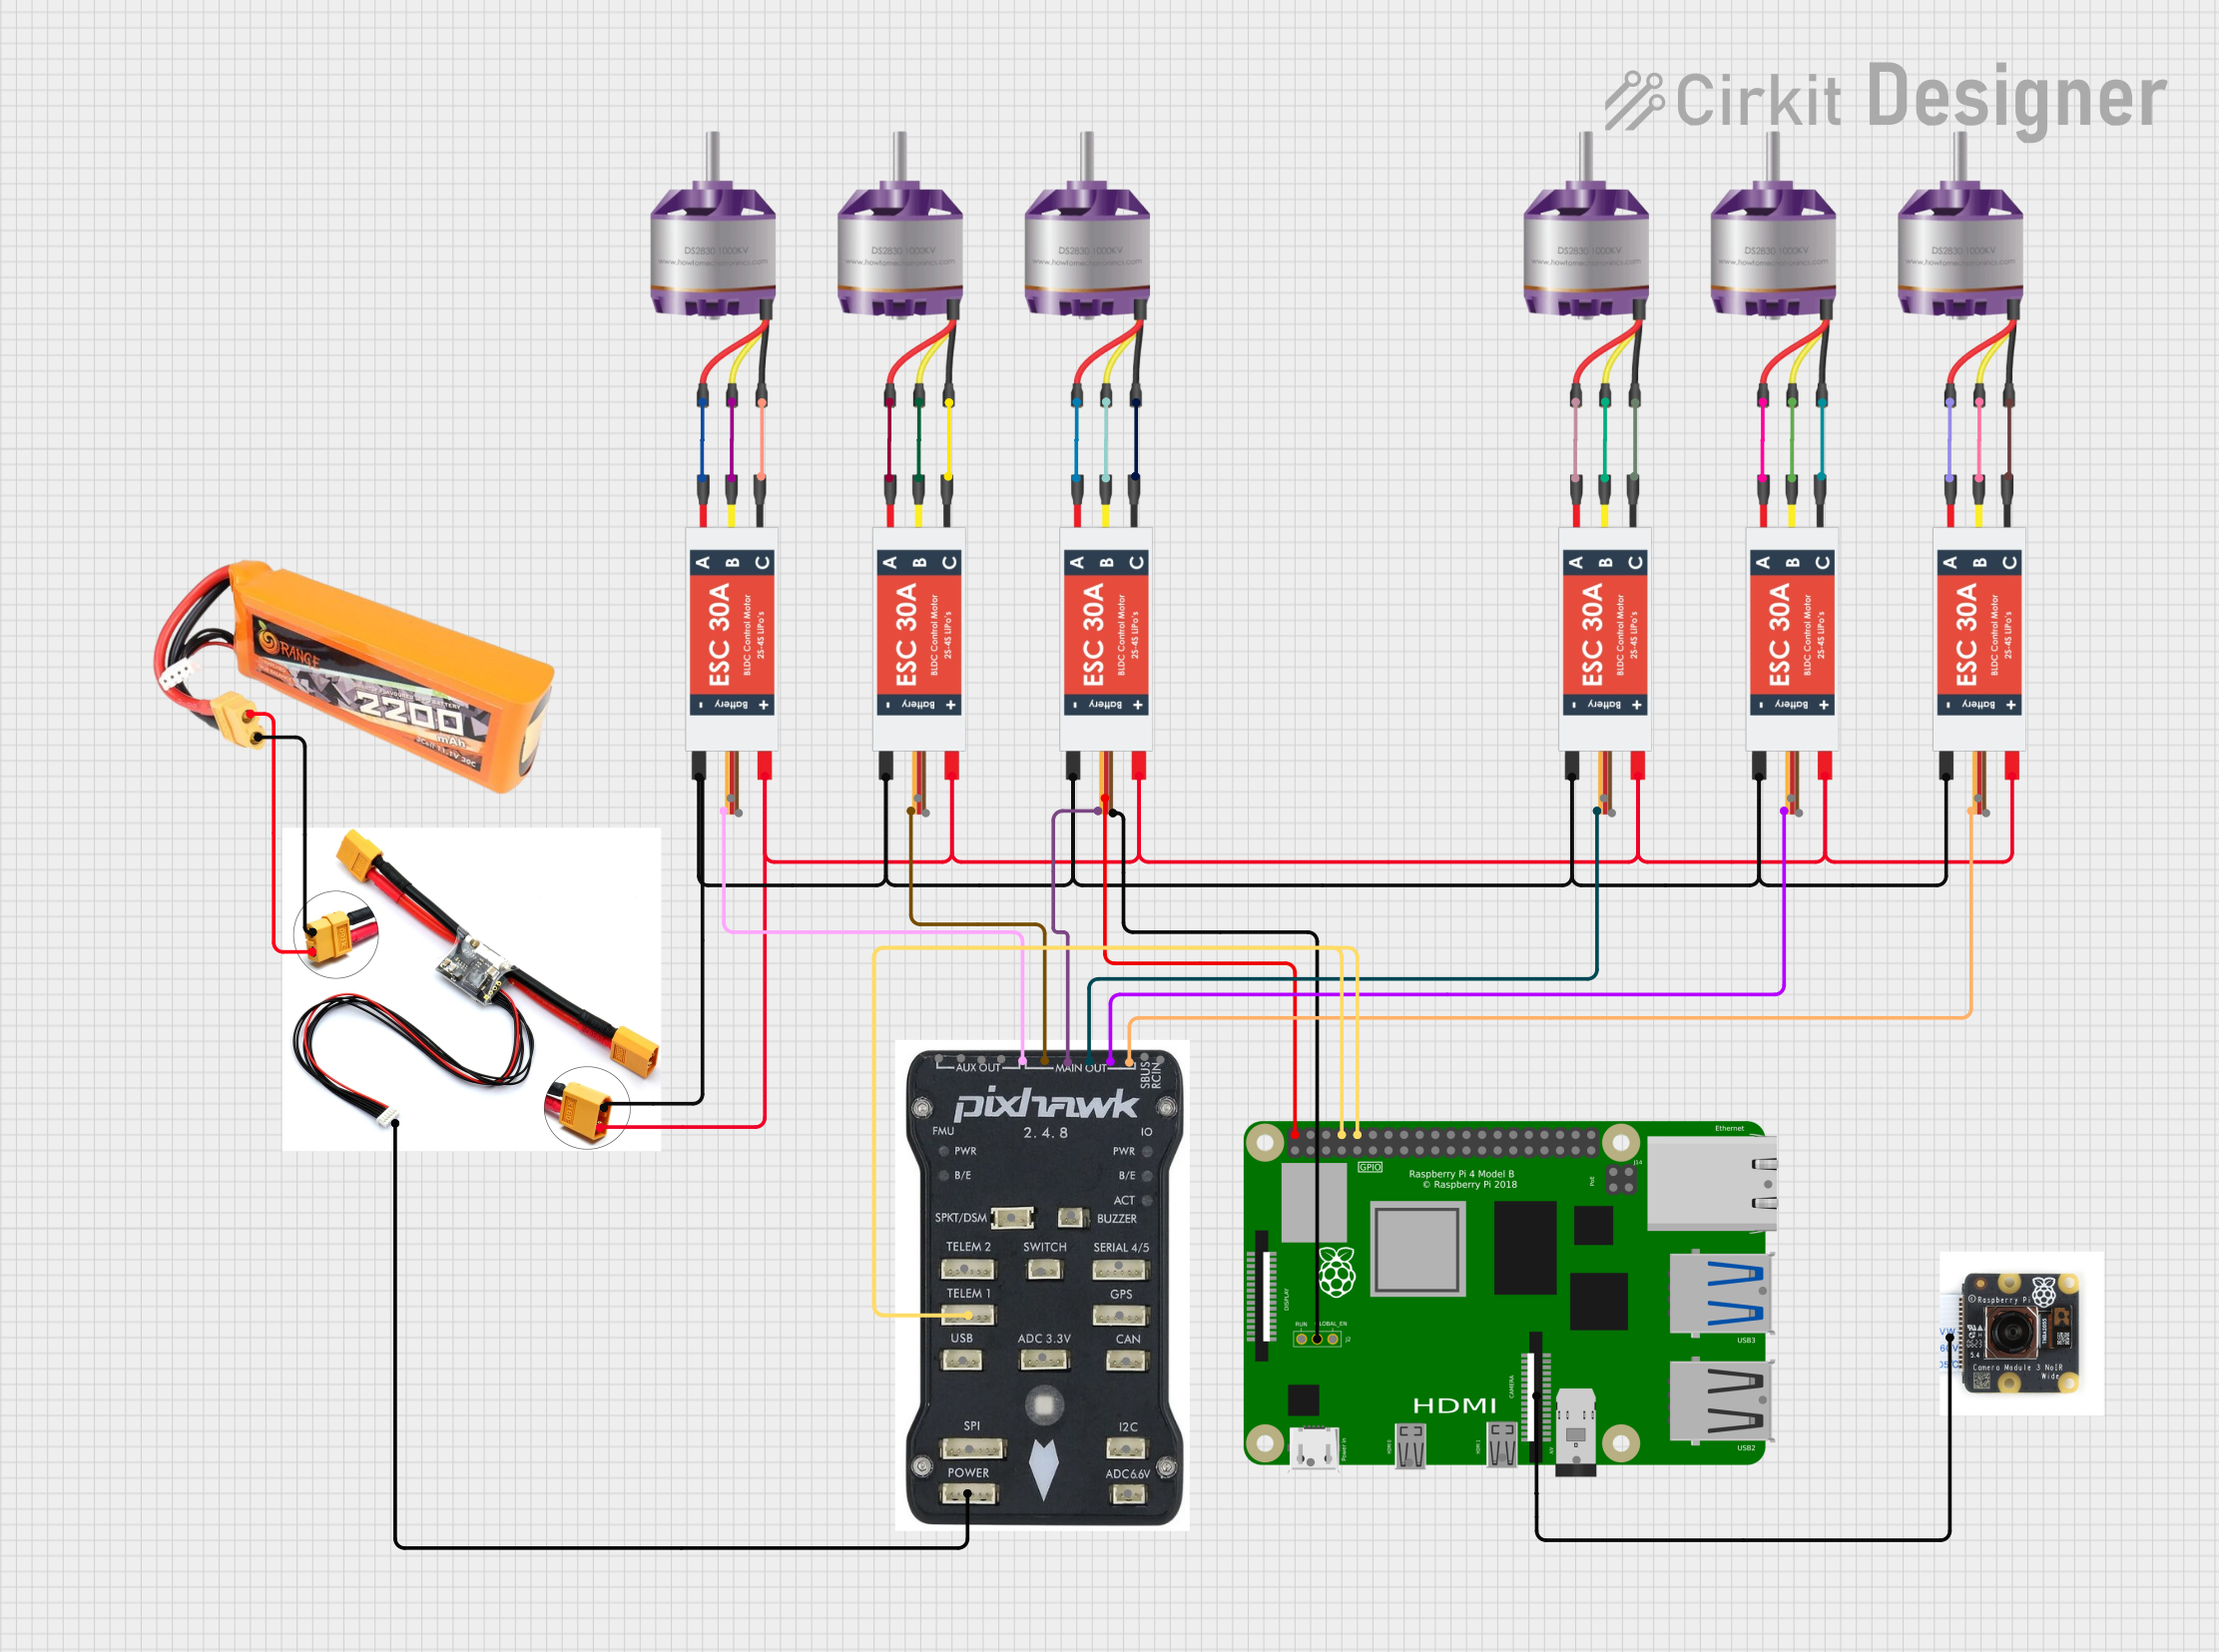
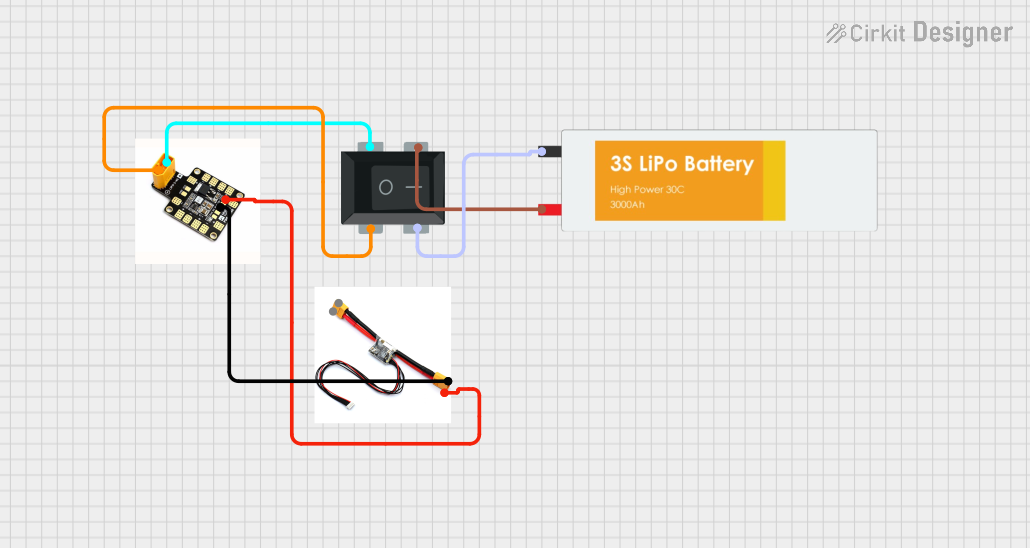
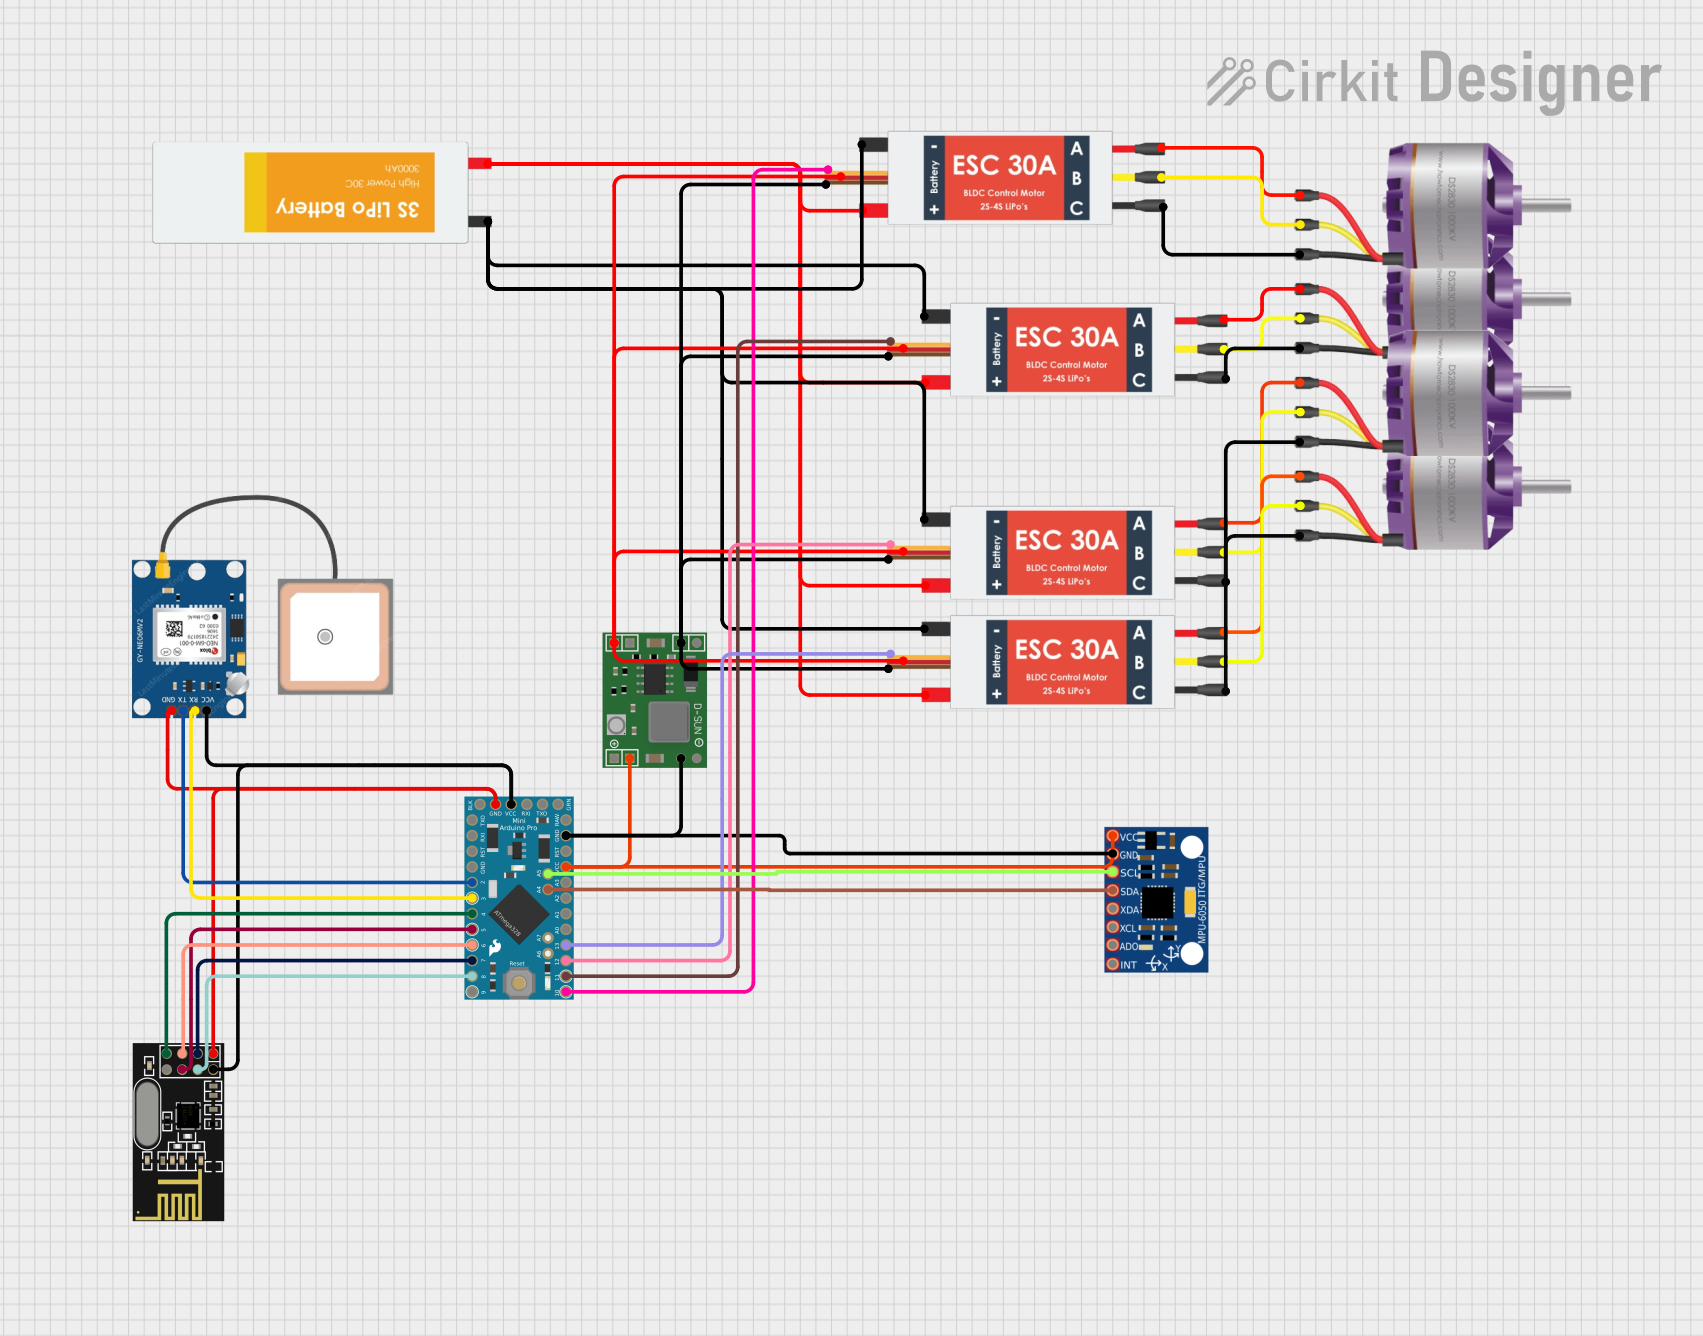
Explore Projects Built with Pixhawk Px4 Front
Common Applications:
- Autonomous drones for aerial photography and videography
- Unmanned ground vehicles (UGVs) for research and development
- Delivery drones for logistics and transportation
- Robotics projects requiring precise navigation and control
- Academic and industrial research in autonomous systems
Technical Specifications
Key Technical Details:
- Processor: 32-bit ARM Cortex-M4 core with FPU
- Sensors:
- 3-axis gyroscope
- 3-axis accelerometer
- 3-axis magnetometer
- Barometer for altitude measurement
- Input Voltage: 4.5V to 5.5V
- Communication Interfaces:
- UART, I2C, SPI, CAN, and USB
- PWM Outputs: Up to 8 channels for motor control
- Storage: MicroSD card slot for data logging
- Dimensions: 81.5mm x 50mm x 15.5mm
- Weight: 38 grams
Pin Configuration and Descriptions:
The Pixhawk Px4 Front features multiple connectors for peripherals and power. Below is a summary of the key pin configurations:
Power Input
| Pin Name | Description | Voltage Range |
|---|---|---|
| VDD | Main power input | 4.5V - 5.5V |
| GND | Ground connection | - |
PWM Outputs
| Pin Name | Description | Signal Type |
|---|---|---|
| PWM1 | Motor 1 control signal | PWM |
| PWM2 | Motor 2 control signal | PWM |
| PWM3 | Motor 3 control signal | PWM |
| PWM4 | Motor 4 control signal | PWM |
| PWM5 | Motor 5 control signal | PWM |
| PWM6 | Motor 6 control signal | PWM |
| PWM7 | Motor 7 control signal | PWM |
| PWM8 | Motor 8 control signal | PWM |
Communication Ports
| Port Name | Description | Protocol |
|---|---|---|
| UART1 | Serial communication port | UART |
| I2C1 | Sensor communication port | I2C |
| SPI1 | High-speed communication | SPI |
| CAN1 | CAN bus for peripherals | CAN |
| USB | USB interface for setup | USB |
Usage Instructions
How to Use the Pixhawk Px4 Front in a Circuit:
Powering the Pixhawk:
- Connect a regulated power supply (4.5V to 5.5V) to the VDD and GND pins.
- Ensure the power source can supply sufficient current for all connected peripherals.
Connecting Motors:
- Use the PWM output pins (PWM1 to PWM8) to connect Electronic Speed Controllers (ESCs) for motor control.
- Ensure the ESCs are compatible with the PWM signal range of the Pixhawk.
Connecting Sensors:
- Use the I2C or SPI ports to connect external sensors such as GPS modules, rangefinders, or additional IMUs.
- Ensure proper wiring and address configuration for I2C devices.
Communication with a Host System:
- Use the USB port to connect the Pixhawk to a computer for initial setup and firmware updates.
- Alternatively, use the UART port for serial communication with a host microcontroller or computer.
Configuring the Pixhawk:
- Install the PX4 firmware using the QGroundControl software.
- Calibrate the onboard sensors (gyroscope, accelerometer, magnetometer) through the software interface.
- Configure flight parameters such as PID values, failsafe settings, and mission waypoints.
Important Considerations and Best Practices:
- Always use a stable and regulated power supply to avoid damaging the Pixhawk.
- Ensure proper isolation of power and signal lines to minimize noise and interference.
- Regularly update the firmware to benefit from the latest features and bug fixes.
- Perform a pre-flight check to verify sensor calibration and motor functionality.
- Use vibration dampening mounts to reduce noise affecting the onboard sensors.
Example Code for Arduino UNO Integration:
The Pixhawk Px4 Front can communicate with an Arduino UNO via the UART interface. Below is an example code snippet for reading data from the Pixhawk:
#include <SoftwareSerial.h>

// Define RX and TX pins for communication with Pixhawk
SoftwareSerial pixhawkSerial(10, 11); // RX = pin 10, TX = pin 11

void setup() {
  // Initialize serial communication
  Serial.begin(9600); // For debugging via Serial Monitor
  pixhawkSerial.begin(57600); // Communication with Pixhawk

  Serial.println("Pixhawk-Arduino Communication Initialized");
}

void loop() {
  // Check if data is available from Pixhawk
  if (pixhawkSerial.available()) {
    // Read and print data from Pixhawk
    String data = pixhawkSerial.readString();
    Serial.println("Data from Pixhawk: " + data);
  }

  // Add a small delay to avoid flooding the Serial Monitor
  delay(100);
}
Note: Ensure the Pixhawk's UART port is configured to output telemetry data at the correct baud rate (57600 in this example).
Troubleshooting and FAQs
Common Issues and Solutions:
Pixhawk Not Powering On:
- Cause: Insufficient or incorrect power supply.
- Solution: Verify the input voltage is within the 4.5V to 5.5V range and check all connections.
Motors Not Responding:
- Cause: Incorrect PWM connections or ESC calibration.
- Solution: Verify the PWM connections and recalibrate the ESCs.
Sensor Calibration Fails:
- Cause: Excessive vibration or magnetic interference.
- Solution: Use vibration dampening mounts and ensure the Pixhawk is away from strong magnetic fields.
No Communication with QGroundControl:
- Cause: USB driver issues or incorrect firmware.
- Solution: Reinstall the USB drivers and ensure the firmware is correctly flashed.
FAQs:
Q: Can the Pixhawk Px4 Front be used with fixed-wing aircraft?
- A: Yes, the Pixhawk supports fixed-wing, multirotor, and VTOL configurations.
Q: What is the maximum range for telemetry communication?
- A: The range depends on the telemetry module used. Typical ranges are 1-2 km for 915 MHz modules.
Q: Can I use the Pixhawk with a Raspberry Pi?
- A: Yes, the Pixhawk can communicate with a Raspberry Pi via UART or USB.
Q: How do I update the firmware?
- A: Use the QGroundControl software to download and install the latest PX4 firmware.
By following this documentation, users can effectively integrate and operate the Pixhawk Px4 Front in their projects.