How to Use Adafruit Music Maker FeatherWing with Amp: Examples, Pinouts, and Specs
Introduction
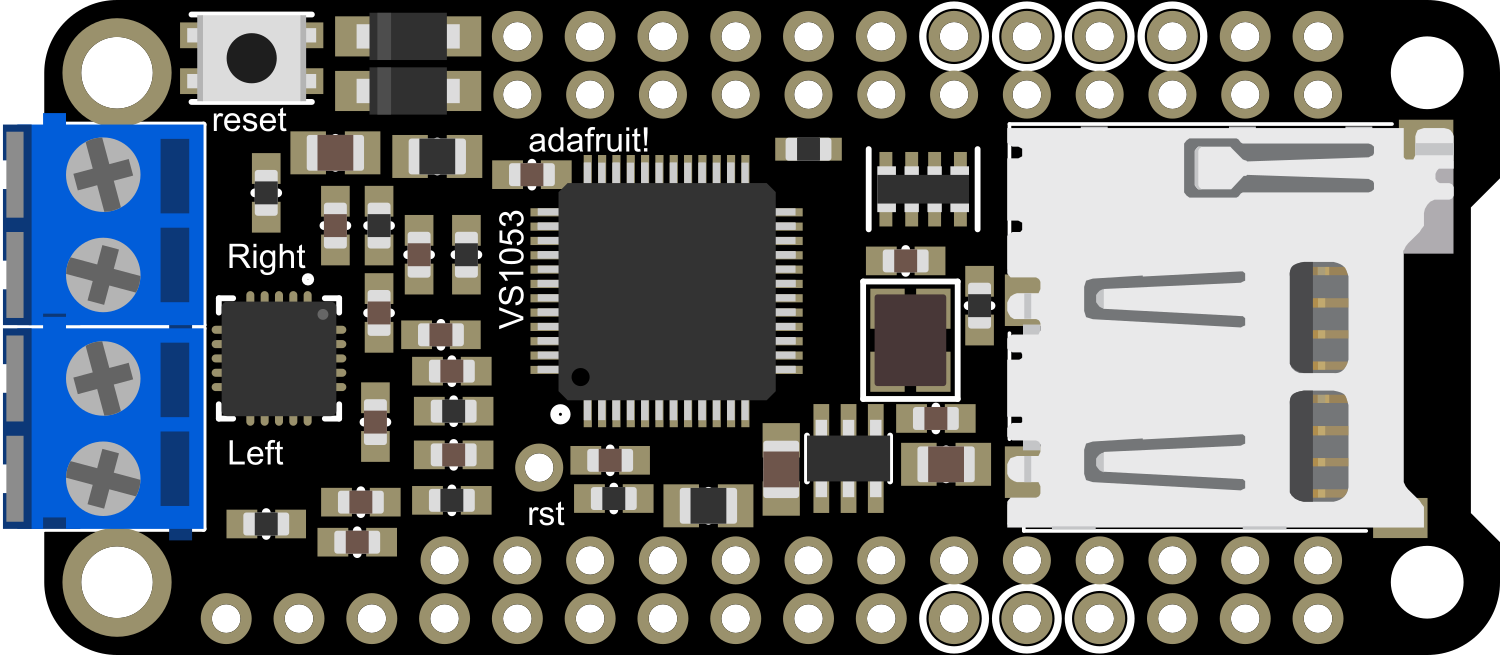
The Adafruit Music Maker FeatherWing with Amp is a versatile and compact audio playback module that enables your Feather development boards to play a wide range of audio formats stored on microSD cards. It comes with a built-in amplifier, making it an ideal choice for projects requiring sound output, such as DIY music players, sound effects boards, or voice announcement systems.
Explore Projects Built with Adafruit Music Maker FeatherWing with Amp


Explore Projects Built with Adafruit Music Maker FeatherWing with Amp
Common Applications and Use Cases
- Portable music players
- Interactive art installations
- Sound effects for cosplay or props
- Voice announcement systems for small spaces
- Educational projects involving audio feedback
Technical Specifications
Key Technical Details
- Audio Format Support: MP3, WAV, AAC, Ogg Vorbis
- Storage: microSD card slot for audio file storage
- Amplifier: Built-in Class D stereo amplifier
- Output Power: Up to 3 Watts per channel into 4 Ohm speakers
- Voltage Requirements: 3.3V to 5V DC
- Current Consumption: Varies with volume and speaker impedance
Pin Configuration and Descriptions
| Pin | Function | Description |
|---|---|---|
| GND | Ground | Common ground for power and signal |
| 3V | Power | 3.3V power supply input |
| BAT | Battery | Battery input for standalone operation |
| EN | Enable | Amplifier enable pin (active high) |
| RST | Reset | Hardware reset pin (active low) |
| MISO | Data | Master In Slave Out for SPI communication |
| MOSI | Data | Master Out Slave In for SPI communication |
| SCK | Clock | Serial Clock for SPI communication |
| CS | Chip Select | SPI chip select for the SD card |
| DCS | Data/Command Select | SPI chip select for the VS1053 codec |
| DREQ | Data Request | Data request pin for VS1053 codec |
| L | Left Audio | Left channel audio output |
| R | Right Audio | Right channel audio output |
Usage Instructions
How to Use the Component in a Circuit
Powering the Module: Connect the 3V pin to a 3.3V supply from your Feather board. Ensure that the GND pin is connected to the common ground.
Enabling the Amplifier: The EN pin can be connected to a digital pin on your Feather board to programmatically enable or disable the amplifier.
Connecting Speakers: Attach speakers to the L and R pins for stereo output. Ensure that the speakers are compatible with the output power of the amplifier.
Loading Audio Files: Insert a microSD card with audio files into the slot on the FeatherWing.
Interfacing with Feather Board: Use the SPI interface (MISO, MOSI, SCK) to communicate with the module. The CS and DCS pins are used to select the SD card and the VS1053 codec, respectively.
Important Considerations and Best Practices
Power Supply: Ensure that the power supply is sufficient for both the FeatherWing and the attached speakers.
Audio File Format: Verify that the audio files are in a supported format and are not corrupted.
Speaker Impedance: Match the speaker impedance with the amplifier's specifications to avoid damage.
Volume Control: Implement software volume control to prevent speaker damage due to high volume levels.
Example Code for Arduino UNO
#include <SPI.h>
#include <SD.h>
#include <Adafruit_VS1053.h>

// Define the pins used
#define BREAKOUT_RESET  -1      // VS1053 reset pin (not used!)
#define BREAKOUT_CS      7      // VS1053 chip select pin (output)
#define BREAKOUT_DCS     6      // VS1053 Data/command select pin (output)
// These are the pins used for the music maker shield
#define SHIELD_RESET  -1      // VS1053 reset pin (unused!)
#define SHIELD_CS     7       // VS1053 chip select pin (output)
#define SHIELD_DCS    6       // VS1053 Data/command select pin (output)
// These are common pins between breakout and shield
#define CARDCS 4     // Card chip select pin
// DREQ should be an Int pin, see http://arduino.cc/en/Reference/attachInterrupt
#define DREQ 3       // VS1053 Data request, ideally an Interrupt pin

Adafruit_VS1053_FilePlayer musicPlayer =
  // create breakout-example object!
  Adafruit_VS1053_FilePlayer(BREAKOUT_RESET, BREAKOUT_CS, BREAKOUT_DCS, DREQ, CARDCS);
  // create shield-example object!
  //Adafruit_VS1053_FilePlayer(SHIELD_RESET, SHIELD_CS, SHIELD_DCS, DREQ, CARDCS);

void setup() {
  Serial.begin(9600);
  Serial.println("Adafruit VS1053 Simple Test");

  if (! musicPlayer.begin()) { // initialise the music player
     Serial.println(F("Couldn't find VS1053, do you have the right pins defined?"));
     while (1);
  }
  Serial.println(F("VS1053 found"));

  if (!SD.begin(CARDCS)) {
    Serial.println(F("SD failed, or not present"));
    while (1);  // don't do anything more
  }

  // Set volume for left, right channels. lower numbers == louder volume!
  musicPlayer.setVolume(20,20);

  // Play one file, don't return until complete
  Serial.println(F("Playing track 001"));
  musicPlayer.playFullFile("/track001.mp3");
  // Play another file in the background, REQUIRES interrupts!
  Serial.println(F("Playing track 002"));
  musicPlayer.useInterrupt(VS1053_FILEPLAYER_PIN_INT);  // DREQ int
  musicPlayer.startPlayingFile("/track002.mp3");
}

void loop() {
  // File is playing in the background
  if (! musicPlayer.stopped()) {
    Serial.println(F("Music is still playing"));
  } else {
    Serial.println(F("Music is done!"));
  }
  delay(1000);
}
Troubleshooting and FAQs
Common Issues Users Might Face
No Audio Output: Ensure that the speakers are properly connected and the amplifier is enabled. Check the volume settings and the integrity of the audio files.
Distorted Sound: This could be due to incorrect speaker impedance or volume levels that are too high. Adjust the volume or check the speaker specifications.
SD Card Not Recognized: Make sure the SD card is formatted correctly and the files are in a supported format. Reinsert the SD card or try a different one.
Solutions and Tips for Troubleshooting
Power Cycling: If the module is unresponsive, try power cycling the FeatherWing by disconnecting and reconnecting the power.
Updating Libraries: Ensure that you have the latest Adafruit VS1053 library installed in your Arduino IDE.
Checking Connections: Verify that all connections are secure and that there are no shorts or open circuits.
FAQs
Q: Can I play audio files of any size? A: The module can play files as long as there is enough space on the microSD card and the file is not larger than the maximum file size supported by the filesystem (typically 4GB for FAT32).
Q: How do I control the playback programmatically?
A: You can use the functions provided by the Adafruit VS1053 library to control playback, such as playFullFile(), startPlayingFile(), stopPlaying(), and pausePlaying().
Q: Can I use this module with other microcontrollers besides Feather boards? A: Yes, as long as the microcontroller supports SPI communication and operates at a compatible voltage level, you can use this module with other microcontrollers. However, you may need to adjust the pin definitions accordingly.