Cirkit Designer Logo
Cirkit Designer
Your all-in-one circuit design IDE
Home / 
Component Documentation

How to Use SparkFun High Precision Temperature Sensor - TMP117 (Qwiic): Examples, Pinouts, and Specs

Image of SparkFun High Precision Temperature Sensor - TMP117 (Qwiic)
Cirkit Designer LogoDesign with SparkFun High Precision Temperature Sensor - TMP117 (Qwiic) in Cirkit Designer

Introduction

The SparkFun High Precision Temperature Sensor - TMP117 (Qwiic) is a high-accuracy digital temperature sensor that offers a high degree of precision at a low power consumption. It is designed to read temperatures with a minimal error margin, making it ideal for a wide range of applications including environmental monitoring, medical devices, and industrial control systems. The sensor communicates over the I2C interface, making it easy to use with microcontrollers such as the Arduino UNO.

Explore Projects Built with SparkFun High Precision Temperature Sensor - TMP117 (Qwiic)

Use Cirkit Designer to design, explore, and prototype these projects online. Some projects support real-time simulation. Click "Open Project" to start designing instantly!
Battery-Powered Health Monitoring System with Nucleo WB55RG and OLED Display
Image of Pulsefex: A project utilizing SparkFun High Precision Temperature Sensor - TMP117 (Qwiic) in a practical application
This circuit is a multi-sensor data acquisition system that uses a Nucleo WB55RG microcontroller to interface with a digital temperature sensor (TMP102), a pulse oximeter and heart-rate sensor (MAX30102), and a 0.96" OLED display via I2C. Additionally, it includes a Sim800l module for GSM communication, powered by a 3.7V LiPo battery.
Cirkit Designer LogoOpen Project in Cirkit Designer
Arduino Mega 2560-Based Multi-Sensor Weather Station with TFT Display and IR Control
Image of aqua2: A project utilizing SparkFun High Precision Temperature Sensor - TMP117 (Qwiic) in a practical application
This circuit uses an Arduino Mega 2560 to read temperature data from multiple DS18B20 sensors, display the data on an ILI9341 TFT display, and maintain time using an Adafruit DS1307 RTC module. It also receives IR signals using a VS1838B IR receiver and includes an Adafruit MS8607 PHT sensor for additional environmental monitoring.
Cirkit Designer LogoOpen Project in Cirkit Designer
Adafruit MPU6050 and VL6180X Sensor Interface with Servo Control
Image of wire: A project utilizing SparkFun High Precision Temperature Sensor - TMP117 (Qwiic) in a practical application
This circuit features an Adafruit QT Py microcontroller interfaced with an Adafruit MPU6050 6-axis accelerometer/gyroscope and an Adafruit VL6180X Time of Flight (ToF) distance sensor, both connected via I2C communication. The QT Py also controls a Servomotor SG90, likely for physical actuation based on sensor inputs. The embedded code initializes the sensors, reads their data, and outputs the readings to a serial monitor, with the potential for motion control based on the sensor feedback.
Cirkit Designer LogoOpen Project in Cirkit Designer
Arduino and ESP32-CAM Based Temperature Monitoring and Timekeeping System
Image of NPD MVP: A project utilizing SparkFun High Precision Temperature Sensor - TMP117 (Qwiic) in a practical application
This is a multi-functional embedded system featuring temperature monitoring, timekeeping, visual display, potential Wi-Fi/camera capabilities, magnetic field detection, and power management with emergency stop functionality. It is designed around an Arduino UNO and an ESP32-CAM, with a buck converter for power regulation from a LiPo battery.
Cirkit Designer LogoOpen Project in Cirkit Designer

Explore Projects Built with SparkFun High Precision Temperature Sensor - TMP117 (Qwiic)

Use Cirkit Designer to design, explore, and prototype these projects online. Some projects support real-time simulation. Click "Open Project" to start designing instantly!
Image of Pulsefex: A project utilizing SparkFun High Precision Temperature Sensor - TMP117 (Qwiic) in a practical application
Battery-Powered Health Monitoring System with Nucleo WB55RG and OLED Display
This circuit is a multi-sensor data acquisition system that uses a Nucleo WB55RG microcontroller to interface with a digital temperature sensor (TMP102), a pulse oximeter and heart-rate sensor (MAX30102), and a 0.96" OLED display via I2C. Additionally, it includes a Sim800l module for GSM communication, powered by a 3.7V LiPo battery.
Cirkit Designer LogoOpen Project in Cirkit Designer
Image of aqua2: A project utilizing SparkFun High Precision Temperature Sensor - TMP117 (Qwiic) in a practical application
Arduino Mega 2560-Based Multi-Sensor Weather Station with TFT Display and IR Control
This circuit uses an Arduino Mega 2560 to read temperature data from multiple DS18B20 sensors, display the data on an ILI9341 TFT display, and maintain time using an Adafruit DS1307 RTC module. It also receives IR signals using a VS1838B IR receiver and includes an Adafruit MS8607 PHT sensor for additional environmental monitoring.
Cirkit Designer LogoOpen Project in Cirkit Designer
Image of wire: A project utilizing SparkFun High Precision Temperature Sensor - TMP117 (Qwiic) in a practical application
Adafruit MPU6050 and VL6180X Sensor Interface with Servo Control
This circuit features an Adafruit QT Py microcontroller interfaced with an Adafruit MPU6050 6-axis accelerometer/gyroscope and an Adafruit VL6180X Time of Flight (ToF) distance sensor, both connected via I2C communication. The QT Py also controls a Servomotor SG90, likely for physical actuation based on sensor inputs. The embedded code initializes the sensors, reads their data, and outputs the readings to a serial monitor, with the potential for motion control based on the sensor feedback.
Cirkit Designer LogoOpen Project in Cirkit Designer
Image of NPD MVP: A project utilizing SparkFun High Precision Temperature Sensor - TMP117 (Qwiic) in a practical application
Arduino and ESP32-CAM Based Temperature Monitoring and Timekeeping System
This is a multi-functional embedded system featuring temperature monitoring, timekeeping, visual display, potential Wi-Fi/camera capabilities, magnetic field detection, and power management with emergency stop functionality. It is designed around an Arduino UNO and an ESP32-CAM, with a buck converter for power regulation from a LiPo battery.
Cirkit Designer LogoOpen Project in Cirkit Designer

Technical Specifications

Key Features

  • Temperature Range: -55°C to +150°C
  • Accuracy: ±0.1°C (from -20°C to +50°C)
  • Resolution: 0.0078°C
  • Supply Voltage: 1.8V to 3.3V
  • Low Power Consumption: 3.5µA (1Hz Conversion Cycle)
  • Interface: I2C (Qwiic Connect System)

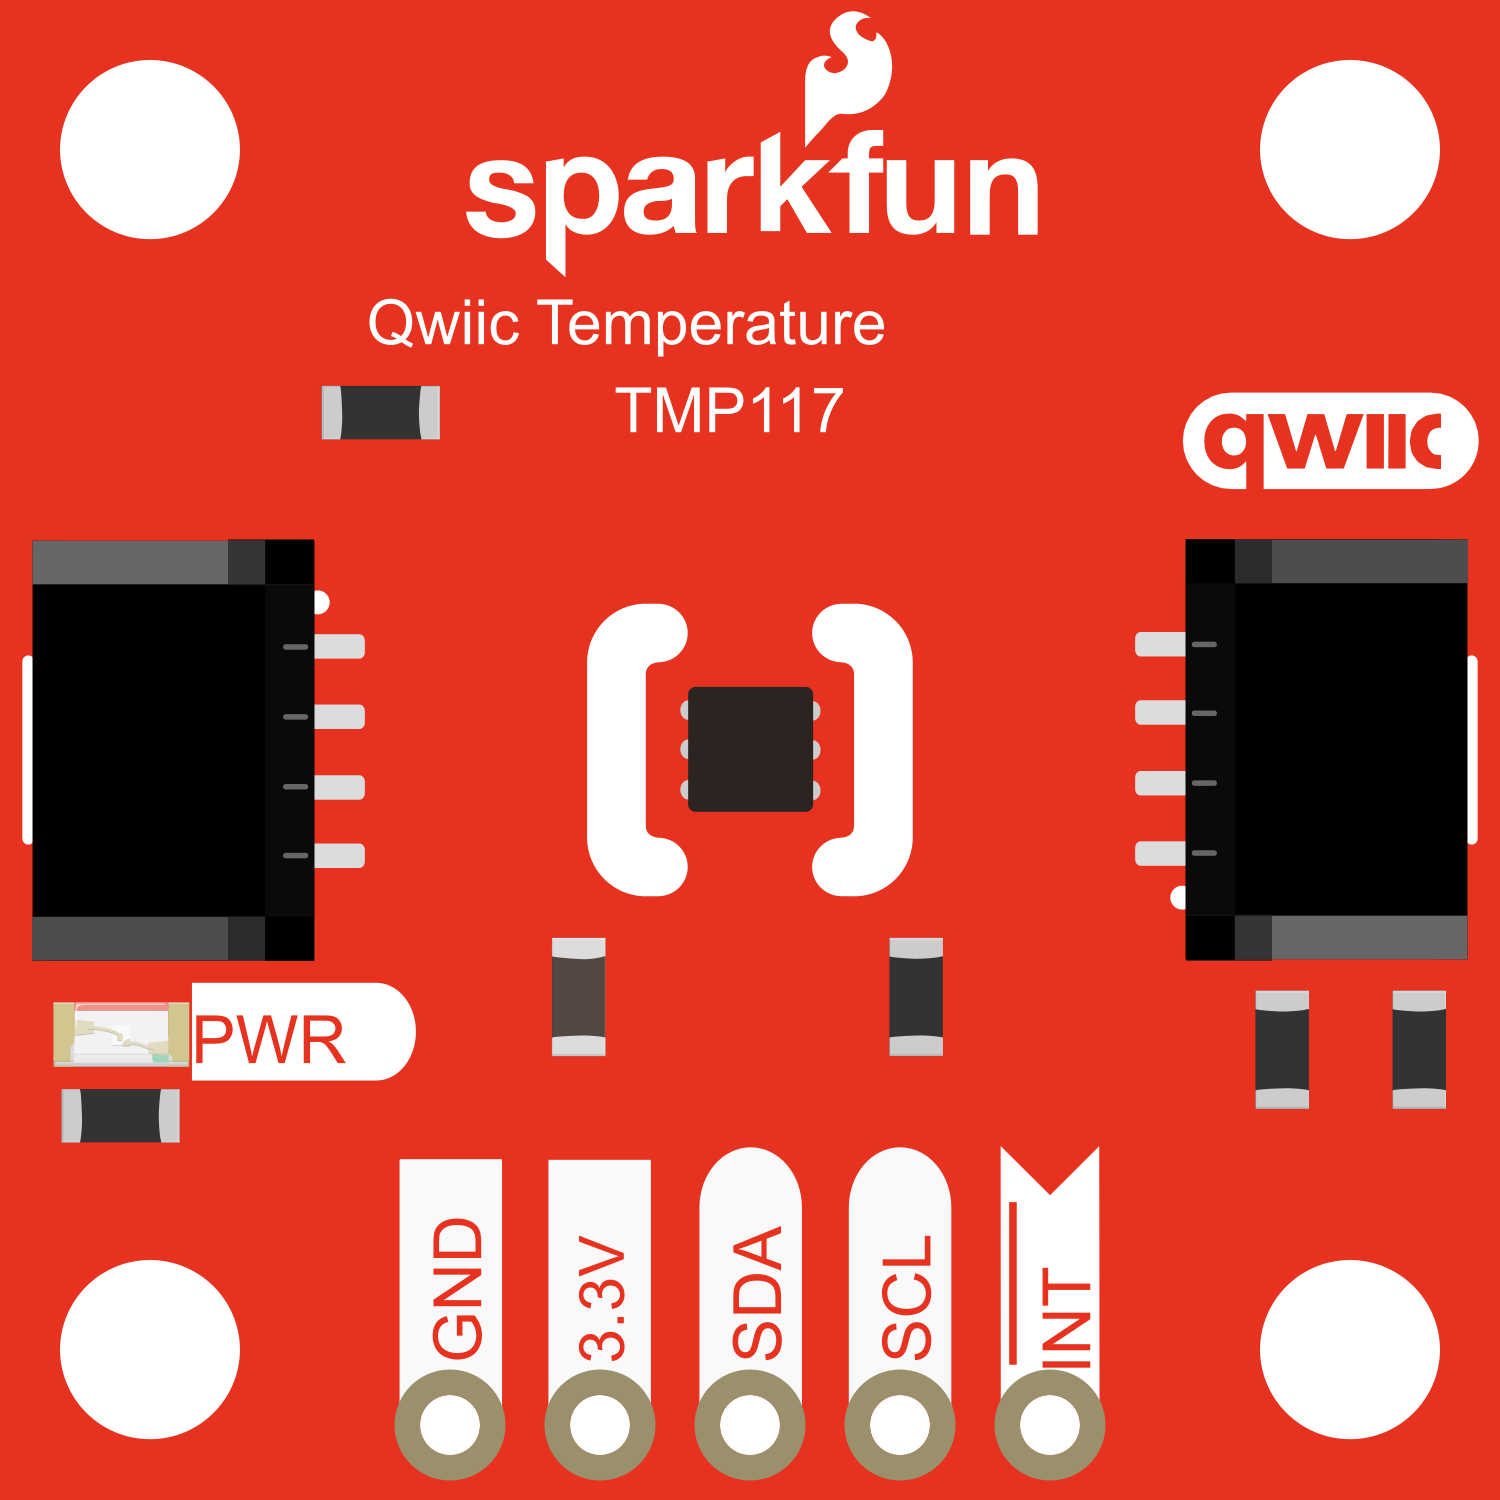
Pin Configuration and Descriptions

Pin Name Description
VCC Power supply (1.8V to 3.3V)
GND Ground connection
SDA I2C Data Line
SCL I2C Clock Line
ADD0 Address pin to set I2C address
ALERT Alert/interrupt output

Usage Instructions

Connecting the Sensor

  1. Connect the VCC pin to a 1.8V to 3.3V power source.
  2. Connect the GND pin to the ground of your system.
  3. Connect the SDA and SCL pins to the I2C data and clock lines on your microcontroller.
  4. The ADD0 pin can be used to change the I2C address if multiple devices are connected to the same I2C bus.
  5. The ALERT pin can be used to trigger an interrupt when a temperature threshold is reached.

Best Practices

  • Ensure that the power supply is stable and within the specified voltage range.
  • Use pull-up resistors on the SDA and SCL lines if they are not already present on your microcontroller board.
  • Avoid placing the sensor near heat-generating components to prevent false readings.
  • For accurate measurements, allow the sensor to acclimate to the environment before taking readings.

Example Code for Arduino UNO

#include <Wire.h>
#include <SparkFun_TMP117.h> // Include the SparkFun TMP117 library

// Create a TMP117 object
TMP117 tempSensor;

void setup() {
  Wire.begin(); // Join I2C bus
  Serial.begin(9600); // Start serial communication at 9600 baud

  if (tempSensor.begin() == false) {
    Serial.println("The TMP117 did not respond. Please check wiring.");
    while (1); // Hang if there is a problem
  }
}

void loop() {
  Serial.print("Temperature: ");
  Serial.print(tempSensor.readTempC()); // Read temperature in Celsius
  Serial.println(" C");
  delay(1000); // Wait 1 second before next reading
}

Troubleshooting and FAQs

Common Issues

  • Sensor Not Responding: Ensure that the sensor is correctly powered and that the I2C connections are secure. Check that the correct I2C address is being used in your code.
  • Inaccurate Readings: Verify that the sensor is not placed near heat sources and that it has had time to acclimate to the ambient temperature.
  • No Serial Output: Confirm that the correct baud rate is set in your serial monitor and that the Arduino is properly connected to your computer.

FAQs

Q: Can the TMP117 sensor be used with a 5V system? A: The TMP117 is rated for 1.8V to 3.3V operation. Using it with a 5V system without proper level shifting could damage the sensor.

Q: How can I change the I2C address of the sensor? A: The I2C address can be changed by connecting the ADD0 pin to GND, VCC, SDA, or SCL, each giving a different address.

Q: Is it possible to use multiple TMP117 sensors on the same I2C bus? A: Yes, you can use multiple sensors by setting a unique I2C address for each one using the ADD0 pin.

Q: How do I calibrate the sensor? A: The TMP117 comes factory-calibrated. However, if recalibration is necessary, refer to the manufacturer's datasheet for detailed instructions.

For further assistance, consult the TMP117 datasheet or contact SparkFun's technical support.