How to Use DOCYKE 350 Kg: Examples, Pinouts, and Specs
Introduction
The DOCYKE 350 Kg is a heavy-duty lifting device engineered to handle loads of up to 350 kilograms. It is commonly used in industrial applications for hoisting and moving heavy materials with precision and safety. This component is ideal for environments such as warehouses, construction sites, and manufacturing facilities where reliable load handling is essential.
Explore Projects Built with DOCYKE 350 Kg
Explore Projects Built with DOCYKE 350 Kg
Common Applications
- Industrial hoisting and lifting operations
- Material handling in warehouses and factories
- Construction site load management
- Integration into automated lifting systems
Technical Specifications
Key Technical Details
| Parameter | Specification |
|---|---|
| Maximum Load Capacity | 350 kg |
| Operating Voltage | 24V DC |
| Power Consumption | 500W |
| Control Interface | Digital (PWM or Relay Control) |
| Lifting Speed | 0.5 m/s |
| Duty Cycle | 50% (5 minutes on, 5 minutes off) |
| Dimensions | 300 mm x 150 mm x 200 mm |
| Weight | 12 kg |
| Safety Features | Overload protection, emergency stop |
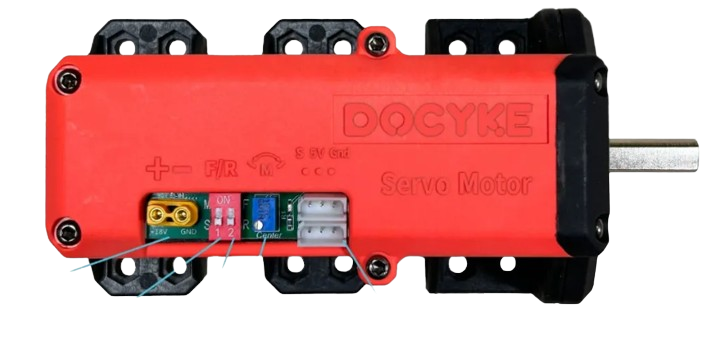
Pin Configuration and Descriptions
| Pin Number | Pin Name | Description |
|---|---|---|
| 1 | V+ (Power) | Positive power input (24V DC) |
| 2 | GND (Ground) | Ground connection for the power supply |
| 3 | PWM Input | Pulse Width Modulation input for speed control (0-5V signal) |
| 4 | Direction | Digital input to control lifting direction (HIGH for up, LOW for down) |
| 5 | Emergency Stop | Digital input for emergency stop (active HIGH) |
| 6 | Status Output | Digital output indicating operational status (HIGH when active, LOW otherwise) |
Usage Instructions
How to Use the DOCYKE 350 Kg in a Circuit
- Power Supply: Connect a 24V DC power supply to the
V+andGNDpins. Ensure the power supply can deliver at least 500W to handle peak loads. - Control Signals:
- Use a microcontroller (e.g., Arduino UNO) or a relay module to send control signals to the
PWM InputandDirectionpins. - The
PWM Inputpin controls the lifting speed. A 0-5V PWM signal adjusts the speed proportionally. - The
Directionpin determines the lifting direction (HIGH for up, LOW for down).
- Use a microcontroller (e.g., Arduino UNO) or a relay module to send control signals to the
- Emergency Stop: Connect a normally open push-button switch to the
Emergency Stoppin. When pressed, this pin should receive a HIGH signal to immediately halt operations. - Status Monitoring: Use the
Status Outputpin to monitor the operational state of the device. This pin can be connected to an LED or a microcontroller for feedback.
Important Considerations and Best Practices
- Load Capacity: Never exceed the maximum load capacity of 350 kg to avoid damage or safety hazards.
- Duty Cycle: Operate the device within its 50% duty cycle to prevent overheating. For example, if the device runs for 5 minutes, allow it to rest for 5 minutes before resuming operation.
- Wiring: Use appropriately rated wires for the power and control connections to handle the current safely.
- Safety: Always test the emergency stop functionality before use. Ensure the device is securely mounted and the load is properly balanced.
Example Code for Arduino UNO
Below is an example of how to control the DOCYKE 350 Kg using an Arduino UNO:
// Define pin connections
const int pwmPin = 9;          // PWM signal pin
const int directionPin = 8;    // Direction control pin
const int emergencyStopPin = 7; // Emergency stop pin

void setup() {
  pinMode(pwmPin, OUTPUT);          // Set PWM pin as output
  pinMode(directionPin, OUTPUT);    // Set direction pin as output
  pinMode(emergencyStopPin, INPUT); // Set emergency stop pin as input

  // Initialize pins
  digitalWrite(directionPin, LOW); // Default direction: down
}

void loop() {
  // Check for emergency stop
  if (digitalRead(emergencyStopPin) == HIGH) {
    analogWrite(pwmPin, 0);         // Stop the motor
    return;                         // Exit the loop
  }

  // Set direction to up
  digitalWrite(directionPin, HIGH);

  // Set lifting speed (50% duty cycle)
  analogWrite(pwmPin, 128);         // PWM value (0-255)

  delay(5000);                      // Run for 5 seconds

  // Stop the motor
  analogWrite(pwmPin, 0);

  delay(5000);                      // Rest for 5 seconds
}
Troubleshooting and FAQs
Common Issues and Solutions
Device Does Not Operate
- Cause: Insufficient power supply.
- Solution: Verify that the power supply provides 24V DC and at least 500W.
Overheating
- Cause: Exceeding the duty cycle or load capacity.
- Solution: Operate within the specified duty cycle and ensure the load does not exceed 350 kg.
Emergency Stop Not Working
- Cause: Faulty wiring or switch.
- Solution: Check the wiring and test the emergency stop switch for proper functionality.
Unstable Lifting Speed
- Cause: Incorrect PWM signal.
- Solution: Ensure the PWM signal is within the 0-5V range and properly configured in the microcontroller.
FAQs
Q: Can the DOCYKE 350 Kg be used outdoors?
A: The device is not weatherproof. If used outdoors, ensure it is protected from moisture and extreme temperatures.
Q: What happens if the load exceeds 350 kg?
A: The built-in overload protection will activate, stopping the device to prevent damage.
Q: Can I use a 12V power supply instead of 24V?
A: No, the device requires a 24V DC power supply for proper operation.
Q: How do I reset the device after an emergency stop?
A: Release the emergency stop button and cycle the power to reset the device.