How to Use Waveshare ESP32-S3 2inch Capacitive Touch Display IPS 240×320: Examples, Pinouts, and Specs
Introduction
The Waveshare ESP32-S3 2inch Capacitive Touch Display is a compact and versatile display module designed for interactive applications. Featuring a 2-inch IPS panel with a resolution of 240x320 pixels, it delivers vibrant colors and wide viewing angles. The module integrates seamlessly with the ESP32-S3 microcontroller, making it ideal for IoT projects, smart home devices, handheld interfaces, and educational tools. Its capacitive touch functionality enables intuitive user interaction, enhancing the usability of your projects.
Explore Projects Built with Waveshare ESP32-S3 2inch Capacitive Touch Display IPS 240×320


Explore Projects Built with Waveshare ESP32-S3 2inch Capacitive Touch Display IPS 240×320
Common Applications
- IoT dashboards and control panels
- Smart home automation interfaces
- Portable device displays
- Educational and prototyping projects
- Interactive kiosks and handheld devices
Technical Specifications
Key Technical Details
| Parameter | Specification |
|---|---|
| Display Type | IPS LCD |
| Screen Size | 2 inches |
| Resolution | 240×320 pixels |
| Touch Type | Capacitive |
| Touch Points | Single-point |
| Controller | ILI9341 (Display), FT6236 (Touch) |
| Interface | SPI |
| Operating Voltage | 3.3V |
| Backlight Control | PWM |
| Dimensions | 40.8mm × 55.8mm |
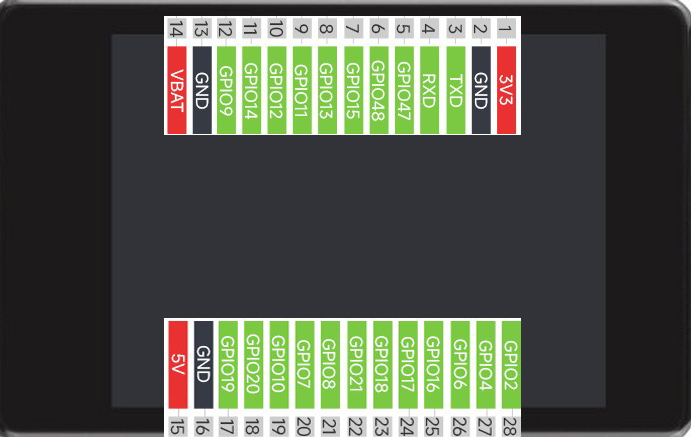
Pin Configuration and Descriptions
Display Module Pinout
| Pin Name | Description |
|---|---|
| VCC | Power input (3.3V) |
| GND | Ground |
| SCK | SPI clock input |
| MOSI | SPI data input |
| MISO | SPI data output (not used in some configurations) |
| CS | Chip select for the display |
| DC | Data/Command control pin |
| RST | Reset pin |
| BL | Backlight control (PWM supported) |
| INT | Interrupt pin for touch controller |
| SDA | I2C data line for touch controller |
| SCL | I2C clock line for touch controller |
Usage Instructions
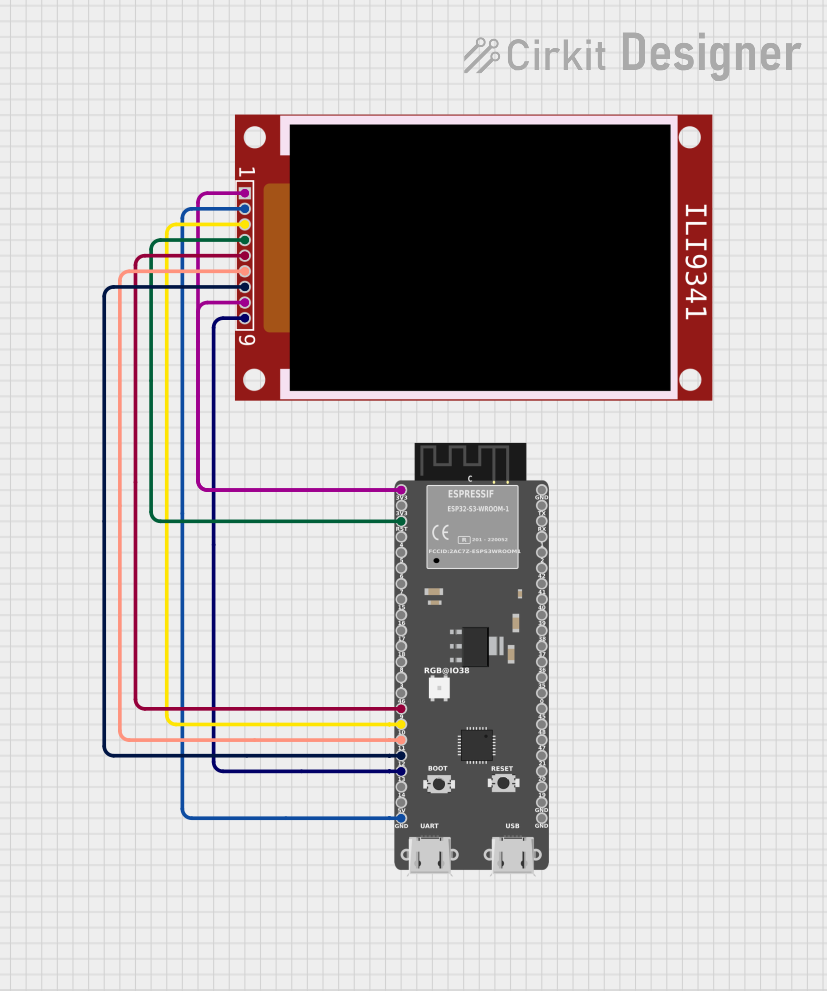
Connecting the Display to an ESP32-S3
To use the Waveshare ESP32-S3 2inch Capacitive Touch Display, connect the module to the ESP32-S3 microcontroller as follows:
| Display Pin | ESP32-S3 Pin |
|---|---|
| VCC | 3.3V |
| GND | GND |
| SCK | GPIO18 |
| MOSI | GPIO23 |
| CS | GPIO5 |
| DC | GPIO16 |
| RST | GPIO17 |
| BL | GPIO4 |
| SDA | GPIO21 |
| SCL | GPIO22 |
Example Code for Arduino IDE
Below is an example of how to initialize and use the display with the ESP32-S3 using the Arduino IDE. This example uses the Adafruit_GFX and Adafruit_ILI9341 libraries for the display and the Wire library for touch input.
#include <Adafruit_GFX.h>
#include <Adafruit_ILI9341.h>
#include <Wire.h>

// Define pins for the display
#define TFT_CS   5   // Chip select
#define TFT_DC   16  // Data/Command
#define TFT_RST  17  // Reset
#define TFT_BL   4   // Backlight control

// Initialize the display
Adafruit_ILI9341 tft = Adafruit_ILI9341(TFT_CS, TFT_DC, TFT_RST);

void setup() {
  // Initialize serial communication for debugging
  Serial.begin(115200);
  Serial.println("Initializing display...");

  // Initialize the display
  tft.begin();
  tft.setRotation(1); // Set display orientation
  tft.fillScreen(ILI9341_BLACK); // Clear the screen

  // Display a test message
  tft.setTextColor(ILI9341_WHITE);
  tft.setTextSize(2);
  tft.setCursor(10, 10);
  tft.println("Hello, ESP32-S3!");

  // Turn on the backlight
  pinMode(TFT_BL, OUTPUT);
  digitalWrite(TFT_BL, HIGH);
}

void loop() {
  // Add your main code here
}
Important Considerations
- Power Supply: Ensure the module is powered with 3.3V. Supplying higher voltages may damage the display.
- Backlight Control: Use the BL pin to control the backlight brightness via PWM or turn it on/off.
- Touch Controller: The touch functionality uses the I2C interface. Ensure the SDA and SCL pins are correctly connected.
- Library Dependencies: Install the
Adafruit_GFXandAdafruit_ILI9341libraries in the Arduino IDE for display control.
Troubleshooting and FAQs
Common Issues
Display Not Turning On
- Verify the power connections (VCC and GND).
- Ensure the backlight pin (BL) is set to HIGH or connected to 3.3V.
No Display Output
- Check the SPI connections (SCK, MOSI, CS, DC).
- Ensure the correct pins are defined in the code.
Touch Not Responding
- Verify the I2C connections (SDA and SCL).
- Check if the touch controller (FT6236) is properly initialized in your code.
Flickering or Dim Display
- Ensure a stable 3.3V power supply.
- Check the backlight control pin (BL) for proper PWM signals.
FAQs
Q: Can I use this display with a 5V microcontroller?
A: No, the display operates at 3.3V. Using a 5V microcontroller requires level shifters for the SPI and I2C lines.
Q: How do I adjust the screen brightness?
A: Use the BL pin to control the backlight brightness via PWM or connect it to 3.3V for full brightness.
Q: What libraries are required for this display?
A: The Adafruit_GFX and Adafruit_ILI9341 libraries are recommended for display control. For touch functionality, use an I2C library like Wire.
Q: Can I use this display in landscape mode?
A: Yes, the display orientation can be changed using the setRotation() function in the code.