
How to Use WeMos D1 Mini 1 Button Shield: Examples, Pinouts, and Specs
 Design with WeMos D1 Mini 1 Button Shield in Cirkit Designer
Introduction
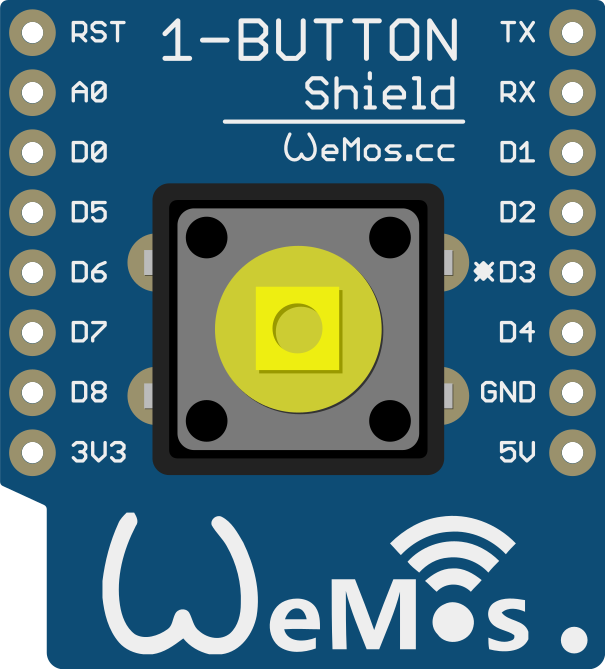
The WeMos D1 Mini 1 Button Shield is a compact and versatile add-on designed specifically for the WeMos D1 Mini development board. It features a single tactile push button that can be used for various input functions in IoT and electronics projects. This shield is ideal for triggering actions, controlling devices, or providing user input in a simple and efficient manner.
Explore Projects Built with WeMos D1 Mini 1 Button Shield
 Open Project in Cirkit Designer
 Open Project in Cirkit Designer
 Open Project in Cirkit Designer
 Open Project in Cirkit Designer
Explore Projects Built with WeMos D1 Mini 1 Button Shield
Open Project in Cirkit DesignerOpen Project in Cirkit DesignerOpen Project in Cirkit DesignerOpen Project in Cirkit DesignerCommon Applications and Use Cases
- Triggering events or actions in IoT projects
- Reset or mode selection for devices
- User input for simple control systems
- Testing and debugging circuits
- Educational projects for learning button-based input systems
Technical Specifications
The WeMos D1 Mini 1 Button Shield is designed to integrate seamlessly with the WeMos D1 Mini. Below are its key technical details:
Key Specifications
- Button Type: Tactile push button
- Operating Voltage: 3.3V (compatible with the WeMos D1 Mini)
- Dimensions: Matches the WeMos D1 Mini form factor
- Pin Compatibility: Directly stackable with the WeMos D1 Mini
- Debouncing: Requires external software or hardware debouncing if needed
Pin Configuration and Descriptions
The shield connects directly to the WeMos D1 Mini, and the button is internally wired to a specific GPIO pin. Below is the pin configuration:
| Pin | Description |
|---|---|
| D3 | GPIO pin connected to the button |
| GND | Ground connection |
| 3V3 | Power supply (3.3V) |
Note: The button is connected to GPIO D3 by default. Pressing the button pulls the pin LOW (active LOW configuration).
Usage Instructions
How to Use the Component in a Circuit
- Stack the Shield: Place the WeMos D1 Mini 1 Button Shield on top of the WeMos D1 Mini board. Ensure the pins are aligned correctly.
- Connect Power: Power the WeMos D1 Mini via USB or an external power source.
- Write Code: Use the GPIO pin (D3) to detect button presses in your program.
- Debounce the Button: Implement software debouncing in your code to avoid false triggers caused by mechanical bouncing.
Important Considerations and Best Practices
- Debouncing: Mechanical buttons can produce multiple signals when pressed or released. Use software or hardware debouncing to ensure reliable operation.
- Pull-up Resistor: The WeMos D1 Mini has an internal pull-up resistor for GPIO pins. Ensure it is enabled in your code to avoid floating pin issues.
- Avoid Excessive Force: Do not press the button with excessive force to prevent damage.
Example Code for Arduino UNO-Compatible Boards
Below is an example code snippet for using the WeMos D1 Mini 1 Button Shield with the Arduino IDE:
// Example code for WeMos D1 Mini 1 Button Shield
// This code detects button presses and toggles an LED on GPIO D4

#define BUTTON_PIN D3  // GPIO pin connected to the button
#define LED_PIN D4     // GPIO pin connected to an LED

void setup() {
  pinMode(BUTTON_PIN, INPUT_PULLUP); // Set button pin as input with pull-up resistor
  pinMode(LED_PIN, OUTPUT);         // Set LED pin as output
  digitalWrite(LED_PIN, LOW);       // Initialize LED as OFF
  Serial.begin(9600);               // Initialize serial communication
}

void loop() {
  // Read the button state (LOW when pressed, HIGH when not pressed)
  int buttonState = digitalRead(BUTTON_PIN);

  if (buttonState == LOW) {
    // Button is pressed
    Serial.println("Button Pressed!");
    digitalWrite(LED_PIN, HIGH); // Turn LED ON
    delay(500);                 // Debounce delay
  } else {
    // Button is not pressed
    digitalWrite(LED_PIN, LOW); // Turn LED OFF
  }
}
Note: The
INPUT_PULLUPmode enables the internal pull-up resistor, ensuring the pin is not left floating.
Troubleshooting and FAQs
Common Issues Users Might Face
Button Not Responding:
- Cause: Incorrect pin configuration or loose connection.
- Solution: Verify that the shield is properly stacked on the WeMos D1 Mini and that the correct GPIO pin (D3) is used in the code.
False Triggers or Multiple Signals:
- Cause: Mechanical bouncing of the button.
- Solution: Implement software debouncing in your code using a delay or a state machine.
Floating Pin Issues:
- Cause: GPIO pin is not properly configured.
- Solution: Ensure the
INPUT_PULLUPmode is enabled in your code to activate the internal pull-up resistor.
Button Feels Stiff or Unresponsive:
- Cause: Physical damage to the button.
- Solution: Inspect the button for damage and replace the shield if necessary.
Solutions and Tips for Troubleshooting
- Use the Serial Monitor in the Arduino IDE to debug button states and ensure the GPIO pin is reading correctly.
- If the button is not functioning as expected, test the GPIO pin with a simple jumper wire to confirm the pin's functionality.
- For advanced users, consider adding an external capacitor across the button terminals for hardware debouncing.
By following this documentation, you can effectively integrate the WeMos D1 Mini 1 Button Shield into your projects and troubleshoot any issues that arise.