Cirkit Designer Logo
Cirkit Designer
Your all-in-one circuit design IDE
Home / 
Component Documentation

How to Use SHT 30: Examples, Pinouts, and Specs

Image of SHT 30
Cirkit Designer LogoDesign with SHT 30 in Cirkit Designer

Introduction

The SHT 30 is a digital humidity and temperature sensor designed for precise environmental monitoring. It combines high accuracy, low power consumption, and a compact design, making it ideal for a wide range of applications. The sensor communicates via an I²C interface, enabling easy integration into microcontroller-based systems. Its robust design ensures reliable performance in HVAC systems, weather stations, smart home devices, and industrial automation.

Explore Projects Built with SHT 30

Use Cirkit Designer to design, explore, and prototype these projects online. Some projects support real-time simulation. Click "Open Project" to start designing instantly!
Arduino Nano-Controlled LED Display with RTC and Humidity Sensing
Image of Alarm Clock: A project utilizing SHT 30 in a practical application
This circuit features a Nano 3.0 ATmega328P microcontroller connected to an LED dot display, a real-time clock (RTC DS3231), and a humidity and temperature sensor (SHT21). The microcontroller communicates with the RTC and SHT21 via I2C (using A4 and A5 as SDA and SCL lines, respectively), and it controls the LED display through SPI-like signals (using D10, D11, and D12 for DIN, CS, and CLK). The circuit is designed to display time and environmental data on the LED display, with all components sharing a common power supply and ground.
Cirkit Designer LogoOpen Project in Cirkit Designer
Wi-Fi Controlled Weather Station with ESP32, DHT22, and SHTC3 Sensors
Image of ESP32-POE-ISO 2 AC and 2 Sensor: A project utilizing SHT 30 in a practical application
This circuit integrates an ESP32 microcontroller with a DHT22 temperature and humidity sensor, an Adafruit SHTC3 sensor, and a 2-channel relay module. The ESP32 reads environmental data from the sensors and can control external devices through the relay module.
Cirkit Designer LogoOpen Project in Cirkit Designer
Arduino Nano-Based Air Quality Monitor with OLED Display and Alert Buzzer
Image of Luftkvalitetsmätare: A project utilizing SHT 30 in a practical application
This circuit features an Arduino Nano microcontroller interfaced with an Adafruit SGP30 air quality sensor, an Adafruit SHTC3 temperature and humidity sensor, and a 0.96" OLED display for real-time environmental monitoring. The sensors communicate with the Arduino via I2C, with the SGP30 and SHTC3 sensors providing air quality readings (CO2 and TVOC) and temperature/humidity data, respectively, which are then displayed on the OLED. Additionally, a buzzer is connected to the Arduino and is programmed to activate when CO2 levels exceed a certain threshold, serving as an alert system.
Cirkit Designer LogoOpen Project in Cirkit Designer
Arduino Nano Weather Station with Ethernet Connectivity
Image of Nano_Sht31_W5500: A project utilizing SHT 30 in a practical application
This circuit features an Arduino Nano microcontroller interfaced with an Ethernet W5500 module for network connectivity and an SHT31 sensor for temperature and humidity measurements. The Arduino Nano communicates with the Ethernet module via SPI and reads data from the SHT31 sensor using I2C, enabling remote monitoring of environmental conditions.
Cirkit Designer LogoOpen Project in Cirkit Designer

Explore Projects Built with SHT 30

Use Cirkit Designer to design, explore, and prototype these projects online. Some projects support real-time simulation. Click "Open Project" to start designing instantly!
Image of Alarm Clock: A project utilizing SHT 30 in a practical application
Arduino Nano-Controlled LED Display with RTC and Humidity Sensing
This circuit features a Nano 3.0 ATmega328P microcontroller connected to an LED dot display, a real-time clock (RTC DS3231), and a humidity and temperature sensor (SHT21). The microcontroller communicates with the RTC and SHT21 via I2C (using A4 and A5 as SDA and SCL lines, respectively), and it controls the LED display through SPI-like signals (using D10, D11, and D12 for DIN, CS, and CLK). The circuit is designed to display time and environmental data on the LED display, with all components sharing a common power supply and ground.
Cirkit Designer LogoOpen Project in Cirkit Designer
Image of ESP32-POE-ISO 2 AC and 2 Sensor: A project utilizing SHT 30 in a practical application
Wi-Fi Controlled Weather Station with ESP32, DHT22, and SHTC3 Sensors
This circuit integrates an ESP32 microcontroller with a DHT22 temperature and humidity sensor, an Adafruit SHTC3 sensor, and a 2-channel relay module. The ESP32 reads environmental data from the sensors and can control external devices through the relay module.
Cirkit Designer LogoOpen Project in Cirkit Designer
Image of Luftkvalitetsmätare: A project utilizing SHT 30 in a practical application
Arduino Nano-Based Air Quality Monitor with OLED Display and Alert Buzzer
This circuit features an Arduino Nano microcontroller interfaced with an Adafruit SGP30 air quality sensor, an Adafruit SHTC3 temperature and humidity sensor, and a 0.96" OLED display for real-time environmental monitoring. The sensors communicate with the Arduino via I2C, with the SGP30 and SHTC3 sensors providing air quality readings (CO2 and TVOC) and temperature/humidity data, respectively, which are then displayed on the OLED. Additionally, a buzzer is connected to the Arduino and is programmed to activate when CO2 levels exceed a certain threshold, serving as an alert system.
Cirkit Designer LogoOpen Project in Cirkit Designer
Image of Nano_Sht31_W5500: A project utilizing SHT 30 in a practical application
Arduino Nano Weather Station with Ethernet Connectivity
This circuit features an Arduino Nano microcontroller interfaced with an Ethernet W5500 module for network connectivity and an SHT31 sensor for temperature and humidity measurements. The Arduino Nano communicates with the Ethernet module via SPI and reads data from the SHT31 sensor using I2C, enabling remote monitoring of environmental conditions.
Cirkit Designer LogoOpen Project in Cirkit Designer

Technical Specifications

The SHT 30 offers the following key technical details:

General Specifications

  • Supply Voltage: 2.4V to 5.5V
  • Current Consumption: 2 µA (standby), 650 µA (measuring)
  • Humidity Measurement Range: 0% to 100% RH
  • Temperature Measurement Range: -40°C to 125°C
  • Accuracy:
    • Humidity: ±2% RH
    • Temperature: ±0.3°C
  • Communication Protocol: I²C
  • Operating Temperature: -40°C to 125°C
  • Dimensions: 2.5mm x 2.5mm x 0.9mm
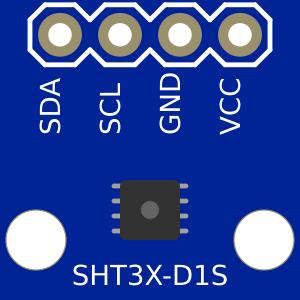
Pin Configuration

The SHT 30 sensor typically comes in a breakout board format. Below is the pin configuration:

Pin Name Description
VCC Power supply (2.4V to 5.5V)
GND Ground
SDA I²C data line
SCL I²C clock line
ADDR I²C address selection (optional)

I²C Address

  • Default I²C Address: 0x44
  • Alternate Address (if ADDR pin is pulled high): 0x45

Usage Instructions

Connecting the SHT 30 to a Circuit

  1. Power Supply: Connect the VCC pin to a 3.3V or 5V power source and the GND pin to ground.
  2. I²C Communication:
    • Connect the SDA pin to the I²C data line of your microcontroller.
    • Connect the SCL pin to the I²C clock line of your microcontroller.
  3. Pull-Up Resistors: Use 4.7kΩ pull-up resistors on the SDA and SCL lines if not already included on the breakout board.
  4. Address Selection: Leave the ADDR pin unconnected for the default address (0x44), or pull it high for the alternate address (0x45).

Example Code for Arduino UNO

Below is an example of how to use the SHT 30 with an Arduino UNO. This code reads temperature and humidity data and displays it on the Serial Monitor.

#include <Wire.h>
#include "Adafruit_SHT31.h" // Include the Adafruit SHT31 library

Adafruit_SHT31 sht30 = Adafruit_SHT31();

void setup() {
  Serial.begin(9600); // Initialize Serial Monitor at 9600 baud
  while (!Serial) delay(10); // Wait for Serial Monitor to connect

  if (!sht30.begin(0x44)) { // Initialize SHT 30 at default I²C address
    Serial.println("Failed to find SHT30 sensor!");
    while (1) delay(1); // Halt execution if sensor is not found
  }
  Serial.println("SHT30 sensor initialized.");
}

void loop() {
  float temperature = sht30.readTemperature(); // Read temperature in Celsius
  float humidity = sht30.readHumidity();       // Read relative humidity

  if (!isnan(temperature) && !isnan(humidity)) {
    // Check if readings are valid
    Serial.print("Temperature: ");
    Serial.print(temperature);
    Serial.println(" °C");

    Serial.print("Humidity: ");
    Serial.print(humidity);
    Serial.println(" %");
  } else {
    Serial.println("Failed to read data from SHT30 sensor!");
  }

  delay(2000); // Wait 2 seconds before the next reading
}

Best Practices

  • Ensure proper decoupling capacitors (e.g., 0.1µF) are placed near the VCC pin to stabilize the power supply.
  • Avoid exposing the sensor to extreme conditions (e.g., condensation or high humidity for prolonged periods) to maintain accuracy.
  • Use a weatherproof enclosure if deploying the sensor outdoors.

Troubleshooting and FAQs

Common Issues

  1. Sensor Not Detected:

    • Ensure the correct I²C address (0x44 or 0x45) is used in the code.
    • Verify the SDA and SCL connections and check for proper pull-up resistors.
    • Confirm that the power supply voltage is within the specified range (2.4V to 5.5V).
  2. Incorrect Readings:

    • Check for environmental factors such as condensation or dust on the sensor.
    • Ensure the sensor is not placed near heat sources or in direct sunlight.
  3. Communication Errors:

    • Verify the I²C clock speed (typically 100kHz or 400kHz).
    • Check for loose or faulty wiring.

FAQs

Q: Can the SHT 30 operate at 5V logic levels?
A: Yes, the SHT 30 supports a supply voltage range of 2.4V to 5.5V, making it compatible with both 3.3V and 5V systems.

Q: How do I calibrate the SHT 30?
A: The SHT 30 is factory-calibrated and does not require additional calibration. However, ensure proper handling to maintain accuracy.

Q: Can I use the SHT 30 outdoors?
A: Yes, but it is recommended to use a weatherproof enclosure to protect the sensor from moisture and debris.

Q: What is the maximum cable length for I²C communication?
A: The maximum cable length depends on the pull-up resistor values and I²C clock speed. For typical setups, keep the cable length under 1 meter to ensure reliable communication.

By following this documentation, you can effectively integrate the SHT 30 sensor into your projects for accurate humidity and temperature measurements.