Cirkit Designer Logo
Cirkit Designer
Your all-in-one circuit design IDE
Home / 
Component Documentation

How to Use Adafruit Joy Bonnet: Examples, Pinouts, and Specs

Image of Adafruit Joy Bonnet
Cirkit Designer LogoDesign with Adafruit Joy Bonnet in Cirkit Designer

Introduction

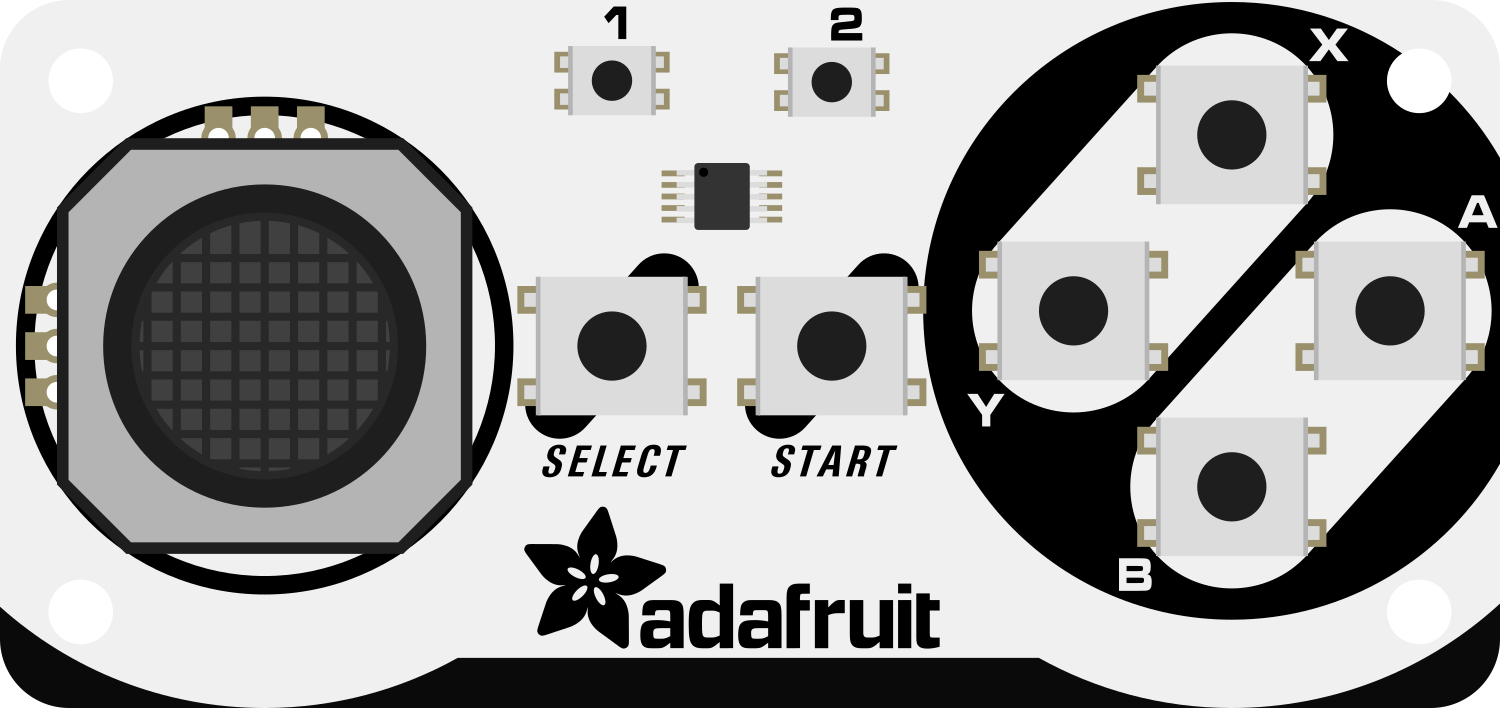
The Adafruit Joy Bonnet is a small, feature-packed game controller add-on for the Raspberry Pi Zero. It is designed to convert your Raspberry Pi Zero into a handheld game console, which can be used for playing retro games or for any DIY gaming project. The Joy Bonnet provides a classic gaming experience with its directional pad, multiple buttons, and an analog joystick.

Explore Projects Built with Adafruit Joy Bonnet

Use Cirkit Designer to design, explore, and prototype these projects online. Some projects support real-time simulation. Click "Open Project" to start designing instantly!
Raspberry Pi 4B-Based Multi-Sensor Interface Hub with GPS and GSM
Image of Rocket: A project utilizing Adafruit Joy Bonnet in a practical application
This circuit features a Raspberry Pi 4B interfaced with an IMX296 color global shutter camera, a Neo 6M GPS module, an Adafruit BMP388 barometric pressure sensor, an MPU-6050 accelerometer/gyroscope, and a Sim800l GSM module for cellular connectivity. Power management is handled by an MT3608 boost converter, which steps up the voltage from a Lipo battery, with a resettable fuse PTC and a 1N4007 diode for protection. The Adafruit Perma-Proto HAT is used for organizing connections and interfacing the sensors and modules with the Raspberry Pi via I2C and GPIO pins.
Cirkit Designer LogoOpen Project in Cirkit Designer
Battery-Powered Smart Sensor Hub with Adafruit QT Py RP2040
Image of wearable final: A project utilizing Adafruit Joy Bonnet in a practical application
This circuit features an Adafruit QT Py RP2040 microcontroller interfaced with an APDS9960 proximity sensor, an MPU6050 accelerometer and gyroscope, and an OLED display via I2C communication. It also includes a buzzer controlled by the microcontroller and is powered by a 3.7V LiPo battery with a toggle switch for power control.
Cirkit Designer LogoOpen Project in Cirkit Designer
Battery-Powered Smart Light with Proximity Sensor and OLED Display using Adafruit QT Py RP2040
Image of lab: A project utilizing Adafruit Joy Bonnet in a practical application
This circuit is a portable, battery-powered system featuring an Adafruit QT Py RP2040 microcontroller that interfaces with an OLED display, a proximity sensor, an accelerometer, and an RGB LED strip. The system is powered by a lithium-ion battery with a step-up boost converter to provide 5V for the LED strip, and it includes a toggle switch for power control. The microcontroller communicates with the sensors and display via I2C.
Cirkit Designer LogoOpen Project in Cirkit Designer
Arduino Nano-Based Remote Control System with Joystick and Bluetooth Connectivity
Image of camera beginnings: A project utilizing Adafruit Joy Bonnet in a practical application
This circuit features an Arduino Nano microcontroller interfaced with various input devices including a 2-axis joystick, pushbutton, rotary potentiometers, and an ADXL345 accelerometer. It also includes an HC-05 Bluetooth module for wireless communication and multiple LEDs for visual feedback, all powered by a 9V battery.
Cirkit Designer LogoOpen Project in Cirkit Designer

Explore Projects Built with Adafruit Joy Bonnet

Use Cirkit Designer to design, explore, and prototype these projects online. Some projects support real-time simulation. Click "Open Project" to start designing instantly!
Image of Rocket: A project utilizing Adafruit Joy Bonnet in a practical application
Raspberry Pi 4B-Based Multi-Sensor Interface Hub with GPS and GSM
This circuit features a Raspberry Pi 4B interfaced with an IMX296 color global shutter camera, a Neo 6M GPS module, an Adafruit BMP388 barometric pressure sensor, an MPU-6050 accelerometer/gyroscope, and a Sim800l GSM module for cellular connectivity. Power management is handled by an MT3608 boost converter, which steps up the voltage from a Lipo battery, with a resettable fuse PTC and a 1N4007 diode for protection. The Adafruit Perma-Proto HAT is used for organizing connections and interfacing the sensors and modules with the Raspberry Pi via I2C and GPIO pins.
Cirkit Designer LogoOpen Project in Cirkit Designer
Image of wearable final: A project utilizing Adafruit Joy Bonnet in a practical application
Battery-Powered Smart Sensor Hub with Adafruit QT Py RP2040
This circuit features an Adafruit QT Py RP2040 microcontroller interfaced with an APDS9960 proximity sensor, an MPU6050 accelerometer and gyroscope, and an OLED display via I2C communication. It also includes a buzzer controlled by the microcontroller and is powered by a 3.7V LiPo battery with a toggle switch for power control.
Cirkit Designer LogoOpen Project in Cirkit Designer
Image of lab: A project utilizing Adafruit Joy Bonnet in a practical application
Battery-Powered Smart Light with Proximity Sensor and OLED Display using Adafruit QT Py RP2040
This circuit is a portable, battery-powered system featuring an Adafruit QT Py RP2040 microcontroller that interfaces with an OLED display, a proximity sensor, an accelerometer, and an RGB LED strip. The system is powered by a lithium-ion battery with a step-up boost converter to provide 5V for the LED strip, and it includes a toggle switch for power control. The microcontroller communicates with the sensors and display via I2C.
Cirkit Designer LogoOpen Project in Cirkit Designer
Image of camera beginnings: A project utilizing Adafruit Joy Bonnet in a practical application
Arduino Nano-Based Remote Control System with Joystick and Bluetooth Connectivity
This circuit features an Arduino Nano microcontroller interfaced with various input devices including a 2-axis joystick, pushbutton, rotary potentiometers, and an ADXL345 accelerometer. It also includes an HC-05 Bluetooth module for wireless communication and multiple LEDs for visual feedback, all powered by a 9V battery.
Cirkit Designer LogoOpen Project in Cirkit Designer

Common Applications and Use Cases

  • Retro gaming emulation with platforms like RetroPie or Recalbox
  • DIY handheld gaming projects
  • Educational projects for learning game development and programming
  • Custom user interfaces for interactive installations

Technical Specifications

Key Technical Details

  • Compatibility: Raspberry Pi Zero (and other models with GPIO header)
  • Power Supply: 3.3V and 5V from Raspberry Pi GPIO
  • Interface: GPIO pins
  • Buttons: 6 momentary push buttons, 1 analog joystick, 1 directional pad

Pin Configuration and Descriptions

Pin Number Description Notes
1 3.3V Power supply for the joystick
6 Ground Common ground for all controls
11 Button A GPIO17
12 Button B GPIO18
13 Button X GPIO27
15 Button Y GPIO22
16 Button L GPIO23
18 Button R GPIO24
22 Button Start GPIO25
29 Button Select GPIO5
31 Joystick Button GPIO6
32 Joystick X-Axis Analog input
33 Joystick Y-Axis Analog input

Usage Instructions

How to Use the Component in a Circuit

  1. Mounting the Bonnet: Carefully align the pins of the Joy Bonnet with the GPIO header on the Raspberry Pi Zero and press down to connect.
  2. Software Configuration: Install the necessary software libraries and drivers to enable the Joy Bonnet. Adafruit provides a script that automatically sets up the Joy Bonnet for use.
  3. Testing: Once the software is installed, you can test the buttons and joystick using a GPIO input testing tool or by running a game that supports gamepad input.

Important Considerations and Best Practices

  • Power Supply: Ensure that your Raspberry Pi Zero is adequately powered; insufficient power can cause erratic behavior or system instability.
  • GPIO Access: The Joy Bonnet will occupy the GPIO pins; plan accordingly if you intend to use additional GPIO-based peripherals.
  • Physical Handling: When attaching or detaching the Joy Bonnet, handle it by the edges to avoid electrostatic discharge damage to the electronic components.

Troubleshooting and FAQs

Common Issues

  • Buttons Not Responding: Ensure that the Joy Bonnet is properly seated on the GPIO header. Check for any bent pins or obstructions.
  • Erratic Joystick Behavior: Calibrate the joystick through the software settings to ensure accurate readings.
  • Software Compatibility: Make sure you are using the latest version of the software and that it is compatible with your version of Raspberry Pi.

Solutions and Tips for Troubleshooting

  • Reboot the Raspberry Pi: Sometimes, a simple reboot can resolve issues with peripheral detection.
  • Check for Updates: Regularly update your Raspberry Pi's operating system and software packages to ensure compatibility and performance.
  • Review Wiring: Double-check the pin connections against the pinout diagram to ensure everything is connected correctly.

FAQs

Q: Can I use the Joy Bonnet with other Raspberry Pi models? A: Yes, the Joy Bonnet can be used with other Raspberry Pi models that have a compatible GPIO header.

Q: Do I need to install drivers for the Joy Bonnet? A: Yes, drivers and software libraries are required for the Joy Bonnet to function correctly. Adafruit provides an installation script for easy setup.

Q: How do I map the buttons for use in games? A: Button mapping can be configured within the game or emulator settings. The Adafruit script sets up common mappings, but these can be customized as needed.

Q: Is it possible to use the Joy Bonnet for projects other than gaming? A: Absolutely. The Joy Bonnet can be repurposed for any project that requires button inputs and joystick control.

For further assistance, visit the Adafruit forums or the Raspberry Pi community forums where fellow users and experts can provide support and advice.