Cirkit Designer Logo
Cirkit Designer
Your all-in-one circuit design IDE
Home / 
Component Documentation

How to Use MKE-S03 Photo Diode Light Sensor: Examples, Pinouts, and Specs

Image of MKE-S03 Photo Diode Light Sensor
Cirkit Designer LogoDesign with MKE-S03 Photo Diode Light Sensor in Cirkit Designer

Introduction

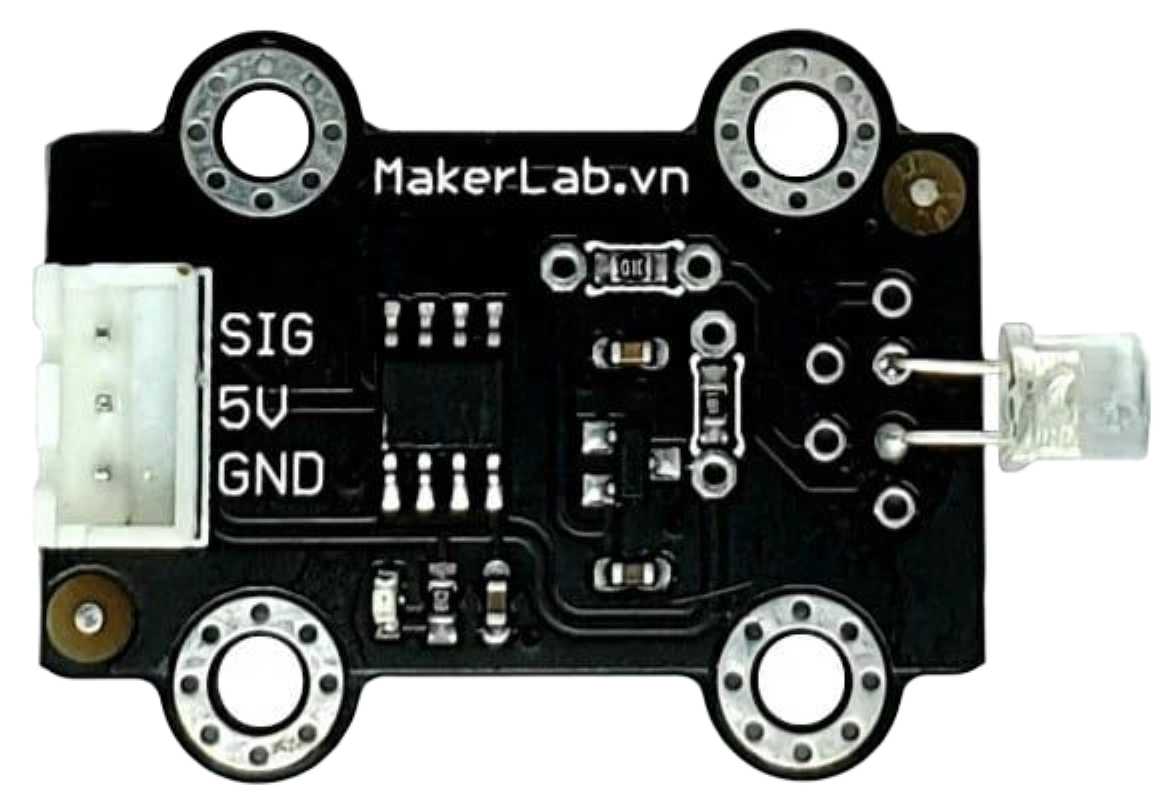
The MKE-S03 Photo Diode Light Sensor is an electronic component that detects light and converts it into an electrical signal. This sensor is widely used in applications that require the measurement of light intensity, such as in automatic lighting control systems, light meters, and optical communication systems. Its sensitivity to light makes it an ideal choice for projects that need to respond to changing light conditions.

Explore Projects Built with MKE-S03 Photo Diode Light Sensor

Use Cirkit Designer to design, explore, and prototype these projects online. Some projects support real-time simulation. Click "Open Project" to start designing instantly!
Arduino UNO-Based Smart Street Light Control with PIR and LDR Sensors
Image of street light: A project utilizing MKE-S03 Photo Diode Light Sensor in a practical application
This circuit is a street light control system using an Arduino UNO, LDR sensor, and two PIR sensors. The LDR sensor determines day or night, turning on three LEDs at night via a transistor switch, while the PIR sensors detect motion to activate an additional LED.
Cirkit Designer LogoOpen Project in Cirkit Designer
Arduino UNO-Based Smart Street Light Control with LDR and PIR Sensors
Image of Copy of street light: A project utilizing MKE-S03 Photo Diode Light Sensor in a practical application
This circuit is a street light control system using an Arduino UNO, LDR sensor, and two PIR sensors. The LDR sensor detects day or night to control three LEDs via a transistor switch, while the PIR sensors detect motion to turn on an additional LED for enhanced illumination.
Cirkit Designer LogoOpen Project in Cirkit Designer
Arduino UNO-Based Smart Street Light Control with LDR and PIR Sensors
Image of street light: A project utilizing MKE-S03 Photo Diode Light Sensor in a practical application
This circuit is a street light control system using an Arduino UNO, LDR sensor, PIR sensors, and LEDs. The LDR sensor detects day or night to control three LEDs via a transistor switch, while the PIR sensors detect motion to turn on an additional LED for enhanced illumination.
Cirkit Designer LogoOpen Project in Cirkit Designer
Arduino UNO-Based Smart Street Light Control with LDR and PIR Sensors
Image of street light: A project utilizing MKE-S03 Photo Diode Light Sensor in a practical application
This circuit is a street light control system using an Arduino UNO, LDR sensor, and two PIR sensors. The LDR sensor determines day or night to control three LEDs via a transistor switch, while the PIR sensors detect motion to turn on an additional LED for enhanced illumination.
Cirkit Designer LogoOpen Project in Cirkit Designer

Explore Projects Built with MKE-S03 Photo Diode Light Sensor

Use Cirkit Designer to design, explore, and prototype these projects online. Some projects support real-time simulation. Click "Open Project" to start designing instantly!
Image of street light: A project utilizing MKE-S03 Photo Diode Light Sensor in a practical application
Arduino UNO-Based Smart Street Light Control with PIR and LDR Sensors
This circuit is a street light control system using an Arduino UNO, LDR sensor, and two PIR sensors. The LDR sensor determines day or night, turning on three LEDs at night via a transistor switch, while the PIR sensors detect motion to activate an additional LED.
Cirkit Designer LogoOpen Project in Cirkit Designer
Image of Copy of street light: A project utilizing MKE-S03 Photo Diode Light Sensor in a practical application
Arduino UNO-Based Smart Street Light Control with LDR and PIR Sensors
This circuit is a street light control system using an Arduino UNO, LDR sensor, and two PIR sensors. The LDR sensor detects day or night to control three LEDs via a transistor switch, while the PIR sensors detect motion to turn on an additional LED for enhanced illumination.
Cirkit Designer LogoOpen Project in Cirkit Designer
Image of street light: A project utilizing MKE-S03 Photo Diode Light Sensor in a practical application
Arduino UNO-Based Smart Street Light Control with LDR and PIR Sensors
This circuit is a street light control system using an Arduino UNO, LDR sensor, PIR sensors, and LEDs. The LDR sensor detects day or night to control three LEDs via a transistor switch, while the PIR sensors detect motion to turn on an additional LED for enhanced illumination.
Cirkit Designer LogoOpen Project in Cirkit Designer
Image of street light: A project utilizing MKE-S03 Photo Diode Light Sensor in a practical application
Arduino UNO-Based Smart Street Light Control with LDR and PIR Sensors
This circuit is a street light control system using an Arduino UNO, LDR sensor, and two PIR sensors. The LDR sensor determines day or night to control three LEDs via a transistor switch, while the PIR sensors detect motion to turn on an additional LED for enhanced illumination.
Cirkit Designer LogoOpen Project in Cirkit Designer

Technical Specifications

Key Technical Details

  • Type: Photo Diode
  • Peak Sensitivity Wavelength: 940nm
  • Reverse Voltage: 32V (max)
  • Forward Current: 50mA (max)
  • Power Dissipation: 150mW (max)
  • Operating Temperature: -25°C to +85°C

Pin Configuration and Descriptions

Pin Number Name Description
1 Anode Connects to the positive supply voltage
2 Cathode Connects to the ground (GND)

Usage Instructions

How to Use the MKE-S03 in a Circuit

  1. Connecting the Sensor:

    • Connect the anode of the MKE-S03 to a positive voltage supply.
    • Connect the cathode to the ground (GND) of the circuit.
  2. Reading the Sensor:

    • The sensor's output is an analog voltage that is inversely proportional to the light intensity. This means that as the light intensity increases, the voltage across the sensor decreases.
    • To read the sensor's output, connect the cathode to an analog input pin of a microcontroller such as an Arduino UNO.
  3. Calibration:

    • Calibrate the sensor by measuring the output voltage in known lighting conditions to create a reference for future measurements.

Important Considerations and Best Practices

  • Avoid Exceeding Ratings: Ensure that the voltage and current do not exceed the specified maximum ratings to prevent damage to the sensor.
  • Ambient Light: Be aware of the ambient light in the environment as it can affect the readings.
  • Shielding: Use appropriate shielding to prevent exposure to strong light sources that could saturate the sensor.
  • Temperature Effects: Consider the operating temperature range and compensate for temperature variations if necessary.

Example Code for Arduino UNO

// Define the pin connected to the sensor
const int photoDiodePin = A0;

void setup() {
  // Initialize serial communication
  Serial.begin(9600);
}

void loop() {
  // Read the value from the photo diode
  int sensorValue = analogRead(photoDiodePin);
  
  // Convert the reading to voltage
  float voltage = sensorValue * (5.0 / 1023.0);
  
  // Print the voltage to the Serial Monitor
  Serial.print("Voltage: ");
  Serial.println(voltage);
  
  // Wait for a bit before reading again
  delay(500);
}

Troubleshooting and FAQs

Common Issues

  • Inconsistent Readings: If the sensor provides inconsistent readings, check for any sources of light interference and ensure stable power supply.
  • No Output Voltage: Ensure that the sensor is correctly connected with the anode to the positive supply and the cathode to the ground.

Solutions and Tips for Troubleshooting

  • Check Connections: Verify that all connections are secure and correct.
  • Use a Multimeter: Use a multimeter to check the voltage across the sensor in different lighting conditions.
  • Filtering: Implement software filtering techniques to smooth out the readings if necessary.

FAQs

Q: Can the MKE-S03 be used to detect the color of light? A: No, the MKE-S03 is a photo diode that is sensitive to light intensity, not color.

Q: What is the response time of the MKE-S03? A: The response time will vary based on the light intensity and conditions, but photo diodes typically have fast response times.

Q: How can I increase the sensitivity of the sensor? A: Sensitivity can be increased by using optical lenses to focus light onto the sensor or by adjusting the input voltage within the recommended range.

Q: Is it necessary to calibrate the sensor? A: Calibration is recommended for precise measurements, especially if the sensor is used in different lighting conditions or temperatures.