How to Use T42: Examples, Pinouts, and Specs
Introduction
The T42 is a versatile transistor commonly used in electronic circuits for switching and amplification purposes. As a semiconductor device, it can control the flow of current, making it an essential component in applications such as signal processing, power regulation, and digital logic circuits. Its reliability and efficiency make it a popular choice for both hobbyists and professionals in the field of electronics.
Explore Projects Built with T42


Explore Projects Built with T42
Common Applications
- Signal amplification in audio and RF circuits
- Switching operations in digital and power circuits
- Voltage regulation and current control
- Oscillator circuits and waveform generation
- Motor control and relay driving
Technical Specifications
The T42 transistor is designed to handle moderate power levels and is suitable for a wide range of applications. Below are its key technical details:
General Specifications
| Parameter | Value |
|---|---|
| Transistor Type | NPN |
| Maximum Collector Current (Ic) | 800 mA |
| Maximum Collector-Emitter Voltage (Vce) | 40 V |
| Maximum Base Current (Ib) | 200 mA |
| Power Dissipation (Ptot) | 500 mW |
| DC Current Gain (hFE) | 100 - 300 |
| Transition Frequency (fT) | 150 MHz |
| Package Type | TO-92 |
Pin Configuration
The T42 transistor is typically housed in a TO-92 package with three pins. The pinout is as follows:
| Pin Number | Name | Description |
|---|---|---|
| 1 | Collector (C) | Current flows out of this terminal. |
| 2 | Base (B) | Controls the transistor's operation. |
| 3 | Emitter (E) | Current flows into this terminal. |
Usage Instructions
The T42 transistor can be used in a variety of circuits for switching and amplification. Below are the steps and considerations for using it effectively:
Using the T42 in a Circuit
- Identify the Pins: Refer to the pin configuration table to correctly identify the Collector, Base, and Emitter pins.
- Biasing the Transistor:
- For switching applications, apply a sufficient base current (Ib) to turn the transistor fully on (saturation mode).
- For amplification, ensure the transistor operates in the active region by providing appropriate biasing resistors.
- Connect the Load:
- For switching, connect the load (e.g., an LED or motor) in series with the Collector pin.
- For amplification, connect the input signal to the Base pin through a coupling capacitor if needed.
- Power Supply: Ensure the supply voltage does not exceed the maximum Collector-Emitter Voltage (Vce) of 40 V.
Example: Using T42 with Arduino UNO
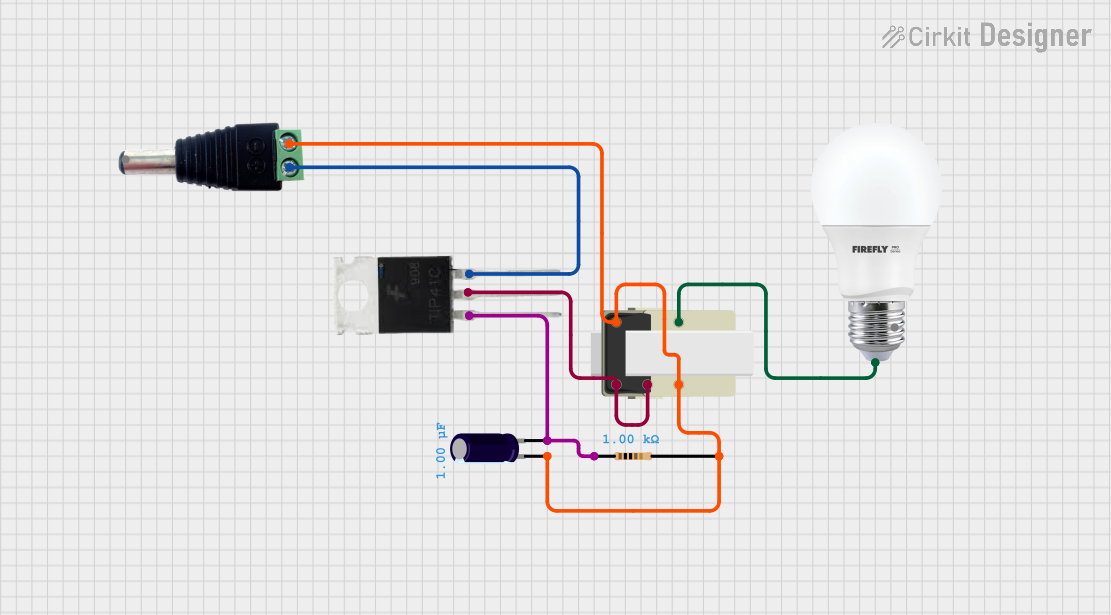
The T42 can be used to control a small DC motor with an Arduino UNO. Below is an example circuit and code:
Circuit Connections
- Connect the Emitter pin to ground.
- Connect the Collector pin to one terminal of the motor. The other terminal of the motor should be connected to the positive supply (e.g., 9V).
- Connect a 1 kΩ resistor between the Base pin and an Arduino digital pin (e.g., D9).
Arduino Code
// Example code to control a DC motor using the T42 transistor
const int motorPin = 9; // Pin connected to the Base of the T42 transistor

void setup() {
  pinMode(motorPin, OUTPUT); // Set the motor pin as an output
}

void loop() {
  digitalWrite(motorPin, HIGH); // Turn the motor ON
  delay(2000);                  // Keep the motor ON for 2 seconds
  digitalWrite(motorPin, LOW);  // Turn the motor OFF
  delay(2000);                  // Keep the motor OFF for 2 seconds
}
Best Practices
- Always use a base resistor to limit the base current and prevent damage to the transistor.
- Ensure the transistor operates within its maximum voltage and current ratings.
- Use a flyback diode across inductive loads (e.g., motors or relays) to protect the transistor from voltage spikes.
Troubleshooting and FAQs
Common Issues
Transistor Overheating:
- Cause: Exceeding the maximum power dissipation or improper heat sinking.
- Solution: Use a heat sink or ensure the transistor operates within its power limits.
No Output Current:
- Cause: Incorrect pin connections or insufficient base current.
- Solution: Double-check the pin configuration and ensure the base resistor is correctly calculated.
Signal Distortion in Amplification:
- Cause: Incorrect biasing or operating outside the active region.
- Solution: Adjust the biasing resistors to ensure proper operation in the active region.
FAQs
Q1: Can the T42 be used for high-power applications?
A1: No, the T42 is designed for moderate power levels with a maximum Collector current of 800 mA. For high-power applications, consider using a power transistor like the TIP120.
Q2: What is the purpose of the base resistor?
A2: The base resistor limits the current flowing into the Base pin, preventing damage to the transistor and ensuring proper operation.
Q3: Can the T42 be used in high-frequency circuits?
A3: Yes, the T42 has a transition frequency (fT) of 150 MHz, making it suitable for high-frequency applications like RF circuits.
By following the guidelines and best practices outlined in this documentation, you can effectively use the T42 transistor in your electronic projects.