Cirkit Designer Logo
Cirkit Designer
Your all-in-one circuit design IDE
Home / 
Component Documentation

How to Use NUCLEO-H533RE: Examples, Pinouts, and Specs

Image of NUCLEO-H533RE
Cirkit Designer LogoDesign with NUCLEO-H533RE in Cirkit Designer

Introduction

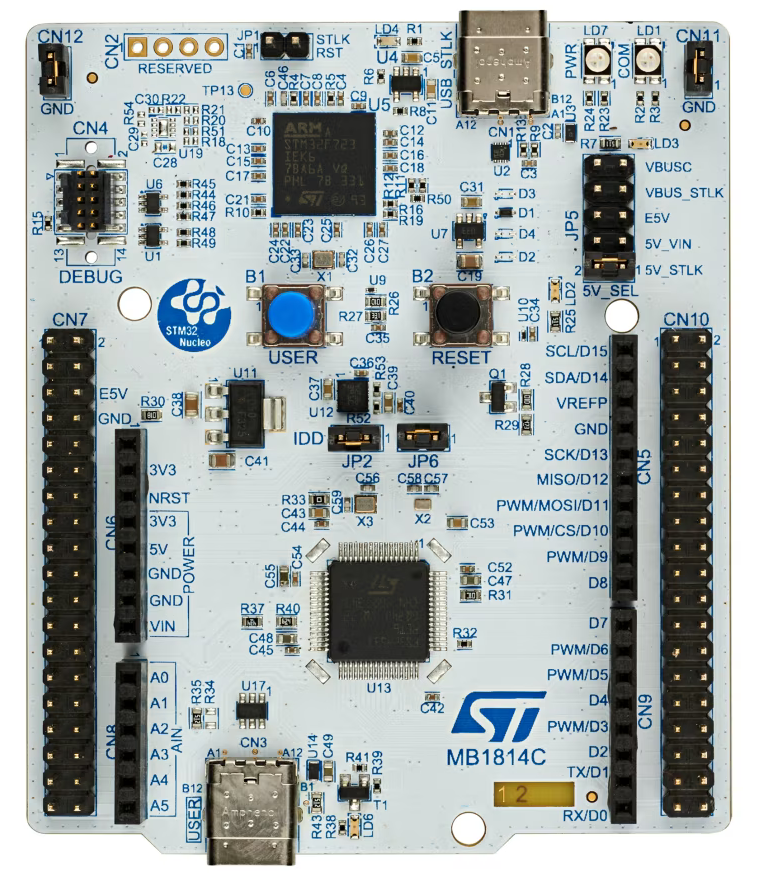
The NUCLEO-H533RE is a development board manufactured by STM32, featuring the powerful STM32H5 microcontroller. This board is designed for rapid prototyping and development of embedded applications, offering a wide range of features and connectivity options. It supports Arduino Uno V3 and ST morpho headers, making it compatible with a variety of expansion boards and shields. The NUCLEO-H533RE is ideal for applications requiring high performance, security, and flexibility.

Explore Projects Built with NUCLEO-H533RE

Use Cirkit Designer to design, explore, and prototype these projects online. Some projects support real-time simulation. Click "Open Project" to start designing instantly!
IoT-Enabled Environmental Monitoring System with NUCLEO-F303RE and ESP8266
Image of GAS LEAKAGE DETECTION: A project utilizing NUCLEO-H533RE in a practical application
This circuit features a NUCLEO-F303RE microcontroller board interfaced with various modules for sensing, actuation, and communication. It includes an MQ-2 gas sensor for detecting combustible gases, a buzzer for audible alerts, and a relay for controlling high-power devices. Additionally, the circuit uses an ESP8266 WiFi module for wireless connectivity and an I2C LCD display for user interface and data display.
Cirkit Designer LogoOpen Project in Cirkit Designer
WiFi-Enabled Environmental Monitoring System with Alert Notifications
Image of GAS LEAKAGE DETECTION: A project utilizing NUCLEO-H533RE in a practical application
This circuit features a NUCLEO-F303RE microcontroller board interfaced with several modules for sensing, actuation, and communication. It uses I2C communication to display data on an LCD screen, UART communication to interface with an ESP8266 WiFi module, and reads an MQ-2 gas sensor via an ADC pin. The microcontroller also controls a buzzer for audible alerts and a relay module for switching higher power loads, possibly in response to sensor readings or remote commands received over WiFi.
Cirkit Designer LogoOpen Project in Cirkit Designer
Nucleo 401RE Controlled Robotic Motor with Vibration Feedback and ADXL345 Accelerometer
Image of MLKIT: A project utilizing NUCLEO-H533RE in a practical application
This circuit features a Nucleo 401RE microcontroller as the central processing unit, interfacing with an ADXL345 accelerometer and an INA219 current sensor over an I2C bus for motion sensing and power monitoring, respectively. A DC motor with an encoder is driven by an L298N motor driver, with speed control potentially provided by a connected potentiometer and vibration feedback through a vibration motor. The system is powered by a 12V battery, with voltage regulation provided for the various components.
Cirkit Designer LogoOpen Project in Cirkit Designer
Battery-Powered Emergency Alert System with NUCLEO-F072RB, SIM800L, and GPS NEO 6M
Image of women safety: A project utilizing NUCLEO-H533RE in a practical application
This circuit is an emergency alert system that uses a NUCLEO-F072RB microcontroller to send SMS alerts and make calls via a SIM800L GSM module, while obtaining location data from a GPS NEO 6M module. The system is powered by a Li-ion battery and includes a TP4056 module for battery charging and protection, with a rocker switch to control power to the microcontroller.
Cirkit Designer LogoOpen Project in Cirkit Designer

Explore Projects Built with NUCLEO-H533RE

Use Cirkit Designer to design, explore, and prototype these projects online. Some projects support real-time simulation. Click "Open Project" to start designing instantly!
Image of GAS LEAKAGE DETECTION: A project utilizing NUCLEO-H533RE in a practical application
IoT-Enabled Environmental Monitoring System with NUCLEO-F303RE and ESP8266
This circuit features a NUCLEO-F303RE microcontroller board interfaced with various modules for sensing, actuation, and communication. It includes an MQ-2 gas sensor for detecting combustible gases, a buzzer for audible alerts, and a relay for controlling high-power devices. Additionally, the circuit uses an ESP8266 WiFi module for wireless connectivity and an I2C LCD display for user interface and data display.
Cirkit Designer LogoOpen Project in Cirkit Designer
Image of GAS LEAKAGE DETECTION: A project utilizing NUCLEO-H533RE in a practical application
WiFi-Enabled Environmental Monitoring System with Alert Notifications
This circuit features a NUCLEO-F303RE microcontroller board interfaced with several modules for sensing, actuation, and communication. It uses I2C communication to display data on an LCD screen, UART communication to interface with an ESP8266 WiFi module, and reads an MQ-2 gas sensor via an ADC pin. The microcontroller also controls a buzzer for audible alerts and a relay module for switching higher power loads, possibly in response to sensor readings or remote commands received over WiFi.
Cirkit Designer LogoOpen Project in Cirkit Designer
Image of MLKIT: A project utilizing NUCLEO-H533RE in a practical application
Nucleo 401RE Controlled Robotic Motor with Vibration Feedback and ADXL345 Accelerometer
This circuit features a Nucleo 401RE microcontroller as the central processing unit, interfacing with an ADXL345 accelerometer and an INA219 current sensor over an I2C bus for motion sensing and power monitoring, respectively. A DC motor with an encoder is driven by an L298N motor driver, with speed control potentially provided by a connected potentiometer and vibration feedback through a vibration motor. The system is powered by a 12V battery, with voltage regulation provided for the various components.
Cirkit Designer LogoOpen Project in Cirkit Designer
Image of women safety: A project utilizing NUCLEO-H533RE in a practical application
Battery-Powered Emergency Alert System with NUCLEO-F072RB, SIM800L, and GPS NEO 6M
This circuit is an emergency alert system that uses a NUCLEO-F072RB microcontroller to send SMS alerts and make calls via a SIM800L GSM module, while obtaining location data from a GPS NEO 6M module. The system is powered by a Li-ion battery and includes a TP4056 module for battery charging and protection, with a rocker switch to control power to the microcontroller.
Cirkit Designer LogoOpen Project in Cirkit Designer

Common Applications and Use Cases

  • IoT (Internet of Things) devices
  • Industrial automation
  • Robotics and motor control
  • Data acquisition systems
  • Prototyping for consumer electronics
  • Educational and research projects

Technical Specifications

Key Technical Details

Parameter Specification
Microcontroller STM32H503RCT6 (ARM Cortex-M33, 32-bit, 250 MHz)
Flash Memory 256 KB
RAM 128 KB
Operating Voltage 3.3V
Input Voltage (VIN) 7V to 12V (via external power supply)
USB Supply Voltage 5V (via USB connection)
GPIO Pins 50+
Communication Interfaces UART, I2C, SPI, CAN, USB
Debugging Interface ST-LINK/V3 embedded debugger
Expansion Compatibility Arduino Uno V3 and ST morpho headers
Dimensions 68.6 mm x 53.3 mm

Pin Configuration and Descriptions

Arduino Uno V3 Header Pinout

Pin Name Functionality Description
A0-A5 Analog Input 12-bit ADC channels
D0-D13 Digital I/O General-purpose digital pins
PWM Pins D3, D5, D6, D9, D10, D11 PWM output for motor control, LEDs, etc.
5V Power Output 5V output from USB or external supply
3.3V Power Output 3.3V regulated output
GND Ground Common ground
VIN Power Input External power supply input (7-12V)

ST Morpho Header Pinout (Partial)

Pin Name Functionality Description
PA0-PA15 GPIO, ADC, PWM, Alternate Func Configurable for multiple functions
PB0-PB15 GPIO, ADC, PWM, Alternate Func Configurable for multiple functions
PC0-PC15 GPIO, ADC, PWM, Alternate Func Configurable for multiple functions

Usage Instructions

How to Use the NUCLEO-H533RE in a Circuit

  1. Powering the Board:

    • Connect the board to your computer via the USB Type-A to Micro-B cable for power and programming.
    • Alternatively, use an external power supply (7-12V) connected to the VIN pin.
  2. Programming the Board:

    • Install the STM32CubeIDE or Arduino IDE (with STM32 core support).
    • Connect the board to your computer via USB.
    • Select the appropriate board and port in your IDE.
    • Write your code and upload it to the board.
  3. Connecting Peripherals:

    • Use the Arduino Uno V3 headers for shields or the ST morpho headers for custom peripherals.
    • Ensure proper voltage levels and pin configurations for connected devices.
  4. Debugging:

    • Use the ST-LINK/V3 embedded debugger for real-time debugging and programming.

Important Considerations and Best Practices

  • Ensure the input voltage does not exceed the specified range (7-12V for VIN).
  • Avoid drawing excessive current from the GPIO pins (maximum 25 mA per pin).
  • Use proper decoupling capacitors when connecting external components to reduce noise.
  • Always check the pin configuration and alternate functions in the STM32H5 datasheet before use.

Example Code for Arduino IDE

Below is an example code to blink an LED connected to pin D13:

// Blink an LED on pin D13 (onboard LED)

// Define the LED pin
const int ledPin = 13;

void setup() {
  // Set the LED pin as an output
  pinMode(ledPin, OUTPUT);
}

void loop() {
  // Turn the LED on
  digitalWrite(ledPin, HIGH);
  delay(1000); // Wait for 1 second

  // Turn the LED off
  digitalWrite(ledPin, LOW);
  delay(1000); // Wait for 1 second
}

Troubleshooting and FAQs

Common Issues and Solutions

  1. Board Not Detected by IDE:

    • Ensure the USB cable is properly connected and functional.
    • Install the required drivers for the ST-LINK/V3 debugger.
    • Verify that the correct board and port are selected in the IDE.
  2. Code Upload Fails:

    • Check the power supply and ensure the board is powered on.
    • Press the reset button on the board and try uploading again.
    • Ensure no other application is using the COM port.
  3. Peripherals Not Working:

    • Double-check the pin connections and configurations.
    • Verify that the peripheral is compatible with the board's voltage levels.
    • Use a multimeter to check for continuity and proper power supply.

FAQs

Q: Can I use the NUCLEO-H533RE with the Arduino IDE?
A: Yes, the board is compatible with the Arduino IDE. Install the STM32 core to enable support.

Q: What is the maximum clock speed of the STM32H5 microcontroller?
A: The STM32H5 microcontroller operates at a maximum clock speed of 250 MHz.

Q: How do I reset the board?
A: Press the reset button located on the board to perform a hardware reset.

Q: Can I power the board using only the USB connection?
A: Yes, the board can be powered via the USB connection, which provides 5V.

Q: Is the NUCLEO-H533RE suitable for low-power applications?
A: Yes, the STM32H5 microcontroller includes power-saving modes, making it suitable for low-power applications.