
How to Use 220V to 12V Transformer: Examples, Pinouts, and Specs
 Design with 220V to 12V Transformer in Cirkit Designer
Introduction
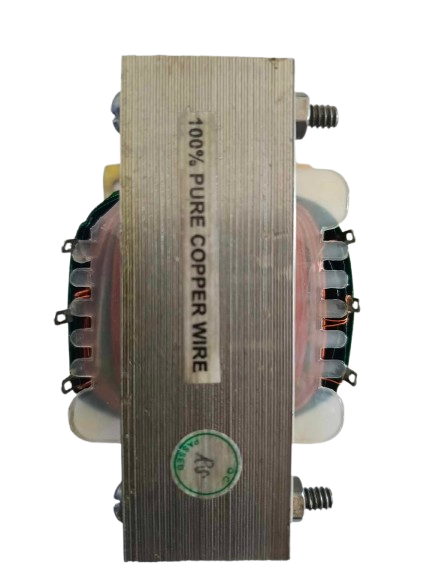
The 220V to 12V Transformer by Tamagawa is a step-down transformer designed to convert high-voltage alternating current (AC) from 220V to a safer, lower voltage of 12V AC. This component is widely used in power supply circuits for electronic devices, lighting systems, and low-voltage appliances. Its robust design ensures reliable performance in both residential and industrial applications.
Explore Projects Built with 220V to 12V Transformer
 Open Project in Cirkit Designer
 Open Project in Cirkit Designer
 Open Project in Cirkit Designer
 Open Project in Cirkit Designer
Explore Projects Built with 220V to 12V Transformer
Open Project in Cirkit DesignerOpen Project in Cirkit DesignerOpen Project in Cirkit DesignerOpen Project in Cirkit DesignerCommon Applications
- Power supplies for low-voltage devices
- LED lighting systems
- Battery chargers
- Home automation systems
- Industrial control panels
Technical Specifications
Below are the key technical details of the Tamagawa 220V to 12V Transformer:
| Parameter | Specification |
|---|---|
| Input Voltage | 220V AC ±10% |
| Output Voltage | 12V AC ±5% |
| Frequency | 50Hz / 60Hz |
| Power Rating | 24W (or as specified by the model) |
| Efficiency | ≥ 90% |
| Insulation Resistance | ≥ 100MΩ |
| Operating Temperature | -10°C to 50°C |
| Dimensions | Varies by model (e.g., 70mm x 50mm x 40mm) |
| Weight | Approx. 300g (varies by model) |
Pin Configuration and Descriptions
The transformer typically has four terminals, as described below:
| Pin | Label | Description |
|---|---|---|
| 1 | Input Live (L) | Connects to the live wire of the 220V AC input. |
| 2 | Input Neutral (N) | Connects to the neutral wire of the 220V AC input. |
| 3 | Output 12V (AC) | Provides the 12V AC output. |
| 4 | Output Ground | Ground connection for the 12V AC output. |
Note: Always verify the pin configuration on the specific model, as it may vary slightly.
Usage Instructions
How to Use the Transformer in a Circuit
Input Connection:
- Connect the live (L) and neutral (N) wires of the 220V AC mains supply to the input terminals of the transformer.
- Ensure proper insulation and secure connections to avoid electrical hazards.
Output Connection:
- Connect the output terminals to the load requiring 12V AC. For example, this could be a rectifier circuit if DC voltage is needed.
- Use appropriate wire gauges to handle the current drawn by the load.
Mounting:
- Secure the transformer to a stable surface using screws or brackets.
- Ensure adequate ventilation to prevent overheating.
Important Considerations and Best Practices
- Safety First: Always disconnect the transformer from the mains supply before making any connections or modifications.
- Fuse Protection: Use a fuse on the input side to protect against overcurrent or short circuits.
- Load Matching: Ensure the connected load does not exceed the transformer's power rating.
- Grounding: Properly ground the transformer to minimize electrical noise and enhance safety.
- Testing: Use a multimeter to verify the output voltage before connecting sensitive devices.
Example: Using the Transformer with an Arduino UNO
If you need to power an Arduino UNO using this transformer, you will first need to convert the 12V AC output to 12V DC using a rectifier and voltage regulator circuit. Below is an example of Arduino code to read an analog sensor powered by the transformer:
// Example Arduino code to read an analog sensor
// Ensure the transformer output is rectified and regulated to 12V DC
// before connecting to the Arduino's power input.

const int sensorPin = A0;  // Analog pin connected to the sensor
int sensorValue = 0;       // Variable to store the sensor reading

void setup() {
  Serial.begin(9600);      // Initialize serial communication at 9600 baud
}

void loop() {
  sensorValue = analogRead(sensorPin);  // Read the sensor value
  Serial.print("Sensor Value: ");       // Print the sensor value to the serial monitor
  Serial.println(sensorValue);
  delay(1000);                          // Wait for 1 second before the next reading
}
Note: Ensure the Arduino's input voltage is within its operating range (7-12V DC) after rectification and regulation.
Troubleshooting and FAQs
Common Issues and Solutions
No Output Voltage:
- Cause: Loose or incorrect connections.
- Solution: Double-check all connections and ensure the input voltage is present.
Overheating:
- Cause: Overloading the transformer or insufficient ventilation.
- Solution: Reduce the load or improve airflow around the transformer.
Voltage Drop:
- Cause: Excessive load or long output wires.
- Solution: Use thicker wires and ensure the load is within the transformer's power rating.
Humming Noise:
- Cause: Loose laminations or mounting.
- Solution: Tighten the mounting screws and ensure the transformer is securely fixed.
FAQs
Q1: Can this transformer be used with DC input?
A1: No, this transformer is designed for AC input only. Using DC input will damage the transformer.
Q2: Can I use this transformer to power a 12V DC device?
A2: Yes, but you will need to add a rectifier and voltage regulator circuit to convert the 12V AC output to 12V DC.
Q3: What happens if I connect a load exceeding the power rating?
A3: The transformer may overheat, and its lifespan will be significantly reduced. Always ensure the load is within the specified power rating.
Q4: Is the transformer waterproof?
A4: No, this transformer is not waterproof. Use it in a dry environment or within a protective enclosure.
By following this documentation, you can safely and effectively use the Tamagawa 220V to 12V Transformer in your projects.