Cirkit Designer Logo
Cirkit Designer
Your all-in-one circuit design IDE
Home / 
Component Documentation

How to Use Convertisseur AC/DC LM100-23B12R2: Examples, Pinouts, and Specs

Image of Convertisseur AC/DC LM100-23B12R2
Cirkit Designer LogoDesign with Convertisseur AC/DC LM100-23B12R2 in Cirkit Designer

Introduction

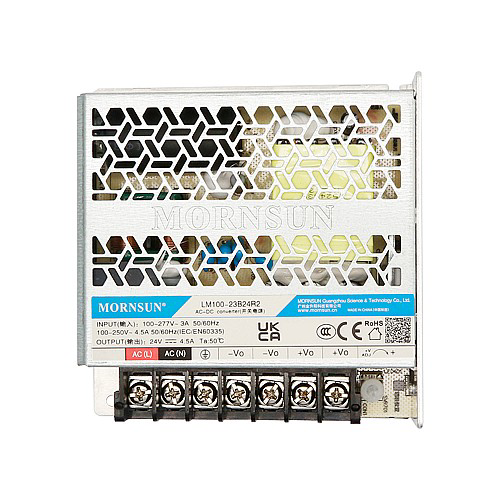
The LM100-23B12R2 is an AC/DC power converter manufactured by Mornsun. This component is designed to transform alternating current (AC) to direct current (DC) with a specific output voltage and current rating. It is suitable for a wide range of electronic applications, including industrial automation, instrumentation, and consumer electronics.

Explore Projects Built with Convertisseur AC/DC LM100-23B12R2

Use Cirkit Designer to design, explore, and prototype these projects online. Some projects support real-time simulation. Click "Open Project" to start designing instantly!
Raspberry Pi Pico Controlled Smart Relay System with Emergency Stop
Image of Labo power: A project utilizing Convertisseur AC/DC LM100-23B12R2 in a practical application
This circuit converts 120V AC power from an outlet to a regulated DC voltage using an AC/DC converter and a DC/DC converter. It includes a Raspberry Pi Pico microcontroller connected to an 8-channel relay module for controlling various devices, with an emergency stop button integrated for safety.
Cirkit Designer LogoOpen Project in Cirkit Designer
240V to 12V Power Conversion Circuit with Stopkontak
Image of daya PLN: A project utilizing Convertisseur AC/DC LM100-23B12R2 in a practical application
This circuit converts a 240V AC power source to a 12V DC output using a 12V adapter. The 240V AC power source is connected to a stopkontak, which then supplies the 12V adapter with the necessary AC voltage to produce a 12V DC output.
Cirkit Designer LogoOpen Project in Cirkit Designer
Battery-Powered Motor Control with Voltage Monitoring and LED Indicator
Image of ckt: A project utilizing Convertisseur AC/DC LM100-23B12R2 in a practical application
This circuit converts AC power to DC using a bridge rectifier to drive a 12V geared motor. It also includes a TP4056 module for charging a 3.7V battery, monitored by a mini digital volt/ammeter, and an LED indicator for power status.
Cirkit Designer LogoOpen Project in Cirkit Designer
Modular Power Distribution System with Multiple SMPS Units and 120V Outlet
Image of Cellion-Tesla: A project utilizing Convertisseur AC/DC LM100-23B12R2 in a practical application
This circuit is designed to convert 240V AC power to both 12V and 24V DC outputs using multiple SMPS units. Terminal blocks are used to organize and distribute the power, while a 120V outlet provides additional AC power access. The circuit is likely used for powering various electronic devices that require different voltage levels.
Cirkit Designer LogoOpen Project in Cirkit Designer

Explore Projects Built with Convertisseur AC/DC LM100-23B12R2

Use Cirkit Designer to design, explore, and prototype these projects online. Some projects support real-time simulation. Click "Open Project" to start designing instantly!
Image of Labo power: A project utilizing Convertisseur AC/DC LM100-23B12R2 in a practical application
Raspberry Pi Pico Controlled Smart Relay System with Emergency Stop
This circuit converts 120V AC power from an outlet to a regulated DC voltage using an AC/DC converter and a DC/DC converter. It includes a Raspberry Pi Pico microcontroller connected to an 8-channel relay module for controlling various devices, with an emergency stop button integrated for safety.
Cirkit Designer LogoOpen Project in Cirkit Designer
Image of daya PLN: A project utilizing Convertisseur AC/DC LM100-23B12R2 in a practical application
240V to 12V Power Conversion Circuit with Stopkontak
This circuit converts a 240V AC power source to a 12V DC output using a 12V adapter. The 240V AC power source is connected to a stopkontak, which then supplies the 12V adapter with the necessary AC voltage to produce a 12V DC output.
Cirkit Designer LogoOpen Project in Cirkit Designer
Image of ckt: A project utilizing Convertisseur AC/DC LM100-23B12R2 in a practical application
Battery-Powered Motor Control with Voltage Monitoring and LED Indicator
This circuit converts AC power to DC using a bridge rectifier to drive a 12V geared motor. It also includes a TP4056 module for charging a 3.7V battery, monitored by a mini digital volt/ammeter, and an LED indicator for power status.
Cirkit Designer LogoOpen Project in Cirkit Designer
Image of Cellion-Tesla: A project utilizing Convertisseur AC/DC LM100-23B12R2 in a practical application
Modular Power Distribution System with Multiple SMPS Units and 120V Outlet
This circuit is designed to convert 240V AC power to both 12V and 24V DC outputs using multiple SMPS units. Terminal blocks are used to organize and distribute the power, while a 120V outlet provides additional AC power access. The circuit is likely used for powering various electronic devices that require different voltage levels.
Cirkit Designer LogoOpen Project in Cirkit Designer

Common Applications and Use Cases

  • Industrial Automation: Powering control systems and sensors.
  • Instrumentation: Providing stable DC power for measurement devices.
  • Consumer Electronics: Supplying power to various household electronic devices.
  • Embedded Systems: Powering microcontrollers and other digital circuits.

Technical Specifications

Key Technical Details

Parameter Value
Input Voltage Range 85-264V AC / 120-370V DC
Output Voltage 12V DC
Output Current 8.33A
Output Power 100W
Efficiency 91%
Operating Temperature -40°C to +70°C
Storage Temperature -40°C to +85°C
Isolation Voltage 3000V AC
Dimensions 127.0 x 76.2 x 30.0 mm
Weight 300g

Pin Configuration and Descriptions

Pin Number Pin Name Description
1 AC(L) AC Line Input
2 AC(N) AC Neutral Input
3 +Vout Positive DC Output
4 -Vout Negative DC Output (Ground)
5 FG Frame Ground (Chassis Ground)

Usage Instructions

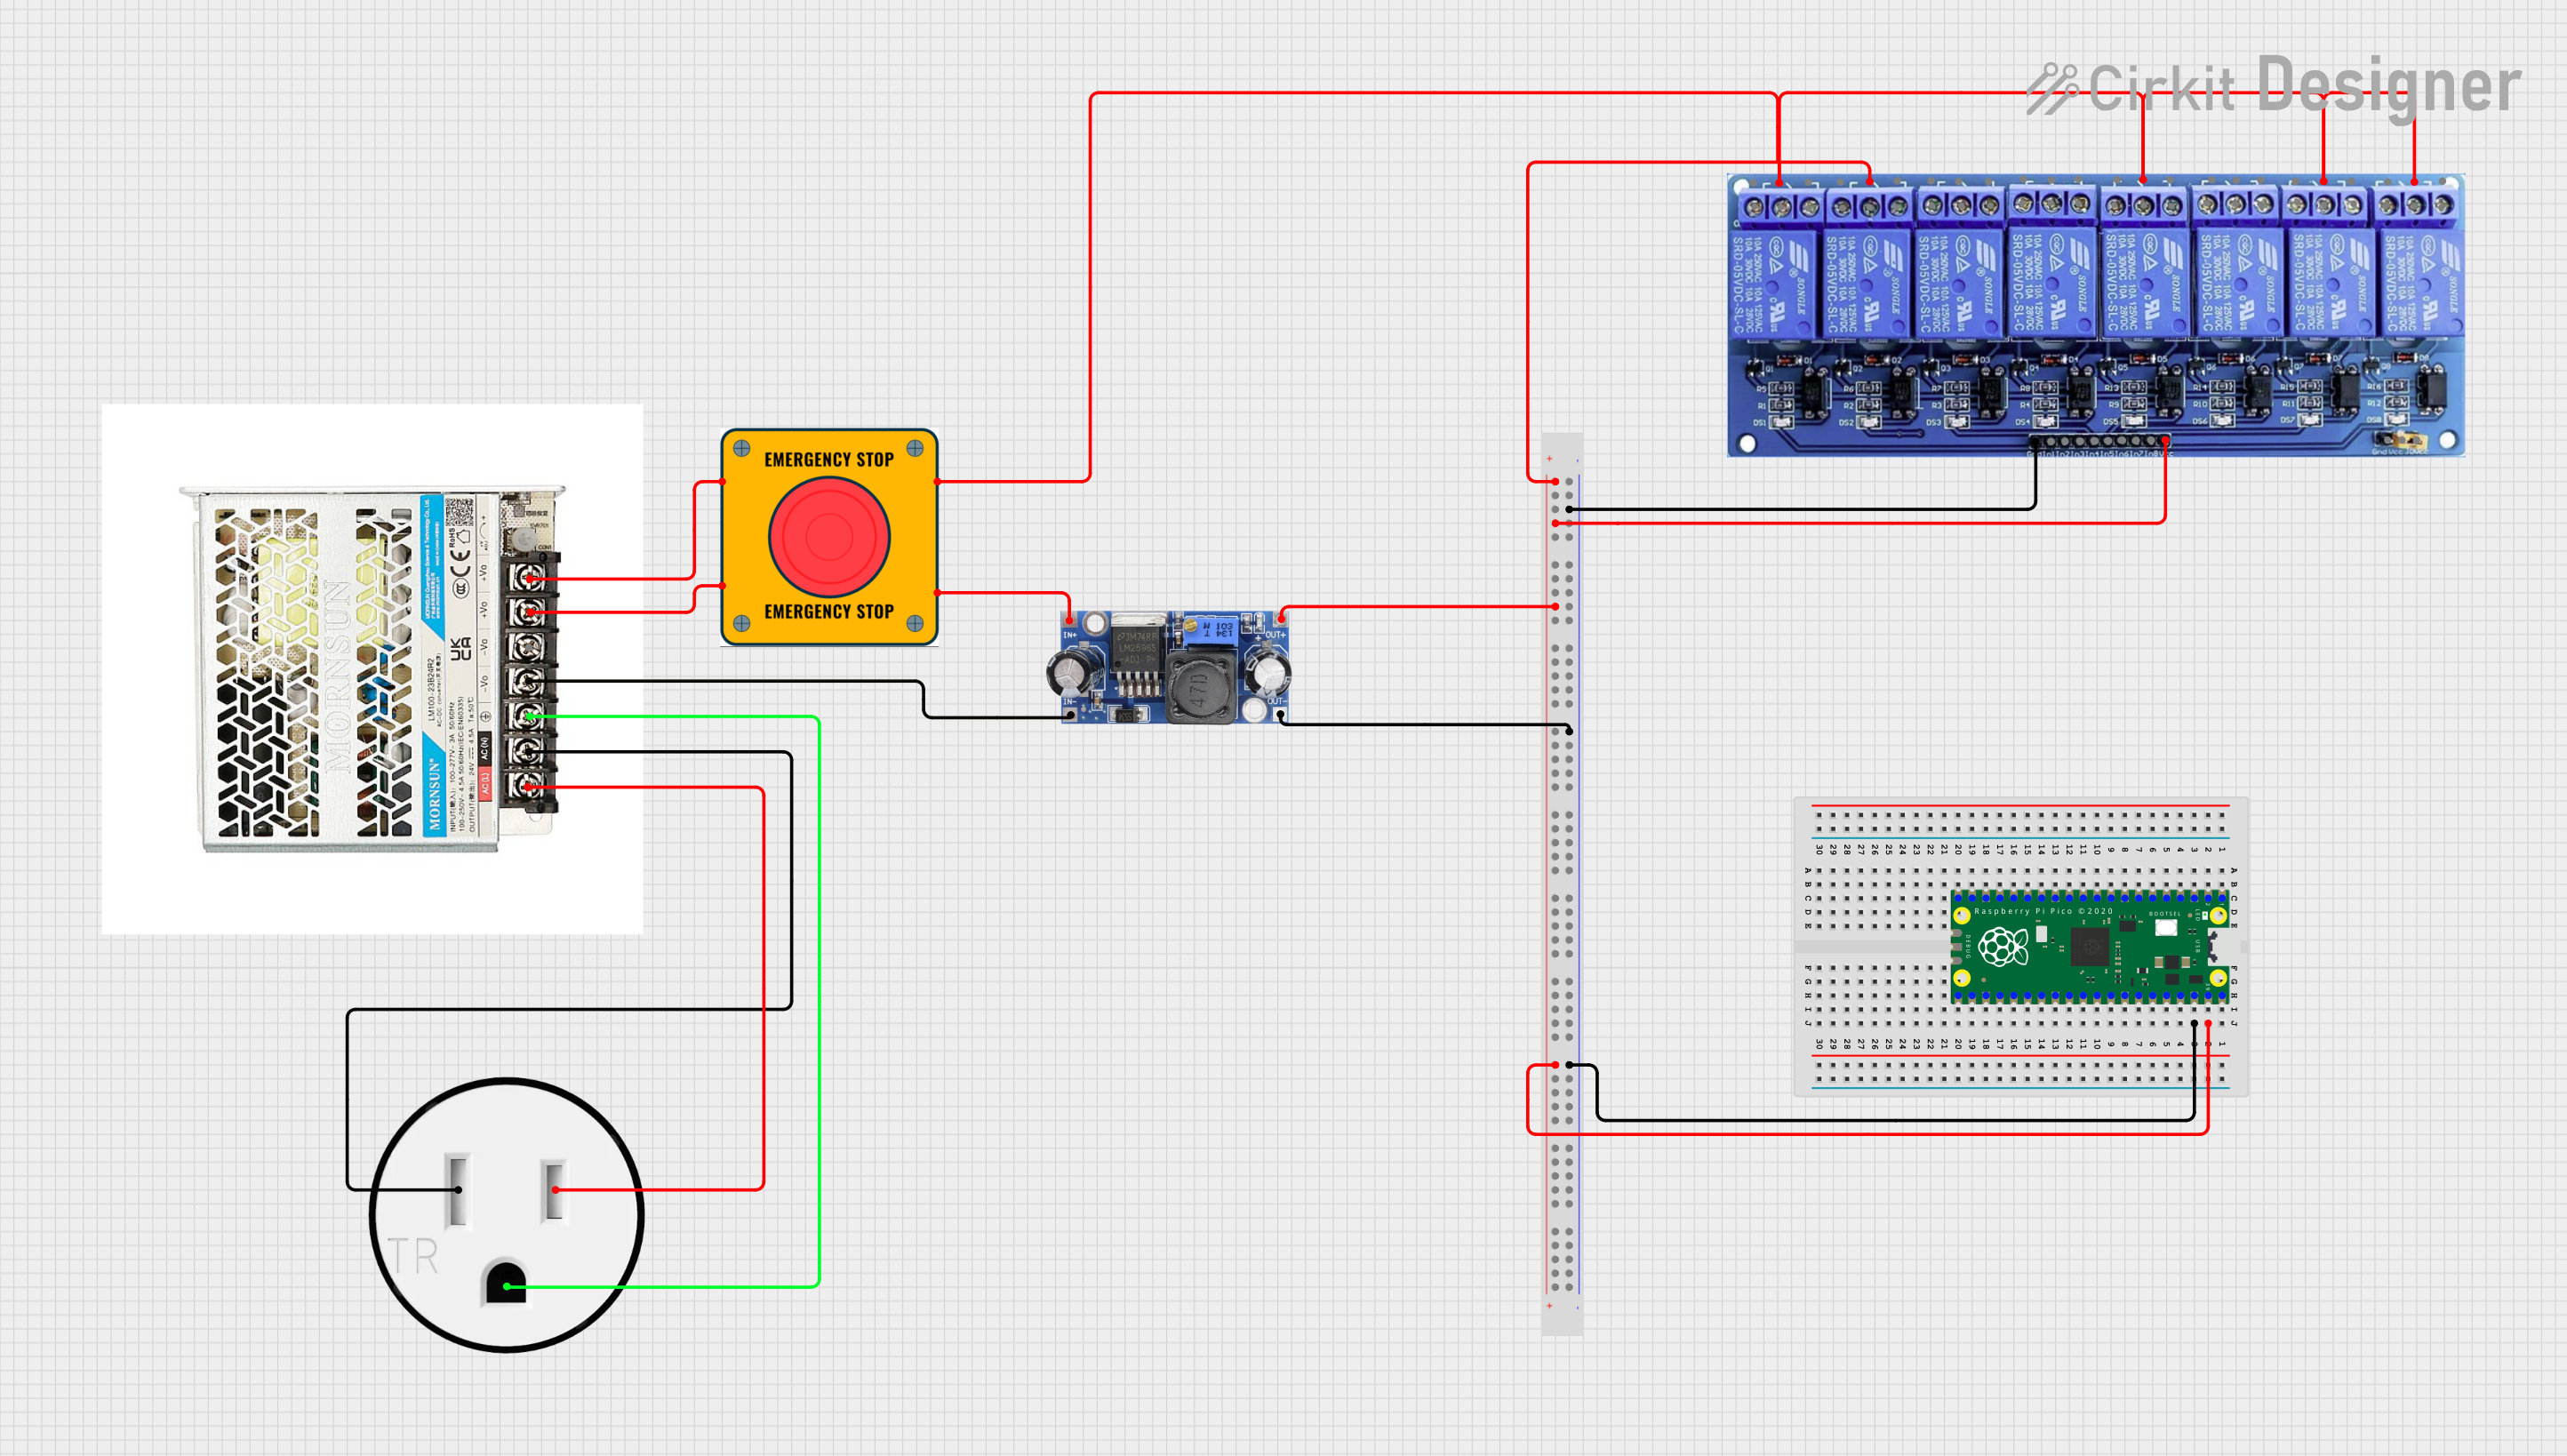
How to Use the Component in a Circuit

  1. Connection to AC Source:

    • Connect the AC(L) pin to the live wire of the AC source.
    • Connect the AC(N) pin to the neutral wire of the AC source.
  2. DC Output Connection:

    • Connect the +Vout pin to the positive terminal of the load.
    • Connect the -Vout pin to the negative terminal (ground) of the load.
  3. Frame Ground:

    • Connect the FG pin to the chassis or earth ground for safety.

Important Considerations and Best Practices

  • Heat Dissipation: Ensure adequate ventilation or heat sinking to maintain the operating temperature within the specified range.
  • Overload Protection: Use appropriate fuses or circuit breakers to protect against overcurrent conditions.
  • Isolation: Maintain proper isolation between the AC input and DC output to prevent electrical hazards.
  • Mounting: Securely mount the converter to avoid mechanical stress and vibrations.

Troubleshooting and FAQs

Common Issues Users Might Face

  1. No Output Voltage:

    • Possible Cause: No AC input or incorrect wiring.
    • Solution: Verify the AC input connections and ensure the AC source is active.
  2. Overheating:

    • Possible Cause: Inadequate ventilation or excessive load.
    • Solution: Improve ventilation, reduce the load, or add a heat sink.
  3. Output Voltage Fluctuations:

    • Possible Cause: Unstable AC input or load variations.
    • Solution: Ensure a stable AC input and check for consistent load conditions.

Solutions and Tips for Troubleshooting

  • Check Connections: Ensure all connections are secure and correct.
  • Measure Input and Output: Use a multimeter to measure the AC input and DC output voltages.
  • Inspect for Damage: Look for any visible signs of damage or overheating on the converter.
  • Consult Datasheet: Refer to the manufacturer's datasheet for detailed specifications and guidelines.

Example Code for Arduino UNO

If you are using the LM100-23B12R2 to power an Arduino UNO, here is a simple example code to blink an LED:

// Pin 13 has an LED connected on most Arduino boards.
const int ledPin = 13;

// The setup function runs once when you press reset or power the board.
void setup() {
  // Initialize the digital pin as an output.
  pinMode(ledPin, OUTPUT);
}

// The loop function runs over and over again forever.
void loop() {
  digitalWrite(ledPin, HIGH);   // Turn the LED on (HIGH is the voltage level).
  delay(1000);                  // Wait for a second.
  digitalWrite(ledPin, LOW);    // Turn the LED off by making the voltage LOW.
  delay(1000);                  // Wait for a second.
}

This code will blink the LED connected to pin 13 of the Arduino UNO, powered by the LM100-23B12R2 AC/DC converter.


This documentation provides a comprehensive overview of the LM100-23B12R2 AC/DC power converter, including its technical specifications, usage instructions, and troubleshooting tips. Whether you are a beginner or an experienced user, this guide will help you effectively utilize this component in your electronic projects.