Cirkit Designer
Your all-in-one circuit design IDE
Home /
Component Documentation
How to Use AAA x2: Examples, Pinouts, and Specs
Introduction
- The AAA x2 configuration refers to two AAA batteries connected in series or parallel, commonly used in portable electronic devices. Each AAA battery provides a nominal voltage of 1.5V, resulting in a combined voltage of 3V when connected in series or maintaining 1.5V with increased capacity when connected in parallel.
- These batteries are widely used in remote controls, flashlights, toys, wireless mice, and other low-power devices due to their compact size and reliable performance.
Explore Projects Built with AAA x2
Battery-Powered Dual DC Motor Control System with IR Sensors
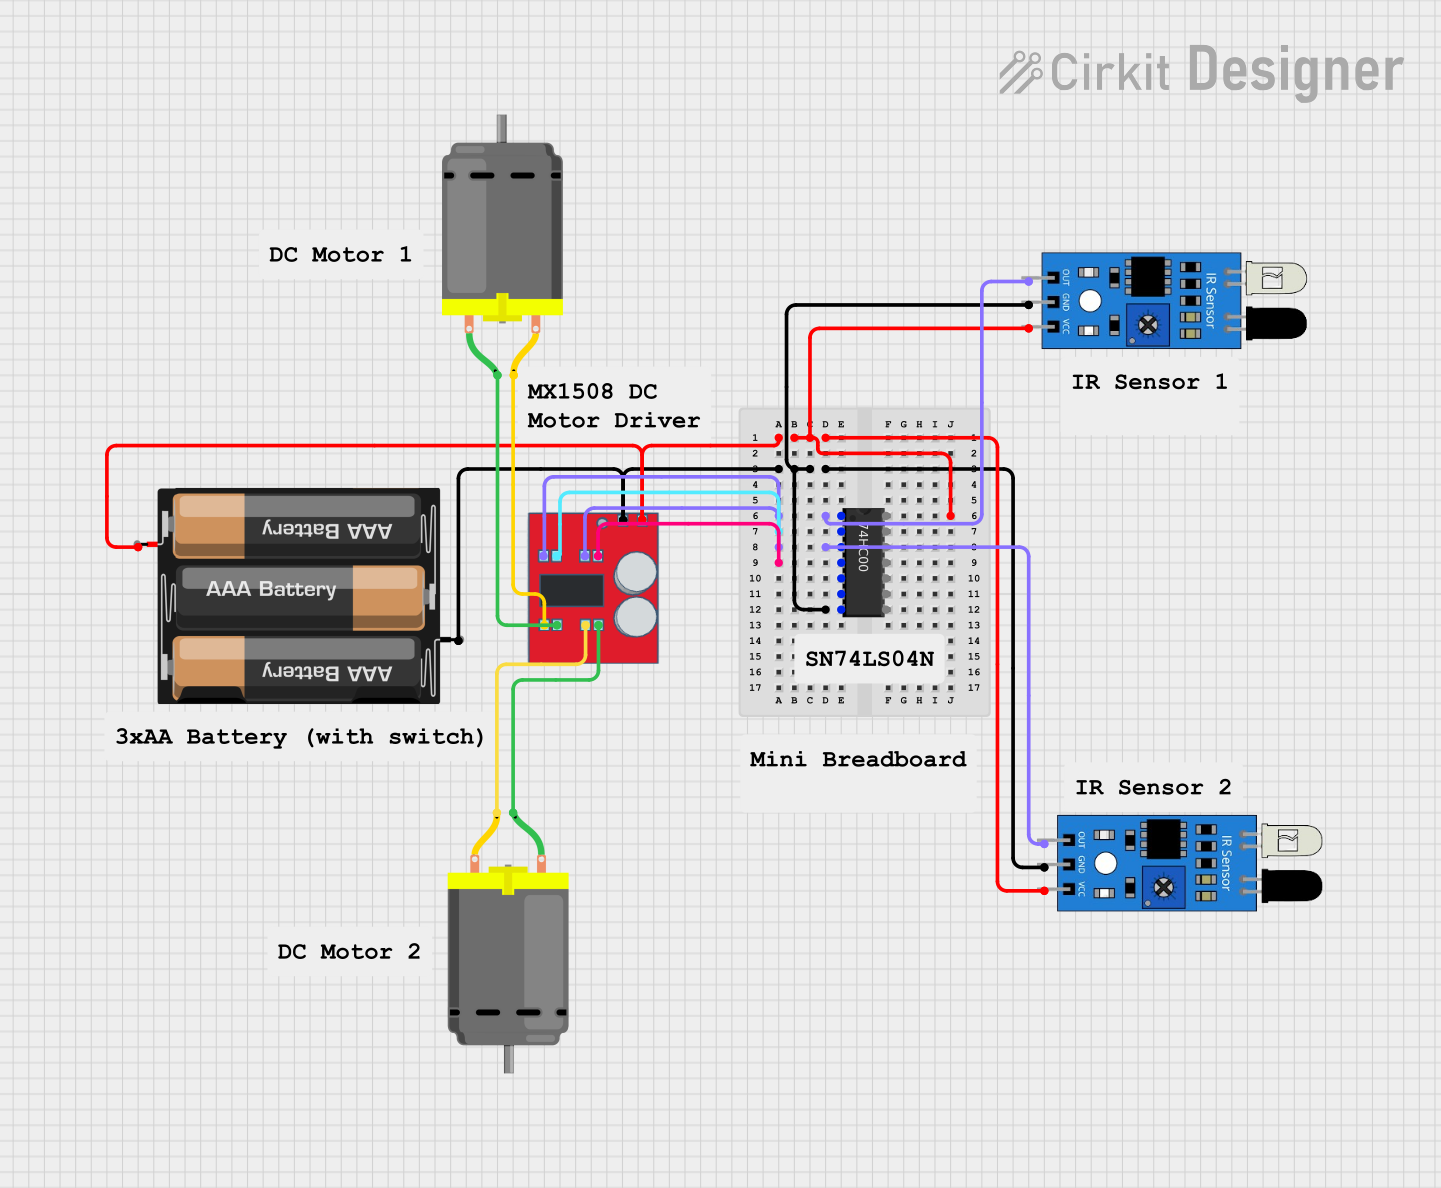
This circuit is a dual-motor control system powered by a 3xAA battery pack, utilizing two IR sensors and a 74HC00 NAND gate to control an MX1508 DC motor driver. The IR sensors provide input signals to the NAND gate, which then drives the motor driver to control the operation of two DC motors.
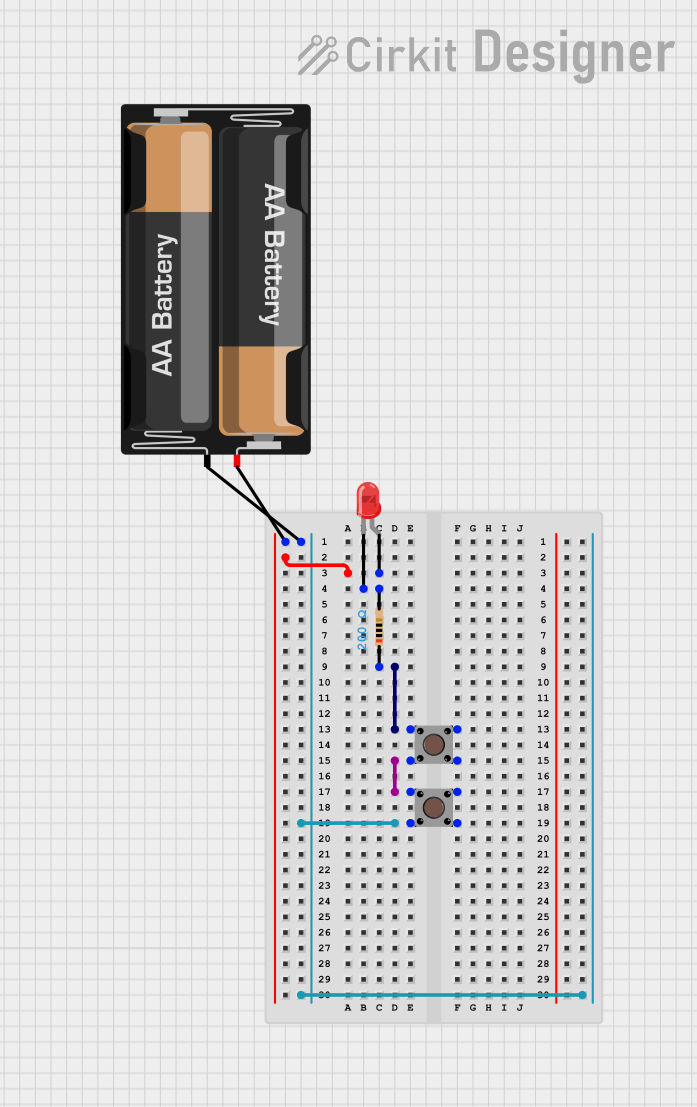
Battery-Powered LED Circuit with Pushbutton Control
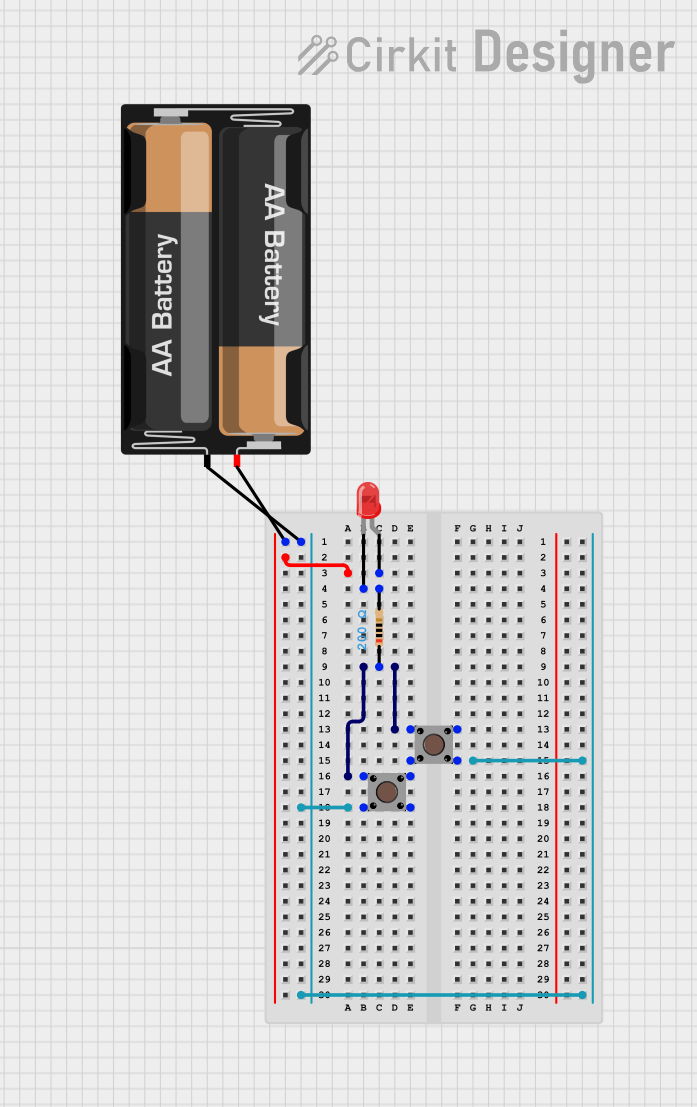
This circuit is a simple LED control system powered by a 2 x AA battery pack. It includes a red LED, a 200-ohm resistor, and two pushbuttons that control the LED's state by completing or breaking the circuit.
Arduino Pro Mini-Based Smart Home Automation with ADXL345 and RS232 Communication
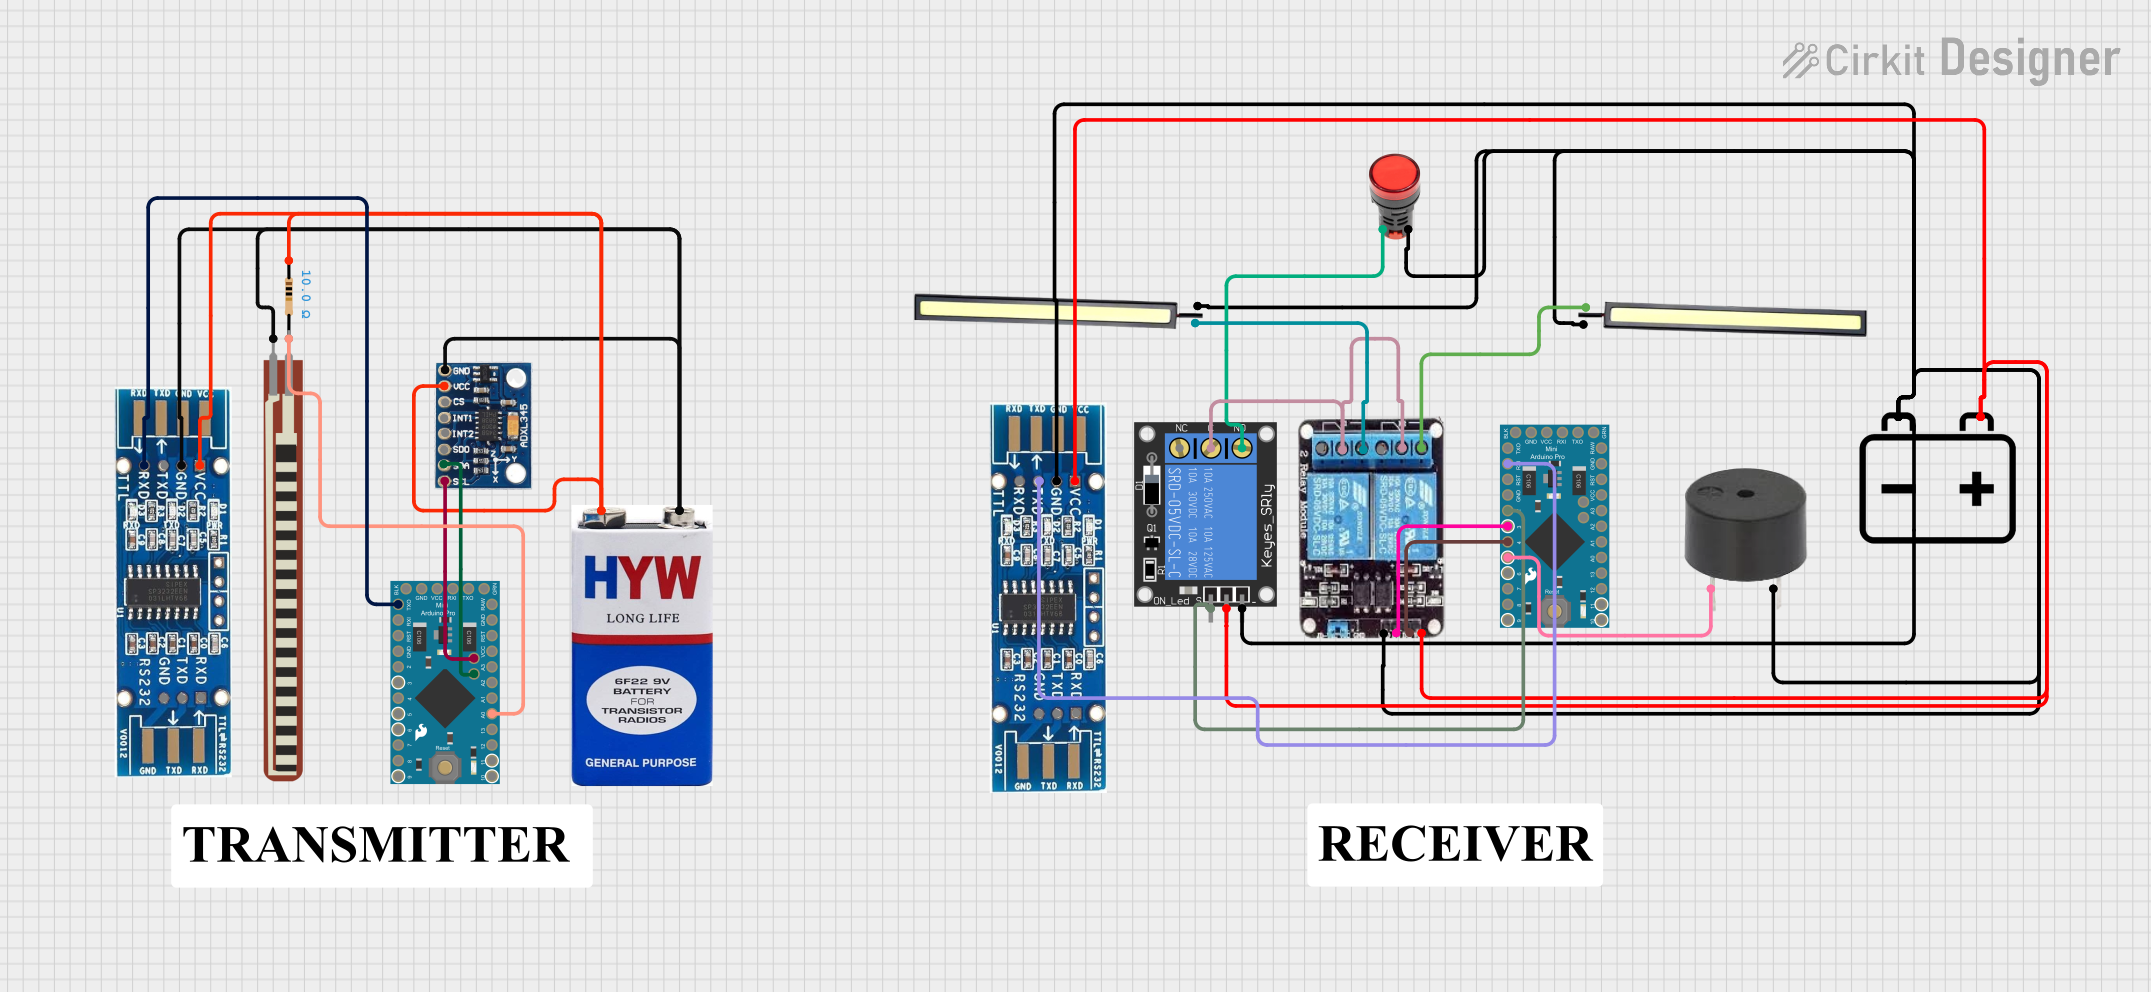
This circuit features two Arduino Pro Mini microcontrollers interfacing with various sensors and actuators. One Arduino reads data from an ADXL345 accelerometer and communicates with an RS232 module, while the other controls a 2-channel relay to manage two 12V LEDs, a 1-channel relay to control a red lamp, and a buzzer. Power is supplied by 9V and 12V batteries.
Battery-Powered LED Circuit with Pushbutton Control
This circuit is a simple LED control system powered by a 2 x AA battery pack. It includes a pushbutton that, when pressed, completes the circuit through a resistor, allowing current to flow and light up the red LED.
Explore Projects Built with AAA x2
Battery-Powered Dual DC Motor Control System with IR Sensors
This circuit is a dual-motor control system powered by a 3xAA battery pack, utilizing two IR sensors and a 74HC00 NAND gate to control an MX1508 DC motor driver. The IR sensors provide input signals to the NAND gate, which then drives the motor driver to control the operation of two DC motors.
Battery-Powered LED Circuit with Pushbutton Control
This circuit is a simple LED control system powered by a 2 x AA battery pack. It includes a red LED, a 200-ohm resistor, and two pushbuttons that control the LED's state by completing or breaking the circuit.
Arduino Pro Mini-Based Smart Home Automation with ADXL345 and RS232 Communication
This circuit features two Arduino Pro Mini microcontrollers interfacing with various sensors and actuators. One Arduino reads data from an ADXL345 accelerometer and communicates with an RS232 module, while the other controls a 2-channel relay to manage two 12V LEDs, a 1-channel relay to control a red lamp, and a buzzer. Power is supplied by 9V and 12V batteries.
Battery-Powered LED Circuit with Pushbutton Control
This circuit is a simple LED control system powered by a 2 x AA battery pack. It includes a pushbutton that, when pressed, completes the circuit through a resistor, allowing current to flow and light up the red LED.
Technical Specifications
- Battery Type: Alkaline, NiMH (rechargeable), or Lithium (non-rechargeable)
- Nominal Voltage (Series): 3V (1.5V per cell)
- Nominal Voltage (Parallel): 1.5V (increased capacity)
- Capacity: Typically 500–1200mAh (varies by battery type)
- Dimensions (per cell): Diameter 10.5mm, Length 44.5mm
- Weight (per cell): ~11.5g (alkaline)
Pin Configuration and Descriptions
| Pin/Terminal | Description | Notes |
|---|---|---|
| Positive (+) | Positive terminal of the battery | Connect to the positive side of the circuit |
| Negative (-) | Negative terminal of the battery | Connect to the ground or negative side of the circuit |
Usage Instructions
Connecting in Series:
- To achieve a combined voltage of 3V, connect the positive terminal of one AAA battery to the negative terminal of the second battery.
- Use a battery holder designed for two AAA batteries to simplify the connection.
Connecting in Parallel:
- To maintain a voltage of 1.5V while increasing capacity, connect the positive terminals of both batteries together and the negative terminals together.
- Ensure the batteries are of the same type and charge level to avoid imbalances.
Important Considerations:
- Always check the polarity before connecting the batteries to a circuit.
- Avoid short-circuiting the terminals, as this can cause overheating or damage.
- Do not mix old and new batteries or different types (e.g., alkaline and NiMH).
- For rechargeable batteries, use a compatible charger and follow the manufacturer's guidelines.
Using with Arduino UNO:
- The AAA x2 configuration can power an Arduino UNO via the VIN pin or the DC barrel jack.
- Ensure the combined voltage is within the Arduino's input voltage range (7–12V recommended for VIN).
- Example code to blink an LED using power from AAA x2 batteries:
// Simple LED blink example for Arduino UNO
// Ensure the Arduino is powered by the AAA x2 battery pack (via VIN or DC jack)

int ledPin = 13; // Built-in LED pin on Arduino UNO

void setup() {
  pinMode(ledPin, OUTPUT); // Set the LED pin as an output
}

void loop() {
  digitalWrite(ledPin, HIGH); // Turn the LED on
  delay(1000);               // Wait for 1 second
  digitalWrite(ledPin, LOW);  // Turn the LED off
  delay(1000);               // Wait for 1 second
}
Troubleshooting and FAQs
Common Issues
Device not powering on:
- Cause: Batteries may be inserted incorrectly or depleted.
- Solution: Check the polarity and replace or recharge the batteries if needed.
Overheating:
- Cause: Short circuit or using incompatible batteries.
- Solution: Disconnect immediately, inspect the circuit for shorts, and ensure batteries are of the same type and charge level.
Low runtime:
- Cause: Using low-capacity or partially discharged batteries.
- Solution: Use fresh or fully charged batteries with a higher capacity.
FAQs
Can I use AAA x2 batteries to power a 5V device?
- No, the combined voltage of 3V (series) is insufficient for most 5V devices. Consider using a step-up converter.
Can I mix rechargeable and non-rechargeable batteries?
- No, mixing different types of batteries can lead to imbalances and potential damage.
How do I safely dispose of AAA batteries?
- Follow local regulations for battery disposal. Rechargeable batteries should be recycled at designated facilities.