Cirkit Designer Logo
Cirkit Designer
Your all-in-one circuit design IDE
Home / 
Component Documentation

How to Use Seeed Studio Grove Shield for XIAO : Examples, Pinouts, and Specs

Image of Seeed Studio Grove Shield for XIAO
Cirkit Designer LogoDesign with Seeed Studio Grove Shield for XIAO in Cirkit Designer

Introduction

The Seeed Studio Grove Shield for XIAO is a versatile expansion board designed specifically for the Seeed XIAO series of microcontrollers. This shield simplifies the process of connecting Grove modules, enabling rapid prototyping and development for a wide range of applications. With its compact design and rich set of features, the Grove Shield for XIAO is ideal for IoT projects, sensor integration, and educational purposes.

Explore Projects Built with Seeed Studio Grove Shield for XIAO

Use Cirkit Designer to design, explore, and prototype these projects online. Some projects support real-time simulation. Click "Open Project" to start designing instantly!
Arduino Sensor Shield with I2C LCD and Bluetooth Interface
Image of wallE: A project utilizing Seeed Studio Grove Shield for XIAO  in a practical application
This circuit features an Arduino Sensor Shield v5.0 interfaced with an I2C LCD Display and an HC-05 Bluetooth Module. The LCD Display is connected for power, ground, and I2C communication, allowing it to display data or messages. The HC-05 Bluetooth Module is wired for serial communication with the Arduino Sensor Shield, enabling wireless data exchange with other Bluetooth-enabled devices.
Cirkit Designer LogoOpen Project in Cirkit Designer
Solar-Powered GSM/GPRS+GPS Tracker with Seeeduino XIAO
Image of SOS System : A project utilizing Seeed Studio Grove Shield for XIAO  in a practical application
This circuit features an Ai Thinker A9G development board for GSM/GPRS and GPS/BDS connectivity, interfaced with a Seeeduino XIAO microcontroller for control and data processing. A solar cell, coupled with a TP4056 charging module, charges a 3.3V battery, which powers the system through a 3.3V regulator ensuring stable operation. The circuit likely serves for remote data communication and location tracking, with the capability to be powered by renewable energy and interfaced with additional sensors or input devices via the Seeeduino XIAO.
Cirkit Designer LogoOpen Project in Cirkit Designer
Arduino Nano Based LoRa Weather Station with BMP280 Sensor and SD Card Logging
Image of CubeSAT MYSA Circuit: A project utilizing Seeed Studio Grove Shield for XIAO  in a practical application
This circuit is designed for environmental data acquisition and remote communication. It features an Arduino Nano interfaced with a BMP280 sensor for temperature and pressure readings, a LoRa Ra-02 SX1278 module for wireless data transmission, and a Micro SD Card Module for data logging. The I/O Expansion Shield is used to connect all components, but the Arduino Nano's code for operation is not yet provided.
Cirkit Designer LogoOpen Project in Cirkit Designer
Raspberry Pi 4B-Based GPS and GSM Tracking System with Audio Feedback
Image of unlimited range: A project utilizing Seeed Studio Grove Shield for XIAO  in a practical application
This circuit features a Raspberry Pi 4B as the central processing unit, interfaced with a GPS NEO-6M V2 module for location tracking and an Adafruit FONA 808 Shield for cellular communication. It includes a PAM8406 5V Digital Audio Amplifier connected to an Adafruit STEMMA Speaker for audio output, and a Condenser Microphone connected to the FONA 808 for audio input. Power management is handled by a 12V battery connected to a voltage regulator that steps down the voltage to 5V and 3V required by the various components.
Cirkit Designer LogoOpen Project in Cirkit Designer

Explore Projects Built with Seeed Studio Grove Shield for XIAO

Use Cirkit Designer to design, explore, and prototype these projects online. Some projects support real-time simulation. Click "Open Project" to start designing instantly!
Image of wallE: A project utilizing Seeed Studio Grove Shield for XIAO  in a practical application
Arduino Sensor Shield with I2C LCD and Bluetooth Interface
This circuit features an Arduino Sensor Shield v5.0 interfaced with an I2C LCD Display and an HC-05 Bluetooth Module. The LCD Display is connected for power, ground, and I2C communication, allowing it to display data or messages. The HC-05 Bluetooth Module is wired for serial communication with the Arduino Sensor Shield, enabling wireless data exchange with other Bluetooth-enabled devices.
Cirkit Designer LogoOpen Project in Cirkit Designer
Image of SOS System : A project utilizing Seeed Studio Grove Shield for XIAO  in a practical application
Solar-Powered GSM/GPRS+GPS Tracker with Seeeduino XIAO
This circuit features an Ai Thinker A9G development board for GSM/GPRS and GPS/BDS connectivity, interfaced with a Seeeduino XIAO microcontroller for control and data processing. A solar cell, coupled with a TP4056 charging module, charges a 3.3V battery, which powers the system through a 3.3V regulator ensuring stable operation. The circuit likely serves for remote data communication and location tracking, with the capability to be powered by renewable energy and interfaced with additional sensors or input devices via the Seeeduino XIAO.
Cirkit Designer LogoOpen Project in Cirkit Designer
Image of CubeSAT MYSA Circuit: A project utilizing Seeed Studio Grove Shield for XIAO  in a practical application
Arduino Nano Based LoRa Weather Station with BMP280 Sensor and SD Card Logging
This circuit is designed for environmental data acquisition and remote communication. It features an Arduino Nano interfaced with a BMP280 sensor for temperature and pressure readings, a LoRa Ra-02 SX1278 module for wireless data transmission, and a Micro SD Card Module for data logging. The I/O Expansion Shield is used to connect all components, but the Arduino Nano's code for operation is not yet provided.
Cirkit Designer LogoOpen Project in Cirkit Designer
Image of unlimited range: A project utilizing Seeed Studio Grove Shield for XIAO  in a practical application
Raspberry Pi 4B-Based GPS and GSM Tracking System with Audio Feedback
This circuit features a Raspberry Pi 4B as the central processing unit, interfaced with a GPS NEO-6M V2 module for location tracking and an Adafruit FONA 808 Shield for cellular communication. It includes a PAM8406 5V Digital Audio Amplifier connected to an Adafruit STEMMA Speaker for audio output, and a Condenser Microphone connected to the FONA 808 for audio input. Power management is handled by a 12V battery connected to a voltage regulator that steps down the voltage to 5V and 3V required by the various components.
Cirkit Designer LogoOpen Project in Cirkit Designer

Common Applications and Use Cases

  • IoT Prototyping: Quickly build IoT devices by connecting Grove sensors and actuators.
  • Educational Projects: Simplify learning with plug-and-play functionality for beginners.
  • Wearable Devices: Leverage the compact size of the XIAO series for portable projects.
  • Rapid Development: Test and iterate designs efficiently with minimal wiring.

Technical Specifications

The Grove Shield for XIAO is designed to expand the functionality of Seeed XIAO microcontrollers by providing easy access to Grove connectors and additional features.

Key Technical Details

  • Compatible Microcontrollers: Seeed XIAO series (e.g., XIAO RP2040, XIAO SAMD21, XIAO ESP32C3)
  • Input Voltage: 3.3V (regulated by the XIAO microcontroller)
  • Grove Ports: 6 (4 digital/analog, 1 I2C, 1 UART)
  • Onboard Features:
    • Reset button
    • Power LED
    • User LED
  • Dimensions: 25.4mm x 25.4mm
  • Weight: ~5g

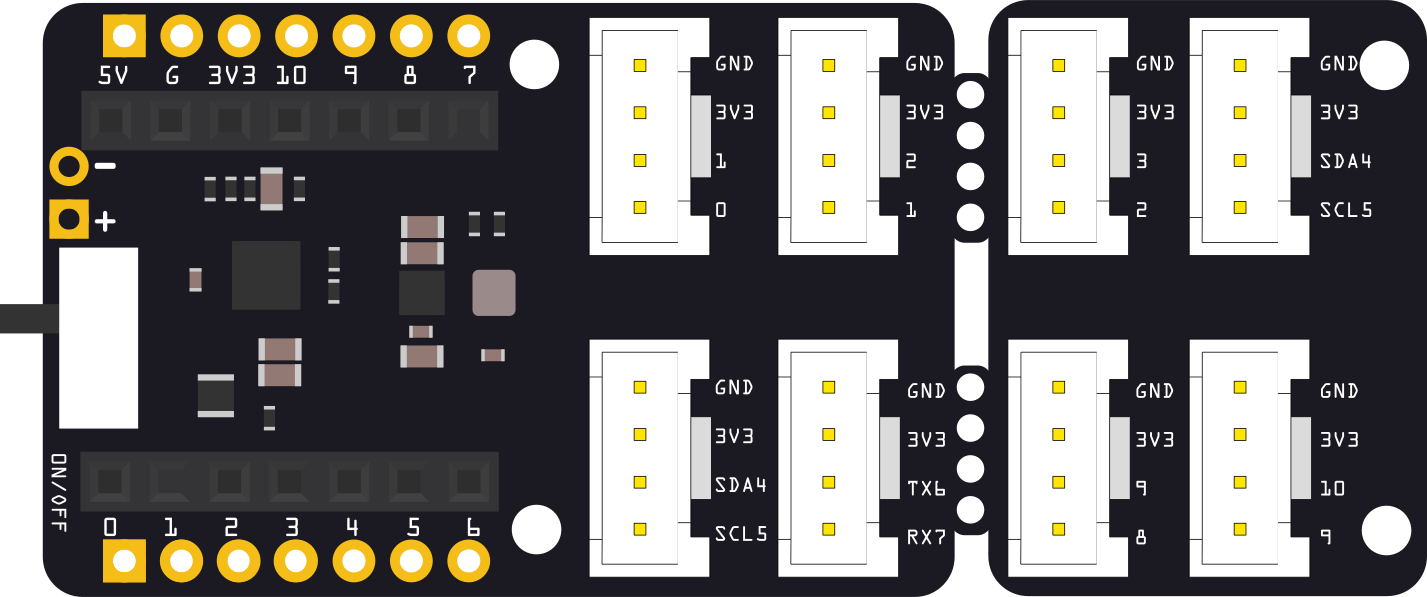
Pin Configuration and Descriptions

The Grove Shield for XIAO provides six Grove connectors, each mapped to specific pins on the XIAO microcontroller. Below is the pin mapping:

Grove Port Function XIAO Pin Description
Grove 1 Digital/Analog A0 General-purpose I/O or analog input
Grove 2 Digital/Analog A1 General-purpose I/O or analog input
Grove 3 Digital/Analog A2 General-purpose I/O or analog input
Grove 4 Digital/Analog A3 General-purpose I/O or analog input
Grove I2C I2C Communication SDA, SCL For connecting I2C-compatible devices
Grove UART Serial Communication TX, RX For connecting UART-compatible devices

Usage Instructions

How to Use the Component in a Circuit

  1. Attach the XIAO Microcontroller: Insert the Seeed XIAO microcontroller into the designated socket on the Grove Shield. Ensure proper alignment of the pins.
  2. Connect Grove Modules: Plug Grove modules into the appropriate connectors based on their functionality (e.g., sensors to analog ports, I2C devices to the I2C port).
  3. Power the Shield: Power the XIAO microcontroller via USB. The shield will draw power directly from the XIAO.
  4. Program the XIAO: Use the Arduino IDE or other compatible development environments to upload code to the XIAO microcontroller.

Important Considerations and Best Practices

  • Voltage Compatibility: Ensure that the connected Grove modules are compatible with the 3.3V logic level of the XIAO microcontroller.
  • Avoid Overloading: Do not connect modules that exceed the current supply capacity of the XIAO microcontroller.
  • Secure Connections: Ensure all Grove connectors are firmly plugged in to avoid intermittent connections.
  • Reset Button: Use the onboard reset button to restart the XIAO microcontroller without disconnecting power.

Example Code for Arduino UNO-Compatible XIAO

Below is an example of how to use the Grove Shield for XIAO with a Grove Light Sensor connected to Grove Port 1 (A0):

// Include necessary libraries
void setup() {
  Serial.begin(9600); // Initialize serial communication at 9600 baud
  pinMode(A0, INPUT); // Set A0 (Grove Port 1) as an input
}

void loop() {
  int lightValue = analogRead(A0); // Read the analog value from the light sensor
  Serial.print("Light Intensity: "); // Print a label for the sensor value
  Serial.println(lightValue);       // Print the sensor value to the Serial Monitor
  delay(500); // Wait for 500ms before reading again
}

Troubleshooting and FAQs

Common Issues Users Might Face

  1. No Response from Connected Modules:

    • Cause: Incorrect Grove port or loose connection.
    • Solution: Verify the module is connected to the correct port and ensure the connector is secure.
  2. XIAO Microcontroller Not Detected:

    • Cause: Improper insertion of the XIAO into the shield.
    • Solution: Reinsert the XIAO microcontroller, ensuring proper alignment of pins.
  3. Inconsistent Sensor Readings:

    • Cause: Electrical noise or insufficient power supply.
    • Solution: Use shorter cables and ensure the XIAO is powered via a stable USB source.
  4. I2C Devices Not Communicating:

    • Cause: Incorrect I2C address or wiring issue.
    • Solution: Check the I2C address of the device and ensure SDA/SCL lines are properly connected.

Solutions and Tips for Troubleshooting

  • Check Power Supply: Ensure the XIAO microcontroller is powered via a reliable USB source.
  • Inspect Connections: Verify that all Grove connectors are securely plugged in.
  • Test with Simple Code: Use basic example code to isolate issues with specific modules.
  • Consult Documentation: Refer to the datasheets of connected Grove modules for compatibility and usage details.