How to Use Battery Meter: Examples, Pinouts, and Specs
Introduction
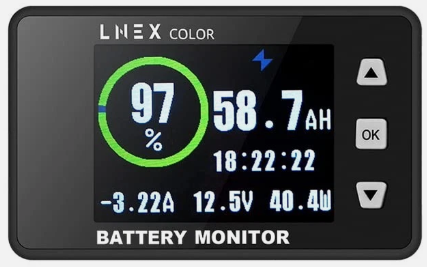
The Battery Meter by LNEX (Part ID: Battery Meter) is a compact and reliable device designed to measure the voltage level of a battery. It provides a clear indication of the battery's charge status, making it an essential tool for monitoring battery health in various applications. This component is ideal for use in portable electronics, renewable energy systems, electric vehicles, and backup power systems.
Explore Projects Built with Battery Meter


Explore Projects Built with Battery Meter
Common Applications and Use Cases
- Monitoring battery charge levels in portable devices
- Ensuring proper battery maintenance in solar power systems
- Tracking battery health in electric vehicles
- Preventing over-discharge in uninterruptible power supplies (UPS)
- General-purpose battery diagnostics
Technical Specifications
The LNEX Battery Meter is designed to work with a wide range of battery types and voltages. Below are the key technical details:
General Specifications
| Parameter | Value |
|---|---|
| Operating Voltage Range | 3.7V to 30V |
| Measurement Accuracy | ±1% |
| Display Type | LED or LCD (depending on model) |
| Power Consumption | < 10mA |
| Operating Temperature | -10°C to 60°C |
| Dimensions | 48mm x 29mm x 21mm |
Pin Configuration and Descriptions
The Battery Meter typically has three pins for connection. The table below describes each pin:
| Pin Number | Pin Name | Description |
|---|---|---|
| 1 | V+ | Positive voltage input (connect to battery +) |
| 2 | V- | Negative voltage input (connect to battery -) |
| 3 | Signal Out | Optional signal output for external monitoring |
Usage Instructions
How to Use the Battery Meter in a Circuit
- Connect the Battery Meter to the Battery:
- Connect the
V+pin to the positive terminal of the battery. - Connect the
V-pin to the negative terminal of the battery.
- Connect the
- Power On the Battery Meter:
- Once connected, the Battery Meter will automatically power on and display the battery voltage.
- Optional Signal Output:
- If your model includes a
Signal Outpin, you can connect it to a microcontroller (e.g., Arduino) or external monitoring system for advanced applications.
- If your model includes a
Important Considerations and Best Practices
- Ensure the battery voltage is within the specified operating range (3.7V to 30V).
- Avoid reverse polarity connections, as this may damage the Battery Meter.
- For long-term use, ensure the Battery Meter is securely mounted to prevent loose connections.
- If using the
Signal Outpin with a microcontroller, ensure proper voltage level matching to avoid damage.
Example: Using the Battery Meter with an Arduino UNO
The Signal Out pin can be connected to an analog input pin on an Arduino UNO to monitor the battery voltage programmatically. Below is an example code snippet:
// Define the analog pin connected to the Signal Out pin of the Battery Meter
const int batteryMeterPin = A0;

// Define the reference voltage of the Arduino (5V for most models)
const float referenceVoltage = 5.0;

// Define the maximum ADC resolution (10-bit ADC = 1024 levels)
const int adcResolution = 1024;

void setup() {
  // Initialize serial communication for debugging
  Serial.begin(9600);
}

void loop() {
  // Read the analog value from the Battery Meter
  int analogValue = analogRead(batteryMeterPin);

  // Convert the analog value to a voltage
  float batteryVoltage = (analogValue * referenceVoltage) / adcResolution;

  // Print the battery voltage to the Serial Monitor
  Serial.print("Battery Voltage: ");
  Serial.print(batteryVoltage);
  Serial.println(" V");

  // Add a delay to avoid flooding the Serial Monitor
  delay(1000);
}
Note: Ensure the Signal Out pin voltage does not exceed the Arduino's input voltage limit (typically 5V).
Troubleshooting and FAQs
Common Issues and Solutions
No Display or Incorrect Readings:
- Cause: Incorrect wiring or reverse polarity.
- Solution: Double-check the connections and ensure proper polarity.
Flickering Display:
- Cause: Loose connections or unstable power supply.
- Solution: Secure the connections and ensure a stable power source.
Signal Out Pin Not Working:
- Cause: Voltage level mismatch with the microcontroller.
- Solution: Use a voltage divider or level shifter to match the voltage levels.
Overheating:
- Cause: Operating outside the specified voltage range.
- Solution: Ensure the battery voltage is within the 3.7V to 30V range.
FAQs
Q1: Can the Battery Meter be used with lithium-ion batteries?
A1: Yes, the Battery Meter is compatible with lithium-ion batteries, as long as the voltage is within the 3.7V to 30V range.
Q2: Does the Battery Meter support multiple battery types?
A2: Yes, it supports various battery types, including lead-acid, lithium-ion, and NiMH batteries.
Q3: Can I use the Battery Meter in outdoor environments?
A3: The Battery Meter operates within a temperature range of -10°C to 60°C. For outdoor use, ensure it is protected from moisture and extreme conditions.
Q4: Is calibration required for accurate readings?
A4: The Battery Meter is factory-calibrated for ±1% accuracy. However, if needed, you can recalibrate it using external tools.
By following this documentation, you can effectively integrate the LNEX Battery Meter into your projects and ensure reliable battery monitoring.