How to Use Battery Monitor: Examples, Pinouts, and Specs
Introduction
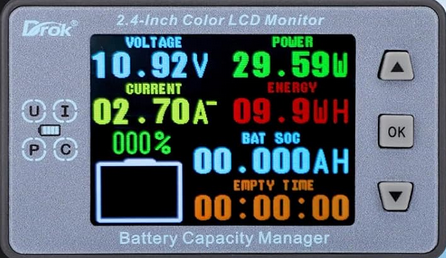
The DROK Battery Monitor is a versatile device designed to measure and display critical parameters of a battery, including voltage, current, and state of charge (SOC). This component is essential for monitoring battery health, ensuring optimal performance, and extending battery longevity. It is widely used in applications such as renewable energy systems, electric vehicles, portable electronics, and backup power systems.
By providing real-time data, the DROK Battery Monitor helps users prevent overcharging, deep discharging, and other conditions that can degrade battery performance.
Explore Projects Built with Battery Monitor


Explore Projects Built with Battery Monitor
Technical Specifications
Below are the key technical details of the DROK Battery Monitor:
| Parameter | Specification |
|---|---|
| Operating Voltage | 6V - 100V DC |
| Current Measurement | 0A - 100A |
| Power Consumption | < 10mA |
| Display Type | LCD (with backlight) |
| Measurement Accuracy | ±1% |
| Operating Temperature | -10°C to 60°C |
| Communication Interface | UART (optional, model-dependent) |
Pin Configuration and Descriptions
The DROK Battery Monitor typically includes the following connections:
| Pin Name | Description |
|---|---|
| V+ | Positive terminal for voltage measurement and power supply |
| V- | Negative terminal for voltage measurement and power supply |
| I+ | Positive terminal for current measurement (connect to the load side) |
| I- | Negative terminal for current measurement (connect to the battery side) |
| UART_TX | Transmit pin for UART communication (optional, for advanced models) |
| UART_RX | Receive pin for UART communication (optional, for advanced models) |
Note: Always refer to the specific model's datasheet for exact pinout and wiring details.
Usage Instructions
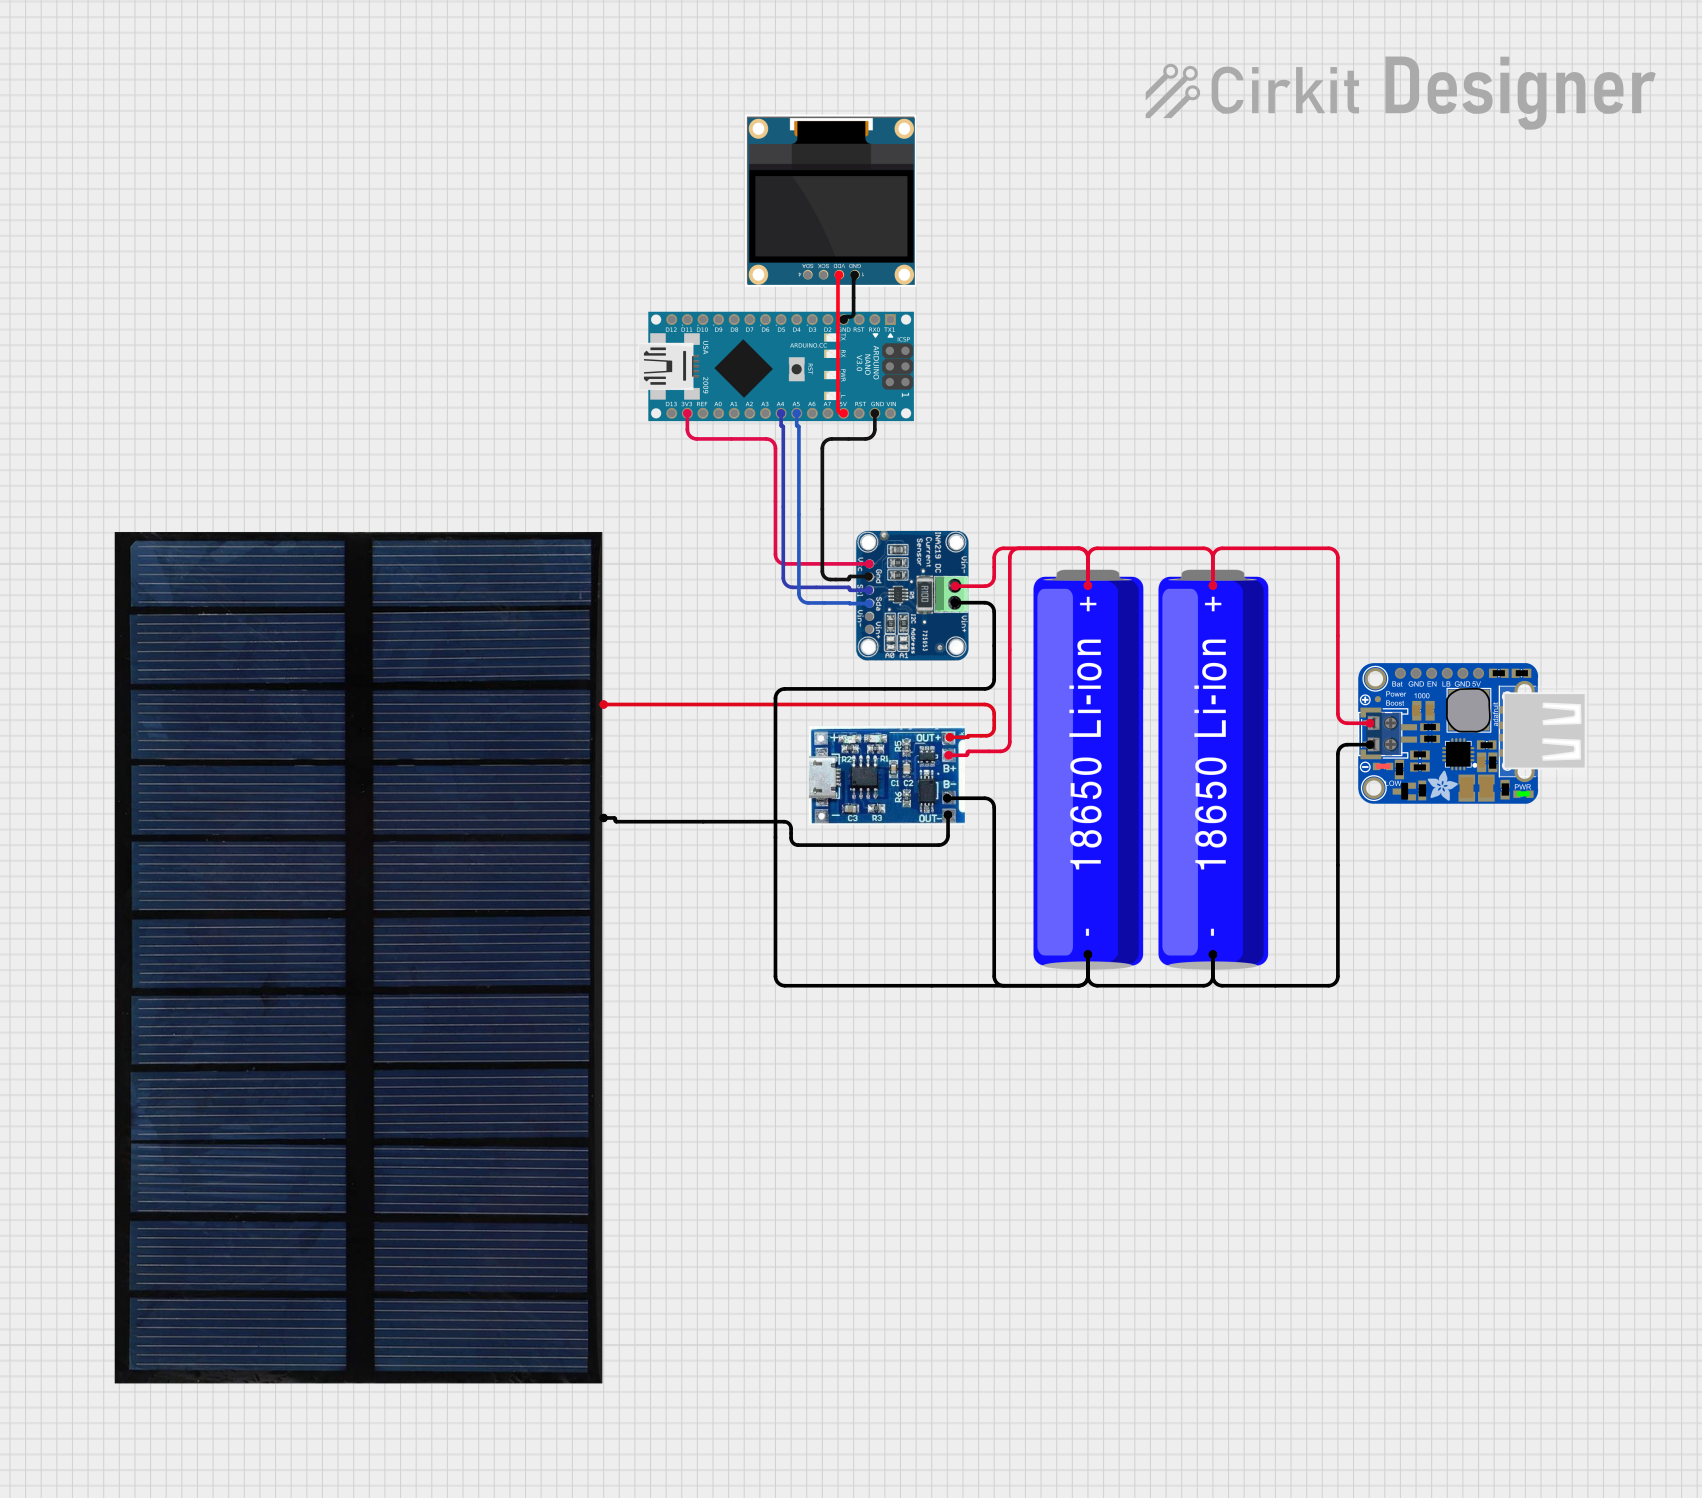
How to Use the DROK Battery Monitor in a Circuit
Connect the Voltage Terminals:
- Connect the
V+pin to the positive terminal of the battery. - Connect the
V-pin to the negative terminal of the battery.
- Connect the
Connect the Current Terminals:
- Place the monitor in series with the load.
- Connect the
I+pin to the positive side of the load. - Connect the
I-pin to the negative side of the load.
Power On the Monitor:
- The monitor is powered directly by the battery. Ensure the battery voltage is within the operating range (6V - 100V DC).
Read the Display:
- The LCD will show real-time voltage, current, and state of charge (SOC) values.
Optional UART Communication:
- For advanced models, connect the
UART_TXandUART_RXpins to a microcontroller (e.g., Arduino UNO) for data logging or remote monitoring.
- For advanced models, connect the
Important Considerations and Best Practices
- Avoid Overloading: Ensure the current passing through the monitor does not exceed its rated capacity (100A).
- Proper Wiring: Use appropriately rated wires to handle the current and minimize resistance.
- Calibration: Some models may require calibration for accurate readings. Follow the manufacturer's instructions.
- Environmental Conditions: Avoid exposing the monitor to extreme temperatures or moisture.
Example: Connecting to an Arduino UNO
For advanced models with UART communication, you can connect the DROK Battery Monitor to an Arduino UNO for data logging. Below is an example Arduino sketch:
#include <SoftwareSerial.h>

// Define RX and TX pins for UART communication
SoftwareSerial batteryMonitor(10, 11); // RX = pin 10, TX = pin 11

void setup() {
  Serial.begin(9600); // Initialize Serial Monitor
  batteryMonitor.begin(9600); // Initialize communication with the battery monitor

  Serial.println("DROK Battery Monitor Initialized");
}

void loop() {
  // Check if data is available from the battery monitor
  if (batteryMonitor.available()) {
    String data = ""; // Variable to store incoming data

    // Read all available data
    while (batteryMonitor.available()) {
      char c = batteryMonitor.read();
      data += c;
    }

    // Print the received data to the Serial Monitor
    Serial.println("Battery Monitor Data: " + data);
  }

  delay(500); // Wait for 500ms before the next read
}
Note: Ensure the UART pins on the DROK Battery Monitor are connected to the appropriate pins on the Arduino UNO. Use a voltage divider or level shifter if the monitor's UART operates at a voltage level higher than 5V.
Troubleshooting and FAQs
Common Issues and Solutions
No Display on the Monitor:
- Cause: Incorrect wiring or insufficient battery voltage.
- Solution: Verify all connections and ensure the battery voltage is within the operating range (6V - 100V DC).
Inaccurate Readings:
- Cause: Calibration may be required or improper wiring.
- Solution: Follow the manufacturer's calibration procedure and double-check the wiring.
Overheating:
- Cause: Excessive current passing through the monitor.
- Solution: Ensure the current does not exceed the rated capacity (100A). Use a shunt resistor if necessary.
UART Communication Not Working:
- Cause: Incorrect baud rate or wiring.
- Solution: Verify the baud rate (default is 9600) and ensure proper connections between the monitor and the microcontroller.
FAQs
Q: Can the DROK Battery Monitor measure both charging and discharging currents?
A: Yes, the monitor can measure both charging and discharging currents, depending on the direction of current flow.Q: Is the monitor compatible with lithium-ion batteries?
A: Yes, the DROK Battery Monitor is compatible with various battery types, including lithium-ion, lead-acid, and NiMH batteries.Q: Can I use the monitor for a 48V solar battery system?
A: Yes, as long as the system voltage is within the operating range (6V - 100V DC).Q: Does the monitor support data logging?
A: Advanced models with UART communication can be used for data logging when connected to a microcontroller or computer.
By following this documentation, users can effectively integrate the DROK Battery Monitor into their projects and ensure reliable battery performance.