How to Use TEMT6000: Examples, Pinouts, and Specs
Introduction
The TEMT6000 is a light sensor designed to detect ambient light levels. It is an analog phototransistor that outputs a voltage proportional to the intensity of light it receives. This makes it an ideal choice for applications requiring precise light measurement, such as automatic lighting control, environmental monitoring, and display brightness adjustment.
Explore Projects Built with TEMT6000


Explore Projects Built with TEMT6000
Common Applications
- Automatic lighting systems (e.g., streetlights, smart home lighting)
- Environmental light monitoring
- Display brightness adjustment in consumer electronics
- Light-sensitive security systems
- Robotics and automation requiring light detection
Technical Specifications
The TEMT6000 is a compact and efficient light sensor with the following key specifications:
| Parameter | Value |
|---|---|
| Supply Voltage (Vcc) | 3.3V to 5V |
| Output Voltage Range | 0V to Vcc (proportional to light) |
| Spectral Sensitivity | 570 nm (peak sensitivity) |
| Light Intensity Range | 10 lux to 100,000 lux |
| Operating Temperature | -40°C to +85°C |
| Power Consumption | Low |
| Package Type | Surface-mount (SMD) or through-hole |
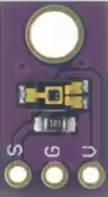
Pin Configuration
The TEMT6000 typically has three pins. Below is the pinout description:
| Pin | Name | Description |
|---|---|---|
| 1 | Vcc | Power supply pin (3.3V to 5V) |
| 2 | GND | Ground connection |
| 3 | OUT | Analog output voltage proportional to light intensity |
Usage Instructions
How to Use the TEMT6000 in a Circuit
- Power the Sensor: Connect the Vcc pin to a 3.3V or 5V power supply and the GND pin to the ground of your circuit.
- Read the Output: Connect the OUT pin to an analog input pin of a microcontroller (e.g., Arduino UNO) or an analog-to-digital converter (ADC) to measure the voltage output.
- Calibrate for Your Application: The output voltage is proportional to the light intensity. You may need to scale or calibrate the readings based on your specific application.
Important Considerations
- Ambient Light Conditions: The sensor is most sensitive to light in the visible spectrum (570 nm). Ensure it is not exposed to infrared or ultraviolet light sources, as these may affect accuracy.
- Power Supply: Use a stable power supply to avoid noise in the output signal.
- Placement: Place the sensor in a location where it can receive unobstructed light for accurate measurements.
- Pull-Down Resistor: If the output signal is noisy, consider adding a pull-down resistor (e.g., 10kΩ) between the OUT pin and GND.
Example: Using TEMT6000 with Arduino UNO
Below is an example of how to connect and read data from the TEMT6000 using an Arduino UNO:
Circuit Connections
- Connect the Vcc pin of the TEMT6000 to the 5V pin of the Arduino.
- Connect the GND pin of the TEMT6000 to the GND pin of the Arduino.
- Connect the OUT pin of the TEMT6000 to the A0 analog input pin of the Arduino.
Arduino Code
// TEMT6000 Light Sensor Example with Arduino UNO
// Reads the analog output of the TEMT6000 and prints the light intensity.

const int sensorPin = A0; // TEMT6000 OUT pin connected to Arduino A0

void setup() {
  Serial.begin(9600); // Initialize serial communication at 9600 baud
}

void loop() {
  int sensorValue = analogRead(sensorPin); // Read the analog value from the sensor
  float voltage = sensorValue * (5.0 / 1023.0); // Convert to voltage (5V reference)

  // Print the raw sensor value and calculated voltage
  Serial.print("Sensor Value: ");
  Serial.print(sensorValue);
  Serial.print(" | Voltage: ");
  Serial.print(voltage);
  Serial.println(" V");

  delay(500); // Wait for 500ms before the next reading
}
Notes
- The
analogRead()function returns a value between 0 and 1023, corresponding to 0V to 5V. - You can map the voltage to light intensity (lux) using a calibration formula specific to your application.
Troubleshooting and FAQs
Common Issues and Solutions
No Output or Incorrect Readings
- Cause: Incorrect wiring or loose connections.
- Solution: Double-check the wiring and ensure all connections are secure.
Output Voltage is Constant
- Cause: The sensor is not exposed to varying light conditions.
- Solution: Test the sensor in different lighting environments to verify functionality.
Noisy Output Signal
- Cause: Electrical noise or unstable power supply.
- Solution: Use a decoupling capacitor (e.g., 0.1µF) between Vcc and GND, and consider adding a pull-down resistor on the OUT pin.
Sensor Not Responding to Light
- Cause: The sensor may be damaged or exposed to non-visible light.
- Solution: Replace the sensor and ensure it is exposed to visible light.
FAQs
Q: Can the TEMT6000 detect infrared or ultraviolet light?
A: No, the TEMT6000 is designed to detect visible light, with peak sensitivity at 570 nm. It is not suitable for detecting infrared or ultraviolet light.
Q: How do I convert the output voltage to lux?
A: The relationship between voltage and lux depends on the specific characteristics of the sensor. Refer to the sensor's datasheet for a detailed conversion formula or perform a calibration using known light sources.
Q: Can I use the TEMT6000 with a 3.3V microcontroller?
A: Yes, the TEMT6000 operates with a supply voltage range of 3.3V to 5V, making it compatible with 3.3V microcontrollers.
Q: Is the TEMT6000 suitable for outdoor use?
A: While the TEMT6000 can operate in a wide temperature range, it should be protected from moisture and extreme environmental conditions for reliable performance. Use an enclosure if deploying outdoors.