Cirkit Designer Logo
Cirkit Designer
Your all-in-one circuit design IDE
Home / 
Component Documentation

How to Use Adafruit Perma-Proto HAT: Examples, Pinouts, and Specs

Image of Adafruit Perma-Proto HAT
Cirkit Designer LogoDesign with Adafruit Perma-Proto HAT in Cirkit Designer

Introduction

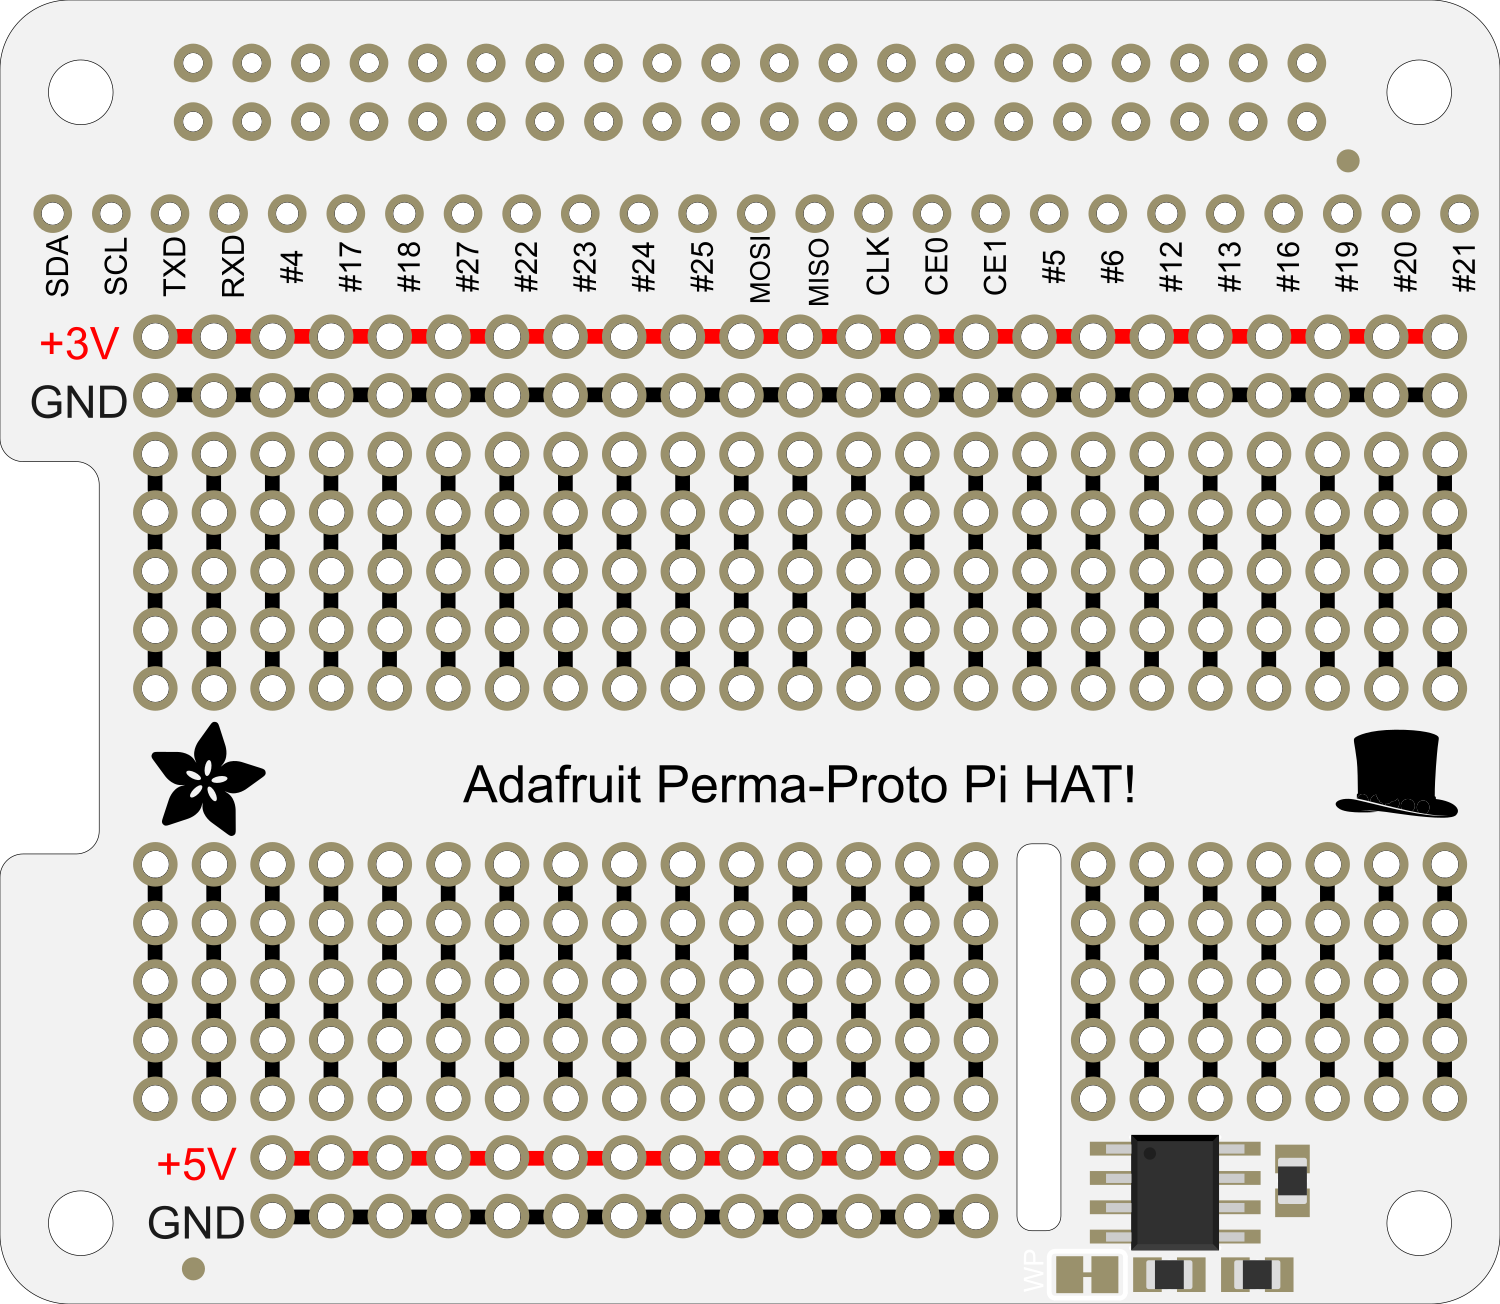
The Adafruit Perma-Proto HAT is a versatile prototyping board designed to fit the Raspberry Pi HAT (Hardware Attached on Top) standard. This board allows hobbyists, engineers, and makers to create custom circuit designs that can be easily attached to a Raspberry Pi, providing a seamless integration with the Pi's GPIO pins. Common applications include creating custom shields for sensors, controllers, power circuits, and any other electronic components that need to interface with a Raspberry Pi.

Explore Projects Built with Adafruit Perma-Proto HAT

Use Cirkit Designer to design, explore, and prototype these projects online. Some projects support real-time simulation. Click "Open Project" to start designing instantly!
Raspberry Pi 4B-Based Multi-Sensor Interface Hub with GPS and GSM
Image of Rocket: A project utilizing Adafruit Perma-Proto HAT in a practical application
This circuit features a Raspberry Pi 4B interfaced with an IMX296 color global shutter camera, a Neo 6M GPS module, an Adafruit BMP388 barometric pressure sensor, an MPU-6050 accelerometer/gyroscope, and a Sim800l GSM module for cellular connectivity. Power management is handled by an MT3608 boost converter, which steps up the voltage from a Lipo battery, with a resettable fuse PTC and a 1N4007 diode for protection. The Adafruit Perma-Proto HAT is used for organizing connections and interfacing the sensors and modules with the Raspberry Pi via I2C and GPIO pins.
Cirkit Designer LogoOpen Project in Cirkit Designer
Arduino-Based Temperature Monitoring System with RGB LED Feedback and I2C LCD Display
Image of wemos custom shield: A project utilizing Adafruit Perma-Proto HAT in a practical application
This circuit features an Adafruit Proto Shield R3 configured with a DS18B20 temperature sensor, a WS2812 RGB LED matrix, and an LCD I2C display. The microcontroller on the Proto Shield reads the temperature from the DS18B20 sensor and displays it on the LCD. It also controls the LED matrix to show random colors and indicates temperature status with onboard LEDs.
Cirkit Designer LogoOpen Project in Cirkit Designer
Raspberry Pi 5 Smart Weather Station with GPS and AI Integration
Image of Senior Design: A project utilizing Adafruit Perma-Proto HAT in a practical application
This circuit integrates a Raspberry Pi 5 with various peripherals including an 8MP 3D stereo camera, an AI Hat, a BMP388 sensor, a 16x2 I2C LCD, and an Adafruit Ultimate GPS module. The Raspberry Pi serves as the central processing unit, interfacing with the camera for image capture, the AI Hat for AI processing, the BMP388 for environmental sensing, the LCD for display, and the GPS module for location tracking, with a USB Serial TTL for serial communication.
Cirkit Designer LogoOpen Project in Cirkit Designer
Battery-Powered Smart Light with Proximity Sensor and OLED Display using Adafruit QT Py RP2040
Image of lab: A project utilizing Adafruit Perma-Proto HAT in a practical application
This circuit is a portable, battery-powered system featuring an Adafruit QT Py RP2040 microcontroller that interfaces with an OLED display, a proximity sensor, an accelerometer, and an RGB LED strip. The system is powered by a lithium-ion battery with a step-up boost converter to provide 5V for the LED strip, and it includes a toggle switch for power control. The microcontroller communicates with the sensors and display via I2C.
Cirkit Designer LogoOpen Project in Cirkit Designer

Explore Projects Built with Adafruit Perma-Proto HAT

Use Cirkit Designer to design, explore, and prototype these projects online. Some projects support real-time simulation. Click "Open Project" to start designing instantly!
Image of Rocket: A project utilizing Adafruit Perma-Proto HAT in a practical application
Raspberry Pi 4B-Based Multi-Sensor Interface Hub with GPS and GSM
This circuit features a Raspberry Pi 4B interfaced with an IMX296 color global shutter camera, a Neo 6M GPS module, an Adafruit BMP388 barometric pressure sensor, an MPU-6050 accelerometer/gyroscope, and a Sim800l GSM module for cellular connectivity. Power management is handled by an MT3608 boost converter, which steps up the voltage from a Lipo battery, with a resettable fuse PTC and a 1N4007 diode for protection. The Adafruit Perma-Proto HAT is used for organizing connections and interfacing the sensors and modules with the Raspberry Pi via I2C and GPIO pins.
Cirkit Designer LogoOpen Project in Cirkit Designer
Image of wemos custom shield: A project utilizing Adafruit Perma-Proto HAT in a practical application
Arduino-Based Temperature Monitoring System with RGB LED Feedback and I2C LCD Display
This circuit features an Adafruit Proto Shield R3 configured with a DS18B20 temperature sensor, a WS2812 RGB LED matrix, and an LCD I2C display. The microcontroller on the Proto Shield reads the temperature from the DS18B20 sensor and displays it on the LCD. It also controls the LED matrix to show random colors and indicates temperature status with onboard LEDs.
Cirkit Designer LogoOpen Project in Cirkit Designer
Image of Senior Design: A project utilizing Adafruit Perma-Proto HAT in a practical application
Raspberry Pi 5 Smart Weather Station with GPS and AI Integration
This circuit integrates a Raspberry Pi 5 with various peripherals including an 8MP 3D stereo camera, an AI Hat, a BMP388 sensor, a 16x2 I2C LCD, and an Adafruit Ultimate GPS module. The Raspberry Pi serves as the central processing unit, interfacing with the camera for image capture, the AI Hat for AI processing, the BMP388 for environmental sensing, the LCD for display, and the GPS module for location tracking, with a USB Serial TTL for serial communication.
Cirkit Designer LogoOpen Project in Cirkit Designer
Image of lab: A project utilizing Adafruit Perma-Proto HAT in a practical application
Battery-Powered Smart Light with Proximity Sensor and OLED Display using Adafruit QT Py RP2040
This circuit is a portable, battery-powered system featuring an Adafruit QT Py RP2040 microcontroller that interfaces with an OLED display, a proximity sensor, an accelerometer, and an RGB LED strip. The system is powered by a lithium-ion battery with a step-up boost converter to provide 5V for the LED strip, and it includes a toggle switch for power control. The microcontroller communicates with the sensors and display via I2C.
Cirkit Designer LogoOpen Project in Cirkit Designer

Technical Specifications

Key Technical Details

  • Compatibility: Fits any Raspberry Pi with a 40-pin GPIO connector.
  • Dimensions: 65mm x 56mm x 2mm / 2.56" x 2.2" x 0.08".
  • Weight: 12g / 0.42oz.
  • Hole Grid: 0.1 inch / 2.54mm spacing.
  • Hole Diameter: 0.9mm / 0.035".
  • Plating: Gold-plated pads for reliability and durability.
  • Mounting Holes: Pre-drilled and metal plated for sturdy mounting.

Pin Configuration and Descriptions

Pin Number Description
1-40 Corresponds to Raspberry Pi GPIO pins
A-D Power rails for +3.3V, +5V, Ground, etc.

Note: The pin numbers directly correspond to the Raspberry Pi's GPIO header pins.

Usage Instructions

Integrating with a Raspberry Pi

  1. Design Your Circuit: Plan your circuit layout before soldering any components onto the Perma-Proto HAT.
  2. Soldering Components: Carefully solder your electronic components onto the board, ensuring clean and secure connections.
  3. Connect to Raspberry Pi: Align the GPIO pins of the Perma-Proto HAT with the Raspberry Pi's GPIO header and press down gently to attach.
  4. Testing: Before powering on, double-check all connections to ensure there are no shorts or incorrect wiring.

Important Considerations and Best Practices

  • Power Ratings: Ensure that the power supplied to the HAT does not exceed the Raspberry Pi's power ratings.
  • GPIO Compatibility: Be aware of the voltage and current limitations of the Raspberry Pi's GPIO pins.
  • Short Circuits: Avoid creating short circuits that could damage the Raspberry Pi or the Perma-Proto HAT.
  • Static Discharge: Use proper anti-static precautions when handling the Perma-Proto HAT and Raspberry Pi.

Troubleshooting and FAQs

Common Issues

  • Loose Connections: If your circuit isn't working, check for loose solder joints or components.
  • Incorrect Wiring: Double-check that all components are connected according to your circuit design.
  • Power Issues: Ensure that the Raspberry Pi is adequately powered and that the power supply can handle the additional load from the HAT.

Solutions and Tips

  • Resoldering: If a connection is loose, reheat the solder joint and add a small amount of solder if necessary.
  • Circuit Testing: Test your circuit incrementally as you build it to isolate issues more easily.
  • Power Supply: Use a power supply with a higher current rating if your project includes power-hungry components.

FAQs

Q: Can I use the Perma-Proto HAT with a Raspberry Pi Zero? A: Yes, the Perma-Proto HAT is compatible with the Raspberry Pi Zero and any other Raspberry Pi with a 40-pin GPIO connector.

Q: How do I know which pin is which on the Raspberry Pi? A: Refer to the Raspberry Pi GPIO pinout diagram to identify each pin's function.

Q: Is it possible to stack multiple HATs on top of each other? A: Yes, you can stack multiple HATs, but ensure that the pins are not electrically conflicting and that there is enough clearance for components on each HAT.

Q: Do I need to solder the header pins onto the Perma-Proto HAT? A: Yes, you will need to solder the header pins onto the Perma-Proto HAT to connect it to the Raspberry Pi GPIO header.

For further assistance or questions, please visit the Adafruit support forums or contact Adafruit customer service.

Note: This documentation is provided for informational purposes only and is subject to change without notice.