Cirkit Designer Logo
Cirkit Designer
Your all-in-one circuit design IDE
Home / 
Component Documentation

How to Use SparkFun Load Sensor Combinator: Examples, Pinouts, and Specs

Image of SparkFun Load Sensor Combinator
Cirkit Designer LogoDesign with SparkFun Load Sensor Combinator in Cirkit Designer

Introduction

The SparkFun Load Sensor Combinator is an electronic module designed to interface with multiple load sensors, commonly known as strain gauges, to measure forces or weights. This component is particularly useful in applications where precise load measurements are required, such as in digital scales, industrial systems, and physical computing projects.

Explore Projects Built with SparkFun Load Sensor Combinator

Use Cirkit Designer to design, explore, and prototype these projects online. Some projects support real-time simulation. Click "Open Project" to start designing instantly!
ESP32-Based Smart Weighing System with Load Sensors and Wi-Fi Connectivity
Image of IOT_PROPOSAL: A project utilizing SparkFun Load Sensor Combinator in a practical application
This circuit is designed to measure weight and force using multiple load sensors and force sensing resistors. The load sensors are connected to an HX711 weighing sensor module, which interfaces with an ESP32 microcontroller for data processing. The ESP32 also reads data from the force sensing resistors, allowing for comprehensive weight and force measurement.
Cirkit Designer LogoOpen Project in Cirkit Designer
Smart Weighing System with ESP8266 and HX711 - Battery Powered and Wi-Fi Enabled
Image of gggg: A project utilizing SparkFun Load Sensor Combinator in a practical application
This circuit is a multi-sensor data acquisition system powered by a 18650 battery and managed by an ESP8266 microcontroller. It includes a load sensor interfaced with an HX711 module for weight measurement, an IR sensor, an ADXL345 accelerometer, a VL53L0X distance sensor, and a Neo 6M GPS module for location tracking. The system is designed for wireless data transmission and is supported by a TP4056 module for battery charging.
Cirkit Designer LogoOpen Project in Cirkit Designer
Arduino UNO-Based Load Sensor System with HX711 Interface and I2C LCD Display
Image of hama Project2: A project utilizing SparkFun Load Sensor Combinator in a practical application
This circuit is a weight measurement system using multiple load sensors connected to HX711 bridge sensor interfaces, which are then interfaced with Arduino UNO microcontrollers. The measured weight data is processed by the Arduinos and displayed on a 16x2 I2C LCD screen.
Cirkit Designer LogoOpen Project in Cirkit Designer
ESP32-Based Smart Weighing System with Load Sensors and HX711 Interface
Image of TA: A project utilizing SparkFun Load Sensor Combinator in a practical application
This circuit uses an ESP32 microcontroller to interface with multiple load sensors and force sensing resistors through an HX711 bridge sensor interface. The ESP32 reads data from the sensors to measure weight and force, which can be used for applications such as digital scales or pressure-sensitive devices.
Cirkit Designer LogoOpen Project in Cirkit Designer

Explore Projects Built with SparkFun Load Sensor Combinator

Use Cirkit Designer to design, explore, and prototype these projects online. Some projects support real-time simulation. Click "Open Project" to start designing instantly!
Image of IOT_PROPOSAL: A project utilizing SparkFun Load Sensor Combinator in a practical application
ESP32-Based Smart Weighing System with Load Sensors and Wi-Fi Connectivity
This circuit is designed to measure weight and force using multiple load sensors and force sensing resistors. The load sensors are connected to an HX711 weighing sensor module, which interfaces with an ESP32 microcontroller for data processing. The ESP32 also reads data from the force sensing resistors, allowing for comprehensive weight and force measurement.
Cirkit Designer LogoOpen Project in Cirkit Designer
Image of gggg: A project utilizing SparkFun Load Sensor Combinator in a practical application
Smart Weighing System with ESP8266 and HX711 - Battery Powered and Wi-Fi Enabled
This circuit is a multi-sensor data acquisition system powered by a 18650 battery and managed by an ESP8266 microcontroller. It includes a load sensor interfaced with an HX711 module for weight measurement, an IR sensor, an ADXL345 accelerometer, a VL53L0X distance sensor, and a Neo 6M GPS module for location tracking. The system is designed for wireless data transmission and is supported by a TP4056 module for battery charging.
Cirkit Designer LogoOpen Project in Cirkit Designer
Image of hama Project2: A project utilizing SparkFun Load Sensor Combinator in a practical application
Arduino UNO-Based Load Sensor System with HX711 Interface and I2C LCD Display
This circuit is a weight measurement system using multiple load sensors connected to HX711 bridge sensor interfaces, which are then interfaced with Arduino UNO microcontrollers. The measured weight data is processed by the Arduinos and displayed on a 16x2 I2C LCD screen.
Cirkit Designer LogoOpen Project in Cirkit Designer
Image of TA: A project utilizing SparkFun Load Sensor Combinator in a practical application
ESP32-Based Smart Weighing System with Load Sensors and HX711 Interface
This circuit uses an ESP32 microcontroller to interface with multiple load sensors and force sensing resistors through an HX711 bridge sensor interface. The ESP32 reads data from the sensors to measure weight and force, which can be used for applications such as digital scales or pressure-sensitive devices.
Cirkit Designer LogoOpen Project in Cirkit Designer

Common Applications and Use Cases

  • Digital weighing scales
  • Force measurement in testing equipment
  • Interactive installations that respond to weight or pressure
  • Feedback systems for robotics

Technical Specifications

Key Technical Details

  • Operating Voltage: 2.7V to 5.5V
  • On-board trim potentiometer for setting the gain
  • Compatible with various load sensors (strain gauges)

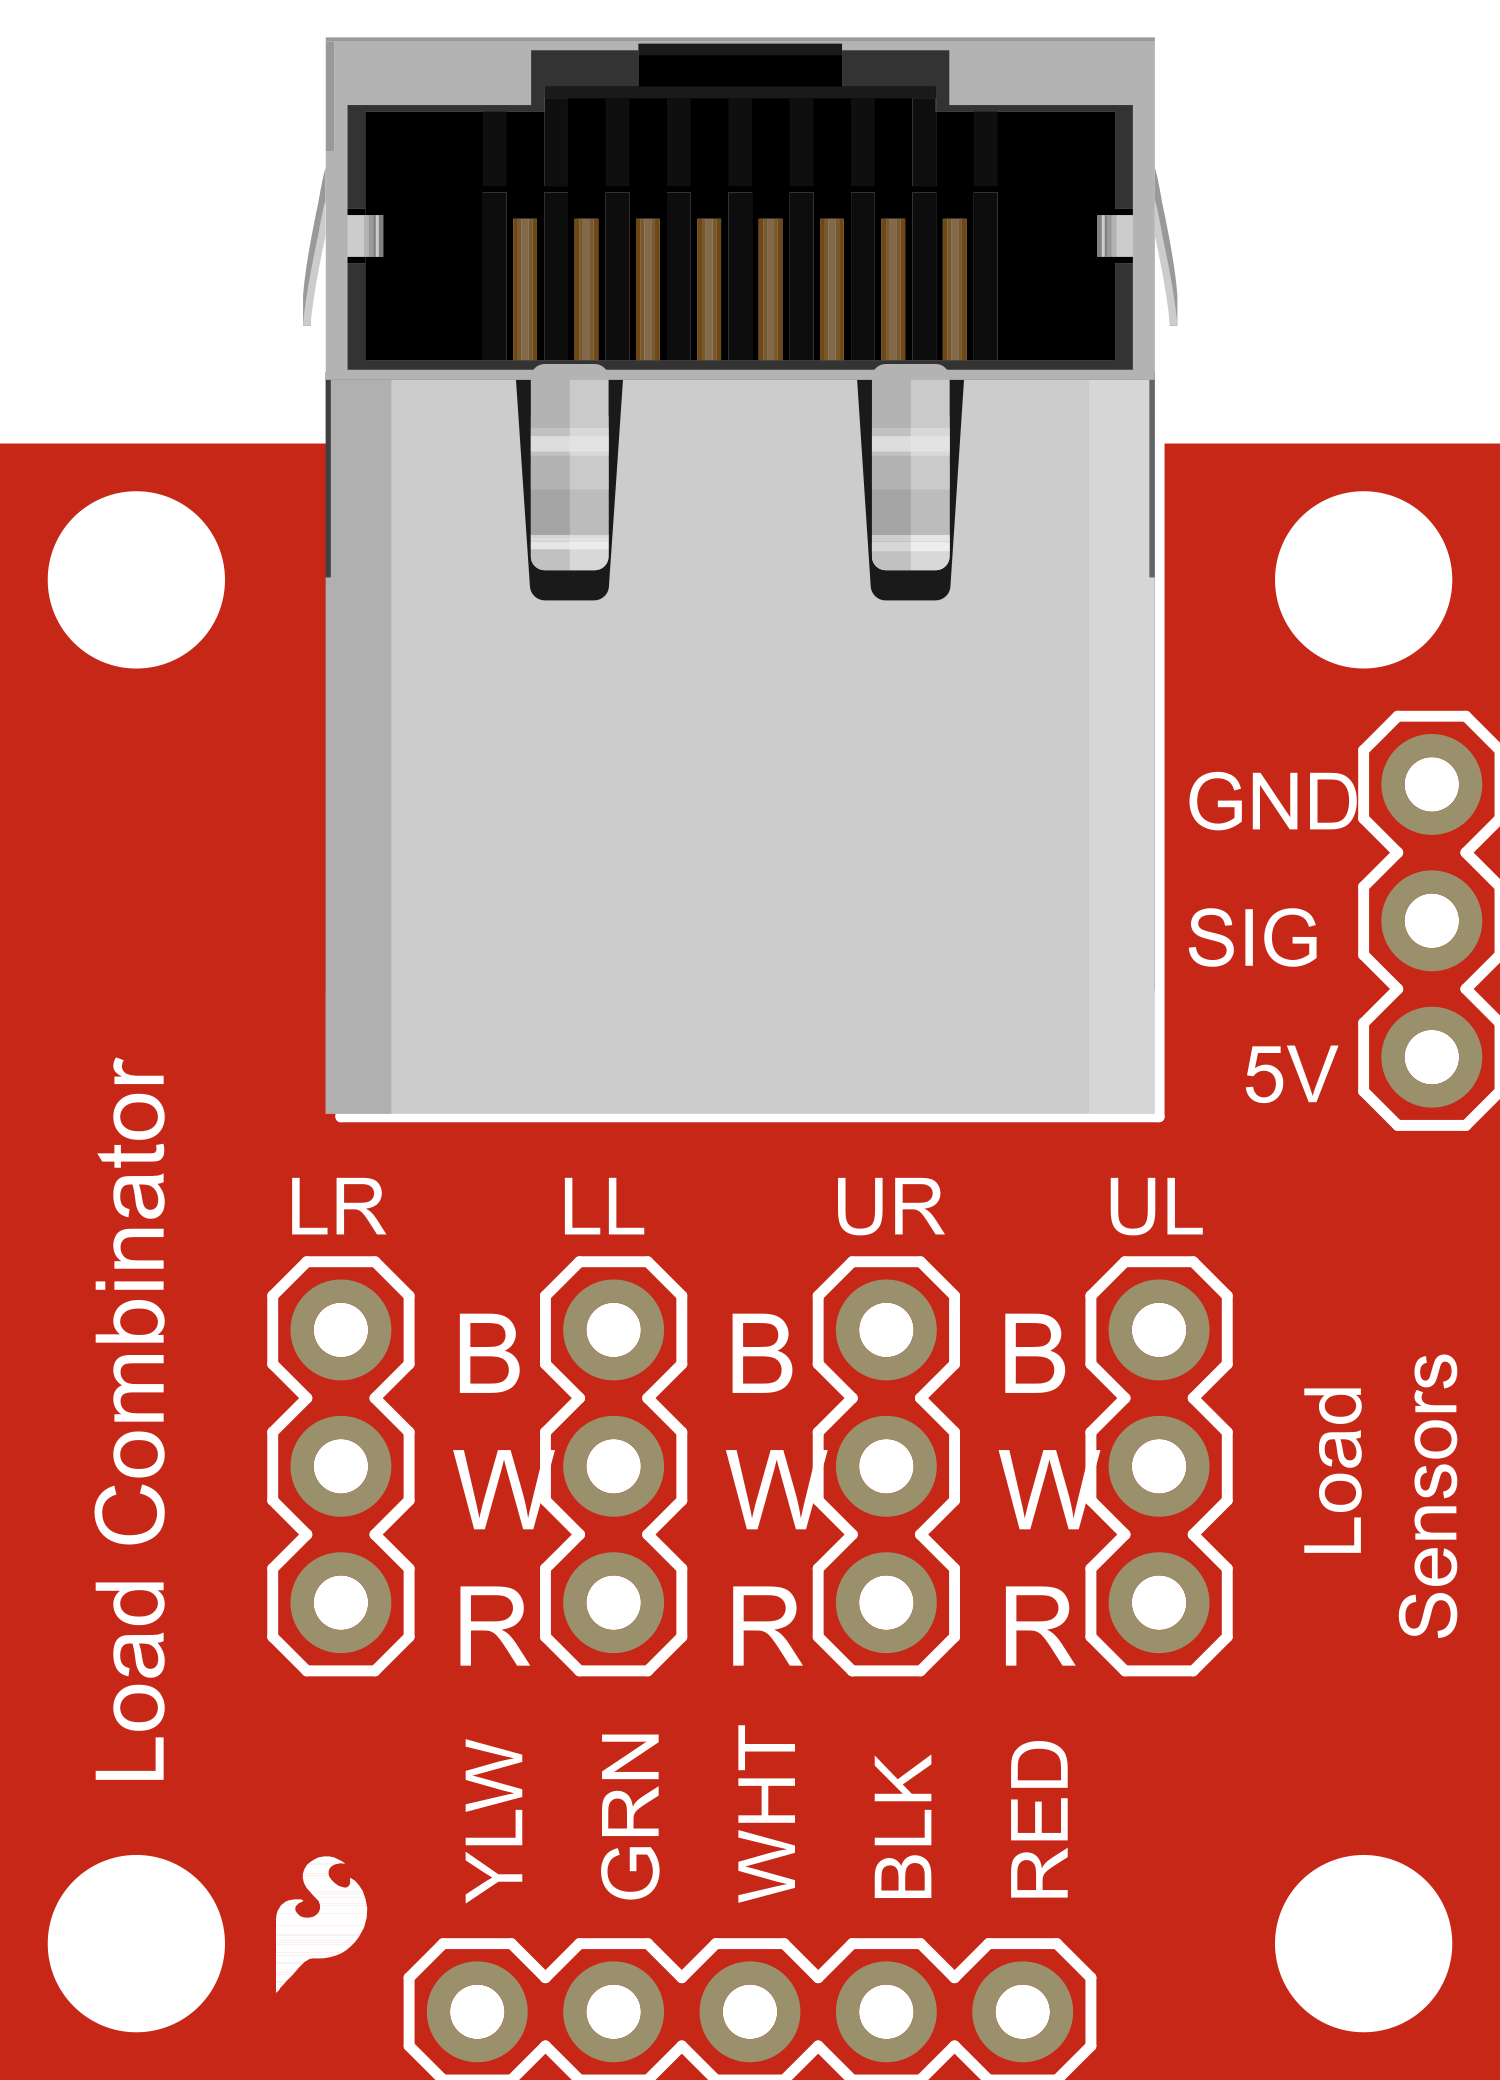
Pin Configuration and Descriptions

Pin Label Description
VCC Power supply input (2.7V to 5.5V)
GND Ground connection
SIG Analog signal output
RATE Output data rate selection (optional use)
S0-S3 Input pins for connecting individual sensors

Usage Instructions

How to Use the Component in a Circuit

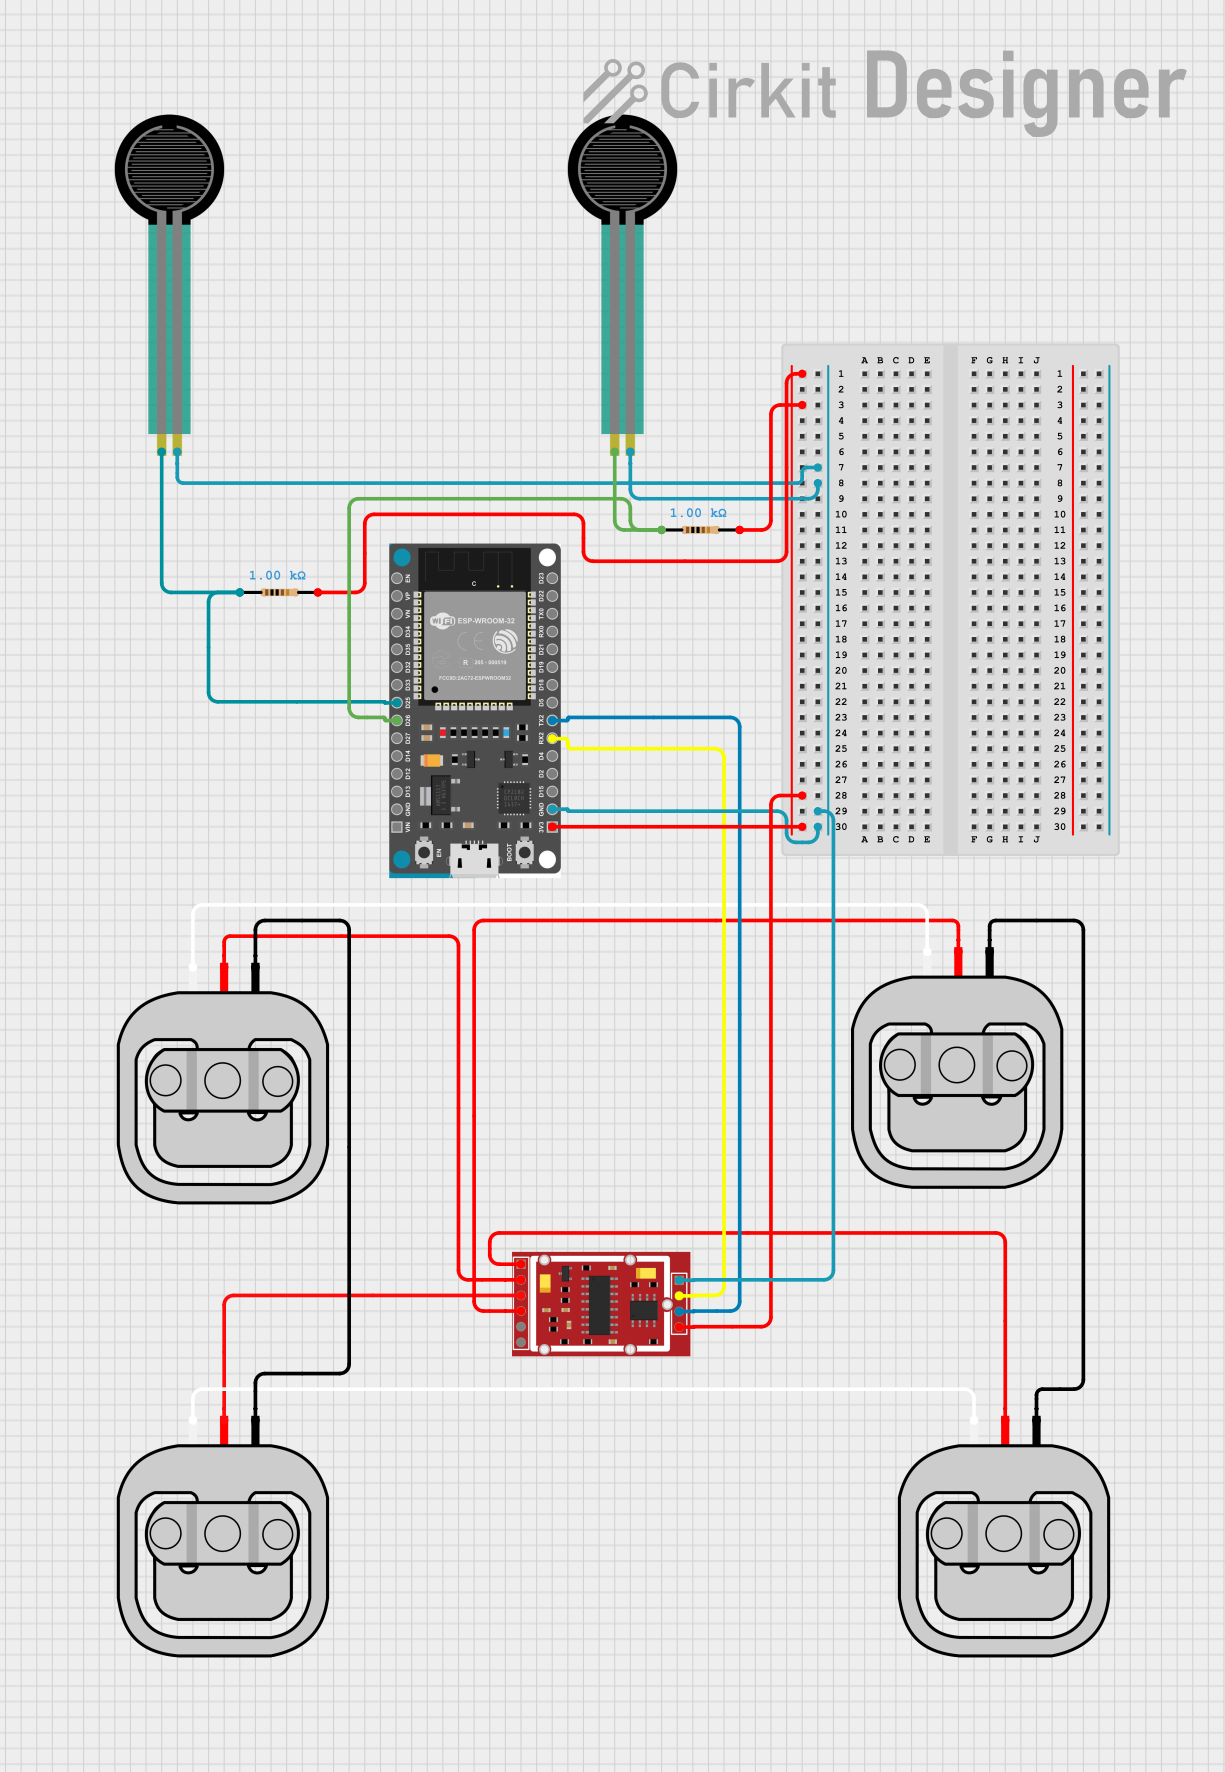
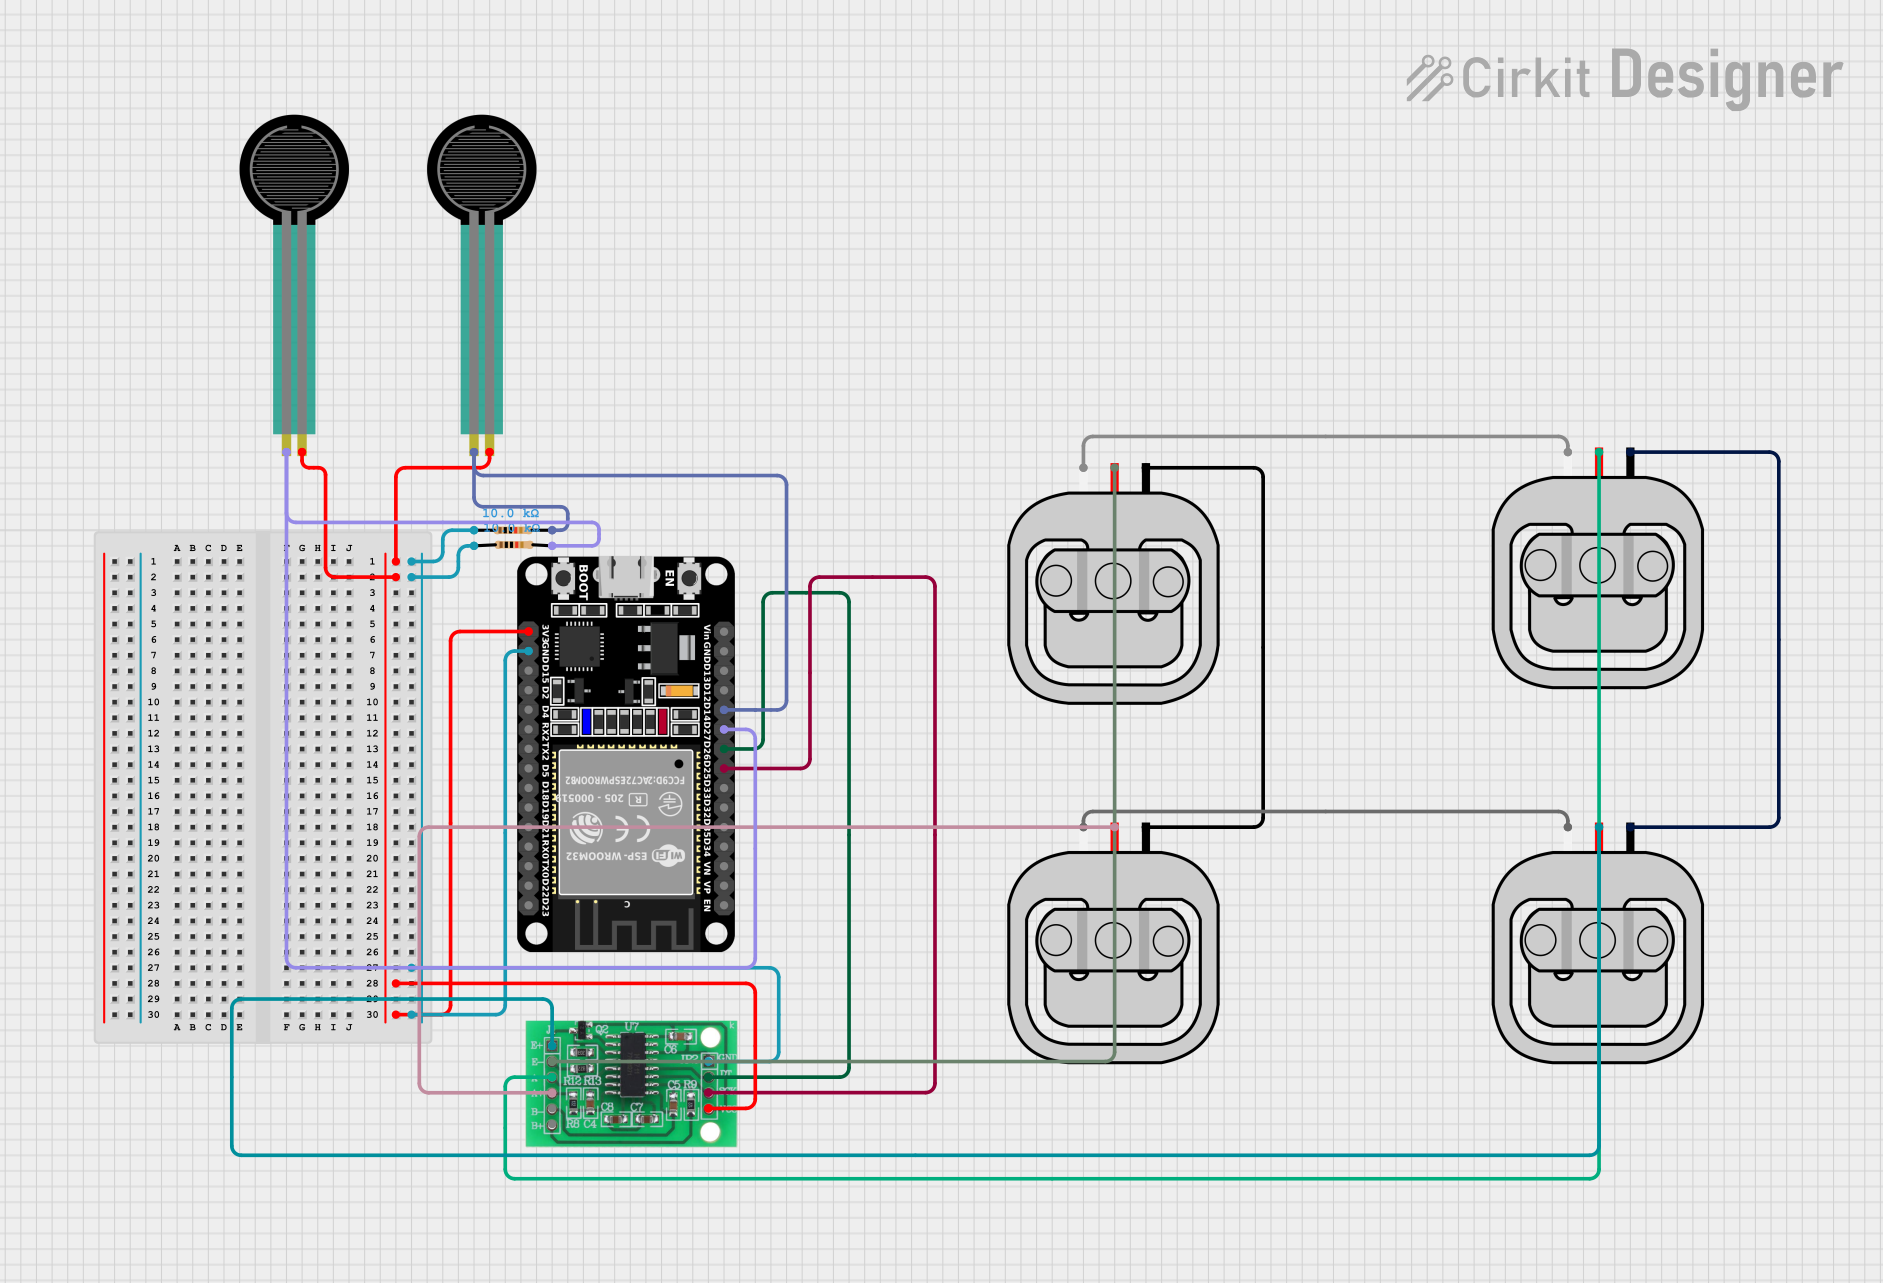
  1. Powering the Combinator: Connect the VCC pin to a power supply within the specified voltage range and the GND pin to the ground of your circuit.

  2. Connecting Load Sensors: Attach up to four load sensors to the S0-S3 input pins. Ensure that the sensors are properly aligned and secured.

  3. Calibration: Use the on-board trim potentiometer to adjust the gain until the desired sensitivity is achieved.

  4. Reading the Output: Connect the SIG pin to an analog input on your microcontroller to read the combined signal from the attached load sensors.

Important Considerations and Best Practices

  • Ensure that the power supply voltage does not exceed the maximum rating to prevent damage to the component.
  • Calibration is crucial for accurate measurements. Take multiple readings and adjust the gain accordingly.
  • Keep the load sensors and combinator away from moisture and extreme temperatures to maintain accuracy.

Example Code for Arduino UNO

// Example code for reading values from the SparkFun Load Sensor Combinator

const int analogPin = A0; // Connect SIG to analog pin A0 on Arduino UNO

void setup() {
  Serial.begin(9600); // Start serial communication at 9600 baud
}

void loop() {
  int sensorValue = analogRead(analogPin); // Read the analog value from combinator
  float weight = sensorValue * (5.0 / 1023.0); // Convert to weight assuming a specific scale
  Serial.println(weight); // Print the weight to the serial monitor
  delay(500); // Wait for half a second before reading again
}

Troubleshooting and FAQs

Common Issues Users Might Face

  • Inaccurate Readings: Ensure that the combinator is properly calibrated and that the load sensors are not damaged or improperly mounted.
  • No Signal Output: Check all connections, including power supply and sensor connections, to ensure they are secure and correct.

Solutions and Tips for Troubleshooting

  • Calibration: Adjust the on-board potentiometer while monitoring the output until the readings stabilize at the expected values.
  • Connection Issues: Use a multimeter to verify that there is continuity where expected and no shorts between pins.

FAQs

Q: Can I use different types of load sensors with the combinator? A: Yes, the combinator is designed to be compatible with various load sensors. However, for best results, use sensors with similar characteristics.

Q: What is the maximum number of load sensors I can connect? A: You can connect up to four load sensors to the SparkFun Load Sensor Combinator.

Q: How do I convert the analog signal to a weight measurement? A: You'll need to calibrate your system with known weights to create a conversion factor that translates the analog signal to a weight value.

Q: Can the combinator be used with microcontrollers other than the Arduino UNO? A: Yes, the combinator can be used with any microcontroller that has an analog input and can provide the appropriate power supply voltage.

Remember, this documentation is a starting point. For more complex applications or troubleshooting, refer to the manufacturer's datasheet and technical forums for additional support.