How to Use Battery Shield v3: Examples, Pinouts, and Specs
Introduction
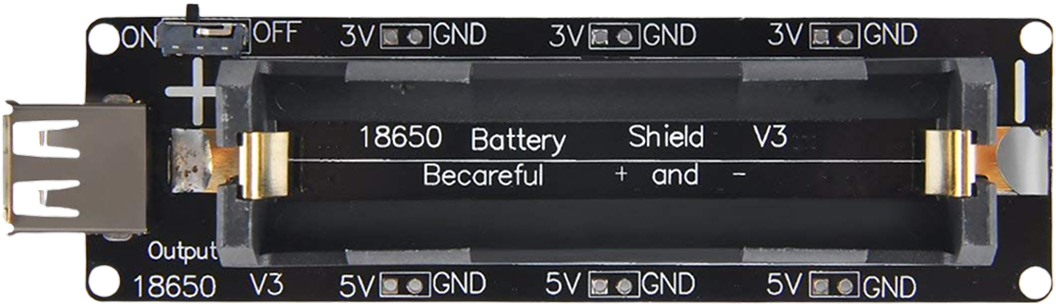
The Battery Shield v3 is an add-on board designed to provide a reliable and convenient power source for microcontroller-based projects. It allows users to power their microcontroller and peripherals using rechargeable batteries, making it ideal for portable and low-power applications. The shield typically includes integrated battery management, charging circuitry, and voltage regulation to ensure a stable and safe power supply.
Explore Projects Built with Battery Shield v3


Explore Projects Built with Battery Shield v3
Common Applications and Use Cases
- Portable IoT devices and wearables
- Robotics and remote-controlled systems
- Low-power sensor networks
- Prototyping battery-powered projects
- Backup power for microcontroller systems
Technical Specifications
The Battery Shield v3 is designed to work seamlessly with popular microcontrollers like Arduino and ESP8266/ESP32. Below are the key technical details:
Key Specifications
- Input Voltage (Charging): 5V via micro-USB or external power source
- Battery Type Supported: Single-cell 3.7V Li-ion or Li-Po battery
- Output Voltage: 5V (regulated) and 3.3V (regulated)
- Maximum Output Current: 1A (5V output)
- Charging Current: 500mA (default, adjustable in some models)
- Battery Protection: Overcharge, over-discharge, and short-circuit protection
- Connector Type: JST 2.0 for battery connection
- Dimensions: Typically 25mm x 50mm (may vary by manufacturer)
Pin Configuration and Descriptions
The Battery Shield v3 typically includes the following pins for interfacing with microcontrollers and peripherals:
| Pin | Label | Description |
|---|---|---|
| 1 | 5V | Regulated 5V output for powering microcontrollers and peripherals. |
| 2 | 3.3V | Regulated 3.3V output for low-power devices. |
| 3 | GND | Ground connection. |
| 4 | BAT | Direct connection to the battery (unregulated voltage). |
| 5 | CHG | Charging status indicator (active LOW when charging). |
| 6 | PWR | Power status indicator (active HIGH when power is available). |
Note: Pin labels and configurations may vary slightly depending on the manufacturer. Always refer to the specific datasheet for your Battery Shield v3.
Usage Instructions
How to Use the Battery Shield v3 in a Circuit
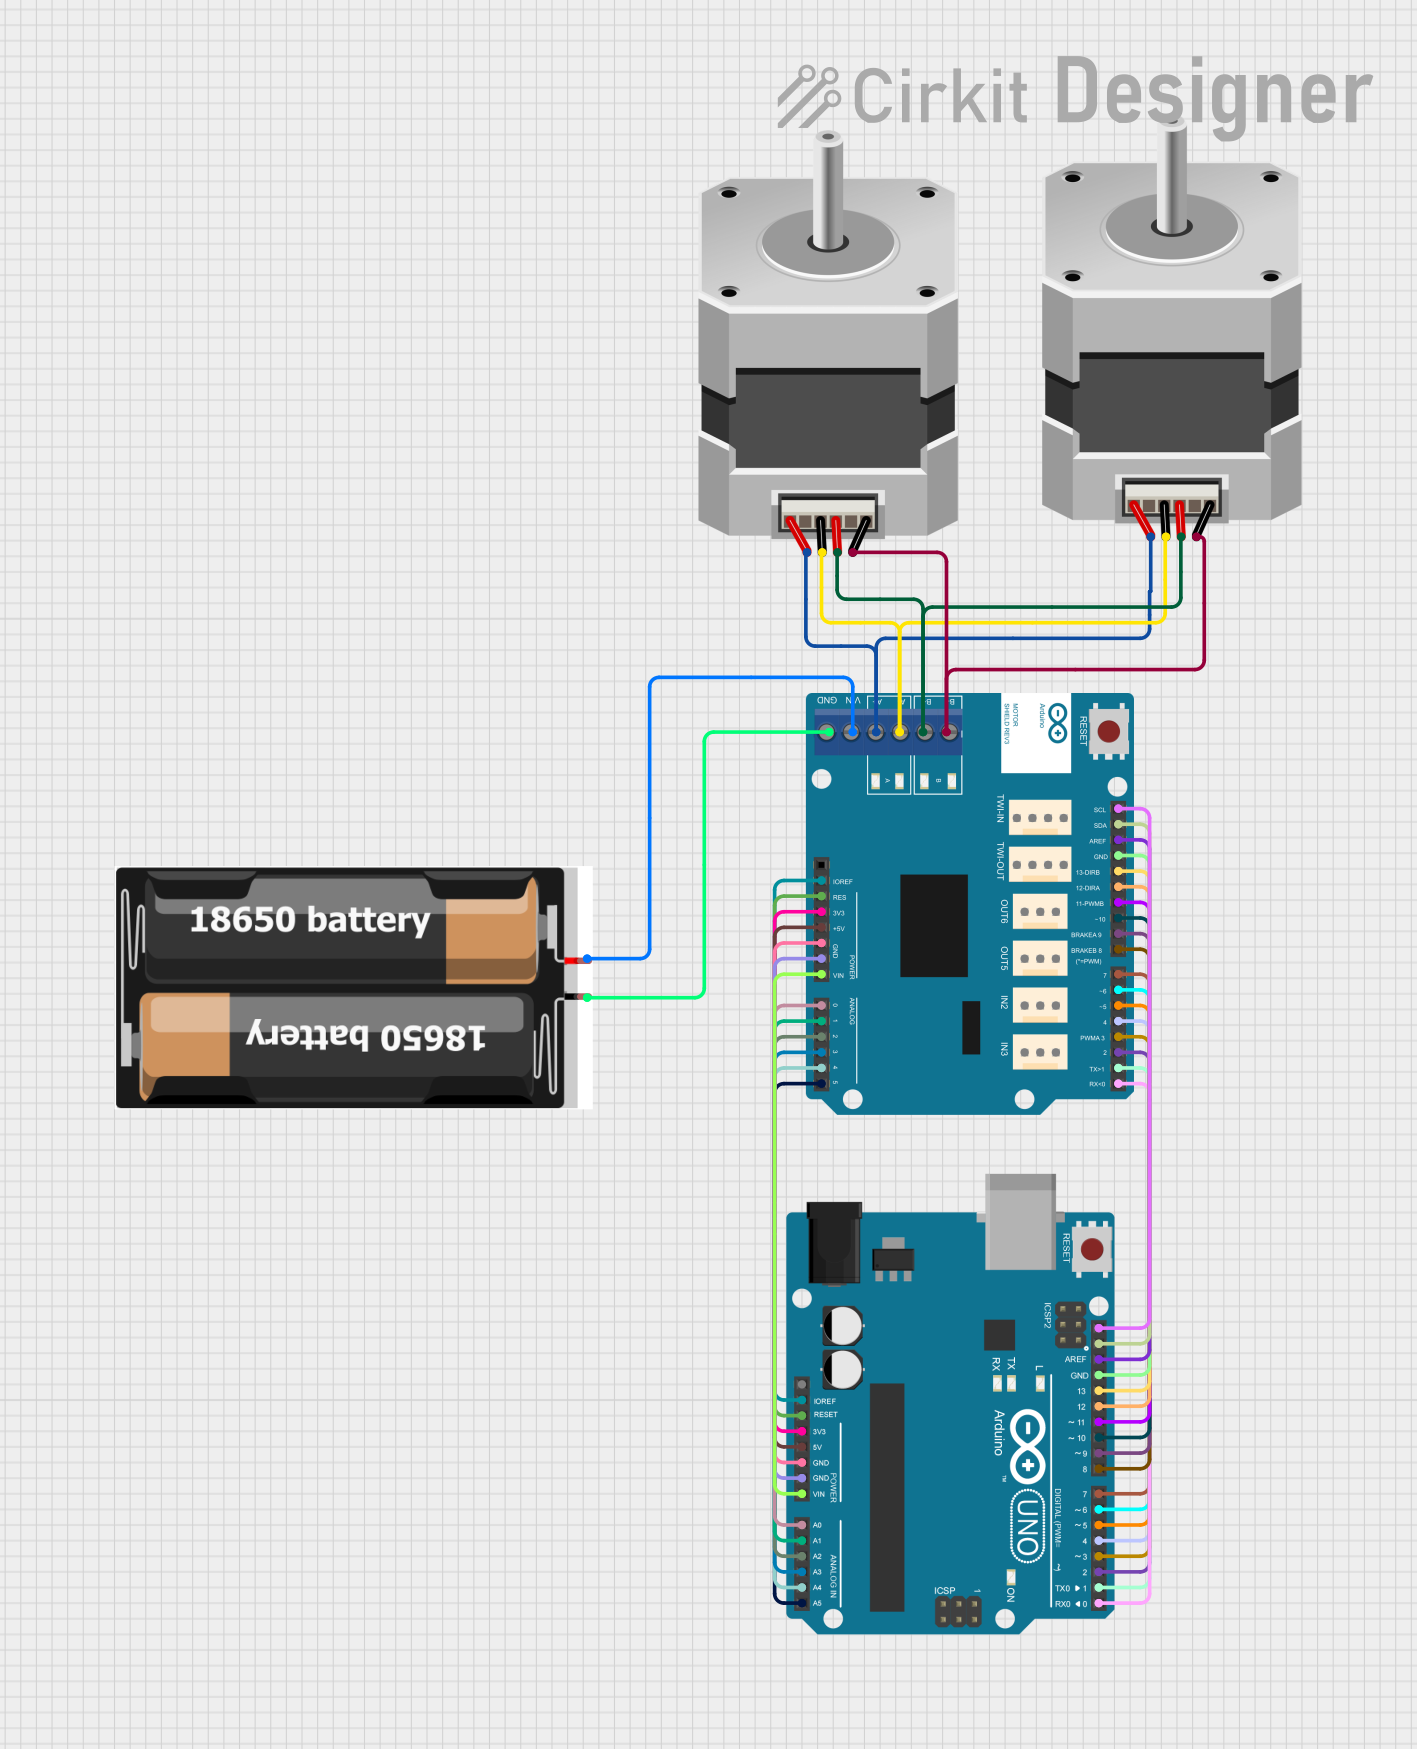
Connect the Battery:
- Attach a 3.7V Li-ion or Li-Po battery to the JST connector on the shield.
- Ensure the battery polarity matches the connector to avoid damage.
Power the Shield:
- Use a micro-USB cable to connect the shield to a 5V power source for charging.
- Alternatively, supply 5V to the shield via the 5V pin.
Connect to a Microcontroller:
- Use the 5V and GND pins to power your microcontroller.
- If your microcontroller operates at 3.3V, use the 3.3V pin instead.
Monitor Status:
- Use the CHG pin to monitor the charging status (LOW = charging, HIGH = fully charged).
- Use the PWR pin to check if the shield is supplying power (HIGH = power available).
Important Considerations and Best Practices
- Battery Selection: Use only compatible 3.7V Li-ion or Li-Po batteries with a JST 2.0 connector.
- Heat Management: Avoid operating the shield in high-temperature environments, as charging generates heat.
- Current Limitations: Do not exceed the maximum output current (1A) to prevent damage to the shield.
- Charging Safety: Always charge the battery in a well-ventilated area and avoid overcharging.
Example: Using Battery Shield v3 with Arduino UNO
Below is an example of how to connect the Battery Shield v3 to an Arduino UNO and monitor the charging status:
Circuit Connections
- Connect the 5V pin of the shield to the 5V pin of the Arduino UNO.
- Connect the GND pin of the shield to the GND pin of the Arduino UNO.
- Connect the CHG pin of the shield to a digital input pin (e.g., D2) on the Arduino UNO.
Arduino Code
// Define the pin connected to the CHG (charging status) pin of the shield
const int chargeStatusPin = 2;

void setup() {
  // Initialize the serial monitor for debugging
  Serial.begin(9600);

  // Set the charge status pin as input
  pinMode(chargeStatusPin, INPUT);
}

void loop() {
  // Read the charging status
  int chargeStatus = digitalRead(chargeStatusPin);

  // Check if the battery is charging
  if (chargeStatus == LOW) {
    Serial.println("Battery is charging...");
  } else {
    Serial.println("Battery is fully charged or not charging.");
  }

  // Add a small delay to avoid flooding the serial monitor
  delay(1000);
}
Note: The CHG pin is active LOW, meaning it outputs LOW when the battery is charging.
Troubleshooting and FAQs
Common Issues and Solutions
Battery Not Charging:
- Cause: Incorrect battery connection or damaged battery.
- Solution: Verify the battery polarity and ensure the battery is functional.
No Output Voltage:
- Cause: Battery is depleted or not connected.
- Solution: Charge the battery or check the battery connection.
Shield Overheating:
- Cause: Excessive current draw or high ambient temperature.
- Solution: Reduce the load on the shield and ensure proper ventilation.
Microcontroller Not Powering On:
- Cause: Insufficient output voltage or loose connections.
- Solution: Check the 5V/3.3V output and ensure secure connections.
FAQs
Q1: Can I use the Battery Shield v3 without a battery?
A1: Yes, the shield can be powered directly via the micro-USB port or 5V pin, but the battery functionality will not be available.
Q2: How do I adjust the charging current?
A2: Some versions of the Battery Shield v3 allow adjusting the charging current via a solder jumper or potentiometer. Refer to the specific model's datasheet for instructions.
Q3: Is the shield compatible with 18650 batteries?
A3: Yes, as long as the 18650 battery is a single-cell 3.7V Li-ion type and has a compatible JST connector.
Q4: Can I use the shield to power high-current devices?
A4: The shield is designed for low-power applications. Do not exceed the 1A output current limit to avoid damage.
By following this documentation, you can effectively integrate the Battery Shield v3 into your projects and troubleshoot common issues.