Cirkit Designer Logo
Cirkit Designer
Your all-in-one circuit design IDE
Home / 
Component Documentation

How to Use Rain Droplet: Examples, Pinouts, and Specs

Image of Rain Droplet
Cirkit Designer LogoDesign with Rain Droplet in Cirkit Designer

Introduction

The Rain Droplet is a small droplet of water that falls from the atmosphere. While it is a natural phenomenon, in the context of electronics, it is often simulated or detected using specialized sensors. These sensors are designed to measure precipitation levels, detect the presence of rain, or simulate weather patterns in controlled environments. Rain droplet sensors are widely used in environmental monitoring systems, agricultural automation, and weather simulation projects.

Explore Projects Built with Rain Droplet

Use Cirkit Designer to design, explore, and prototype these projects online. Some projects support real-time simulation. Click "Open Project" to start designing instantly!
Arduino Nano-Based Rain Detection and Light Sensing System
Image of smart window: A project utilizing Rain Droplet in a practical application
This circuit features an Arduino Nano microcontroller connected to a rain sensor and a photocell (LDR) for environmental sensing, and a Tower Pro SG90 servo for actuation. The rain sensor's analog output (AO) is connected to the Arduino's analog input (A0) to measure rain intensity, while the photocell is connected to another analog input (A1) through a 220-ohm resistor to measure light levels. The servo is controlled by a digital output (D2) from the Arduino, and all components share a common power supply from the Arduino's 5V and ground (GND) pins.
Cirkit Designer LogoOpen Project in Cirkit Designer
Arduino UNO Based Weather Monitoring System with Rain Sensor and DHT11
Image of projekmikro: A project utilizing Rain Droplet in a practical application
This circuit features an Arduino UNO microcontroller interfaced with a rain sensor, a DHT11 temperature and humidity sensor, and a servo motor (MG996R). Two LEDs with series resistors are connected to digital pins for indication purposes. The rain sensor's digital output is connected to the Arduino, as is the DHT11 data line, and the servo motor is controlled via a signal line from the Arduino. The code provided for the Arduino is a template with empty setup and loop functions, indicating that the specific functionality is yet to be implemented.
Cirkit Designer LogoOpen Project in Cirkit Designer
Arduino UNO-Based Automatic Umbrella Control System with Rain and Temperature Sensors
Image of umbrella automatic: A project utilizing Rain Droplet in a practical application
This circuit is an automatic umbrella control system using an Arduino UNO, a rain sensor, a DHT11 temperature sensor, an LDR module, a servo motor, and an LED. The system opens the umbrella when it detects rain or when the temperature exceeds 30°C, and lights up the LED during the night.
Cirkit Designer LogoOpen Project in Cirkit Designer
Arduino UNO Controlled Rain-Activated Servo System
Image of Copy of iot batch 17: A project utilizing Rain Droplet in a practical application
This circuit features an Arduino UNO microcontroller connected to a YL-83 Rain Sensor and a Tower Pro SG90 servo motor. The rain sensor's analog output is read by the Arduino on pin D4 to detect rain presence, and the servo motor is controlled via pin D5. When rain is detected, the servo motor is actuated to a position based on the sensor's output, likely to perform an action like closing a water tap or moving a cover to protect something from the rain.
Cirkit Designer LogoOpen Project in Cirkit Designer

Explore Projects Built with Rain Droplet

Use Cirkit Designer to design, explore, and prototype these projects online. Some projects support real-time simulation. Click "Open Project" to start designing instantly!
Image of smart window: A project utilizing Rain Droplet in a practical application
Arduino Nano-Based Rain Detection and Light Sensing System
This circuit features an Arduino Nano microcontroller connected to a rain sensor and a photocell (LDR) for environmental sensing, and a Tower Pro SG90 servo for actuation. The rain sensor's analog output (AO) is connected to the Arduino's analog input (A0) to measure rain intensity, while the photocell is connected to another analog input (A1) through a 220-ohm resistor to measure light levels. The servo is controlled by a digital output (D2) from the Arduino, and all components share a common power supply from the Arduino's 5V and ground (GND) pins.
Cirkit Designer LogoOpen Project in Cirkit Designer
Image of projekmikro: A project utilizing Rain Droplet in a practical application
Arduino UNO Based Weather Monitoring System with Rain Sensor and DHT11
This circuit features an Arduino UNO microcontroller interfaced with a rain sensor, a DHT11 temperature and humidity sensor, and a servo motor (MG996R). Two LEDs with series resistors are connected to digital pins for indication purposes. The rain sensor's digital output is connected to the Arduino, as is the DHT11 data line, and the servo motor is controlled via a signal line from the Arduino. The code provided for the Arduino is a template with empty setup and loop functions, indicating that the specific functionality is yet to be implemented.
Cirkit Designer LogoOpen Project in Cirkit Designer
Image of umbrella automatic: A project utilizing Rain Droplet in a practical application
Arduino UNO-Based Automatic Umbrella Control System with Rain and Temperature Sensors
This circuit is an automatic umbrella control system using an Arduino UNO, a rain sensor, a DHT11 temperature sensor, an LDR module, a servo motor, and an LED. The system opens the umbrella when it detects rain or when the temperature exceeds 30°C, and lights up the LED during the night.
Cirkit Designer LogoOpen Project in Cirkit Designer
Image of Copy of iot batch 17: A project utilizing Rain Droplet in a practical application
Arduino UNO Controlled Rain-Activated Servo System
This circuit features an Arduino UNO microcontroller connected to a YL-83 Rain Sensor and a Tower Pro SG90 servo motor. The rain sensor's analog output is read by the Arduino on pin D4 to detect rain presence, and the servo motor is controlled via pin D5. When rain is detected, the servo motor is actuated to a position based on the sensor's output, likely to perform an action like closing a water tap or moving a cover to protect something from the rain.
Cirkit Designer LogoOpen Project in Cirkit Designer

Common Applications and Use Cases

  • Weather Monitoring Systems: Detecting rainfall and measuring precipitation levels.
  • Agricultural Automation: Triggering irrigation systems based on rain detection.
  • Smart Home Systems: Automatically closing windows or activating rain shields.
  • Educational Projects: Simulating weather patterns for learning purposes.
  • IoT Devices: Integrating rain detection into smart environmental monitoring systems.

Technical Specifications

Below are the technical specifications for a typical rain droplet sensor module:

Parameter Value
Operating Voltage 3.3V - 5V
Output Type Analog and Digital
Analog Output Range 0V - 5V (proportional to wetness)
Digital Output High (no rain) / Low (rain detected)
Sensitivity Adjustment Via onboard potentiometer
Dimensions ~3cm x 2cm
Operating Temperature -40°C to 85°C

Pin Configuration and Descriptions

Pin Name Description
VCC Power supply pin (3.3V - 5V). Connect to the positive terminal of the power source.
GND Ground pin. Connect to the ground of the circuit.
A0 Analog output pin. Outputs a voltage proportional to the amount of water detected.
D0 Digital output pin. Outputs HIGH or LOW based on the presence of rain.

Usage Instructions

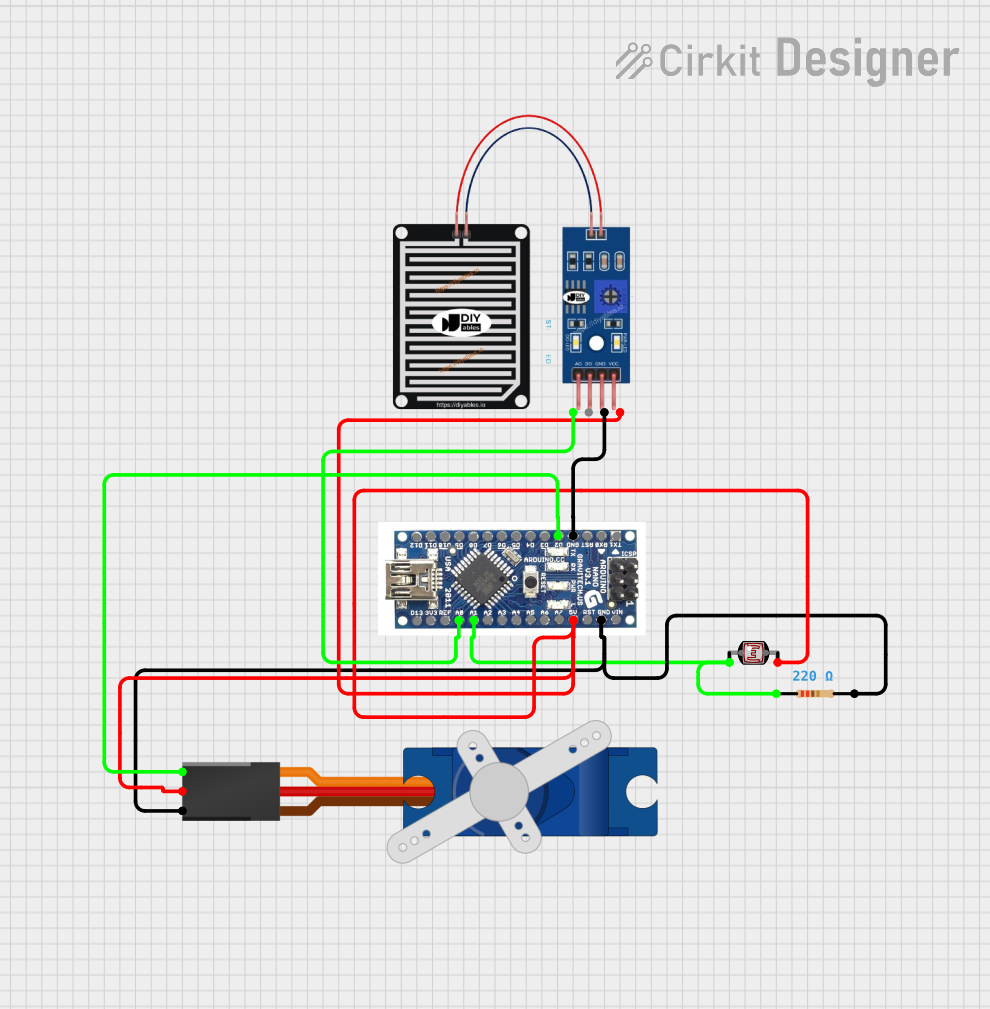
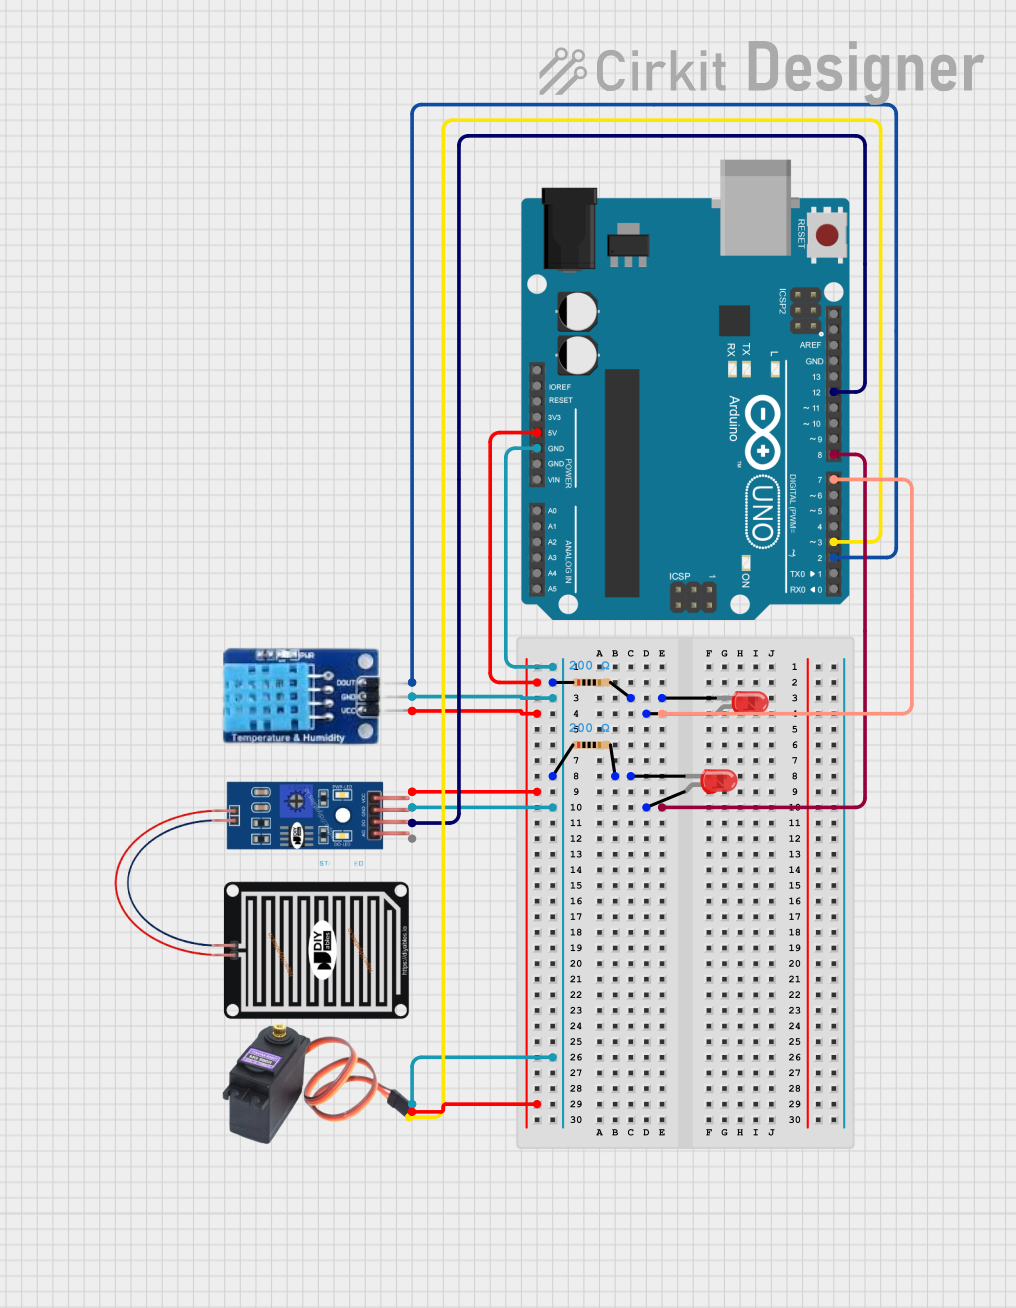
How to Use the Component in a Circuit

  1. Power the Sensor: Connect the VCC pin to a 3.3V or 5V power source and the GND pin to the ground.
  2. Connect Outputs:
    • For analog readings, connect the A0 pin to an analog input pin on your microcontroller.
    • For digital readings, connect the D0 pin to a digital input pin on your microcontroller.
  3. Adjust Sensitivity: Use the onboard potentiometer to adjust the sensitivity of the digital output. Turn it clockwise to increase sensitivity and counterclockwise to decrease it.
  4. Place the Sensor: Position the sensor in an area where it can detect rain droplets. Ensure it is not submerged in water or exposed to extreme conditions beyond its operating range.

Important Considerations and Best Practices

  • Avoid Submersion: The sensor is designed to detect rain droplets, not to be submerged in water.
  • Clean Regularly: Dust or debris on the sensor surface can affect its accuracy. Clean it gently with a soft cloth.
  • Protect from Corrosion: If used outdoors, consider applying a protective coating to prevent corrosion.
  • Use Pull-Up Resistors: For digital output, use a pull-up resistor if the microcontroller does not have an internal one.
  • Test Sensitivity: Before deployment, test the sensor's sensitivity and adjust the potentiometer as needed.

Example Code for Arduino UNO

Below is an example of how to use a rain droplet sensor with an Arduino UNO:

// Define pin connections
const int analogPin = A0; // Analog output pin connected to A0
const int digitalPin = 2; // Digital output pin connected to D2
const int ledPin = 13;    // LED pin to indicate rain detection

void setup() {
  pinMode(digitalPin, INPUT); // Set digital pin as input
  pinMode(ledPin, OUTPUT);    // Set LED pin as output
  Serial.begin(9600);         // Initialize serial communication
}

void loop() {
  // Read analog value from the sensor
  int analogValue = analogRead(analogPin);
  Serial.print("Analog Value: ");
  Serial.println(analogValue);

  // Read digital value from the sensor
  int digitalValue = digitalRead(digitalPin);
  Serial.print("Digital Value: ");
  Serial.println(digitalValue);

  // Turn on LED if rain is detected (digital output is LOW)
  if (digitalValue == LOW) {
    digitalWrite(ledPin, HIGH);
    Serial.println("Rain detected!");
  } else {
    digitalWrite(ledPin, LOW);
    Serial.println("No rain detected.");
  }

  delay(1000); // Wait for 1 second before the next reading
}

Troubleshooting and FAQs

Common Issues Users Might Face

  1. No Output from the Sensor:

    • Solution: Check the power connections to ensure the sensor is receiving the correct voltage.
    • Tip: Verify that the GND pin is properly connected to the circuit ground.
  2. Inconsistent Readings:

    • Solution: Clean the sensor surface to remove dust or debris.
    • Tip: Ensure the sensor is not exposed to extreme environmental conditions.
  3. Digital Output Always HIGH or LOW:

    • Solution: Adjust the sensitivity using the onboard potentiometer.
    • Tip: Test the sensor with a small amount of water to verify its functionality.
  4. Analog Output Not Changing:

    • Solution: Check the analog pin connection and ensure it is properly configured in the code.
    • Tip: Use a multimeter to measure the voltage at the A0 pin for troubleshooting.

FAQs

Q: Can the sensor detect humidity or only rain?
A: The sensor is designed to detect rain droplets. It is not suitable for measuring ambient humidity.

Q: Can I use this sensor indoors?
A: Yes, the sensor can be used indoors for simulations or controlled experiments, but it is primarily designed for outdoor use.

Q: How do I protect the sensor from corrosion?
A: Apply a thin layer of waterproof coating or use a protective enclosure to shield the sensor from prolonged exposure to moisture.

Q: What is the maximum distance between the sensor and the microcontroller?
A: The maximum distance depends on the quality of the wires and the environment, but it is generally recommended to keep the distance under 1 meter to avoid signal degradation.