Cirkit Designer Logo
Cirkit Designer
Your all-in-one circuit design IDE
Home / 
Component Documentation

How to Use Adafruit NeoPixel FeatherWing: Examples, Pinouts, and Specs

Image of Adafruit NeoPixel FeatherWing
Cirkit Designer LogoDesign with Adafruit NeoPixel FeatherWing in Cirkit Designer

Introduction

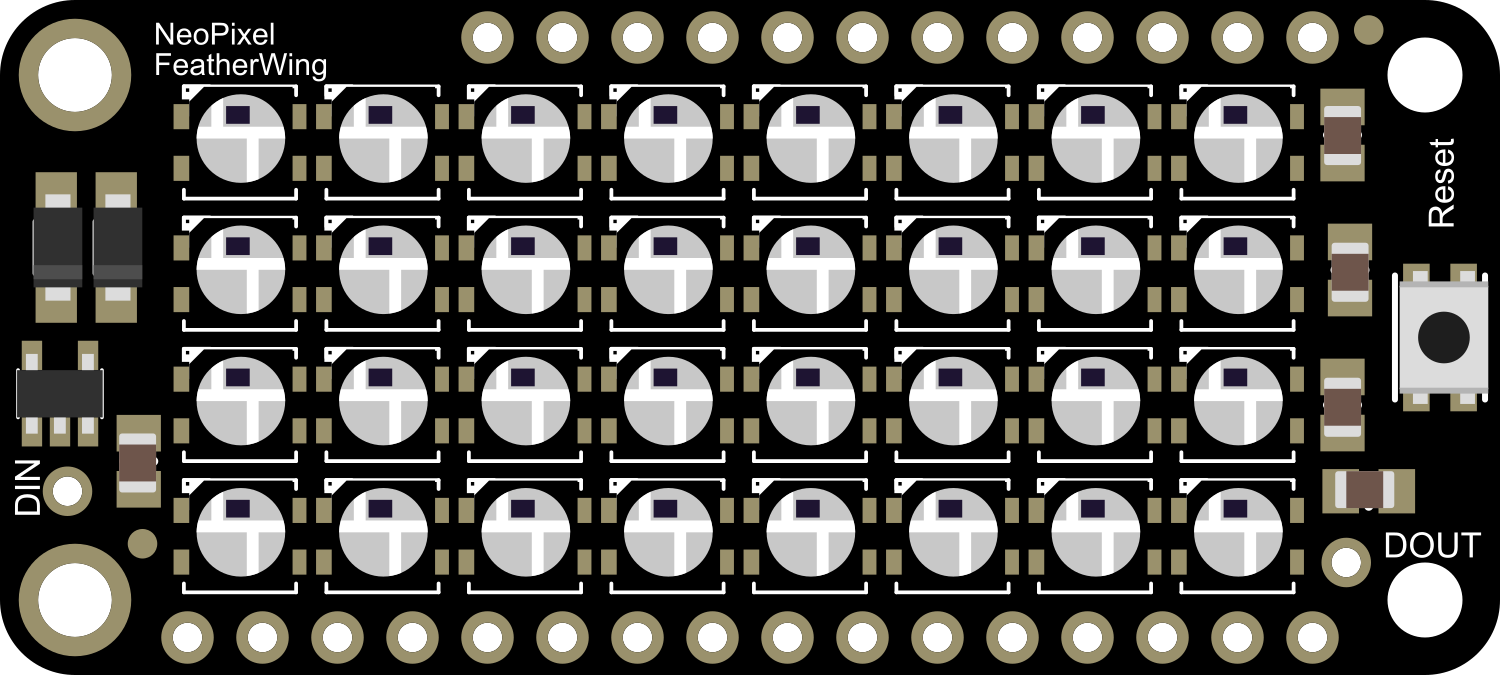
The Adafruit NeoPixel FeatherWing is an add-on board for the Adafruit Feather ecosystem. It features a matrix of individually addressable RGB LEDs, commonly known as NeoPixels. These LEDs can be controlled with a single microcontroller pin and offer full 24-bit color, which allows for a wide range of color blending and animations. The FeatherWing is ideal for creating colorful and complex lighting effects for wearables, indicators, displays, and any project requiring a splash of vibrant color.

Explore Projects Built with Adafruit NeoPixel FeatherWing

Use Cirkit Designer to design, explore, and prototype these projects online. Some projects support real-time simulation. Click "Open Project" to start designing instantly!
Battery-Powered Adafruit Flora RGB NeoPixel Light Show
Image of FloraTest: A project utilizing Adafruit NeoPixel FeatherWing in a practical application
This circuit consists of an Adafruit Flora v3 microcontroller connected to a Breadboard-friendly RGB Smart NeoPixel and powered by a 3xAAA battery pack. The microcontroller runs code to control the NeoPixel, displaying various colors and patterns.
Cirkit Designer LogoOpen Project in Cirkit Designer
Arduino UNO and OLED FeatherWing Display: Battery-Powered Hello World Project
Image of ARDUINO_SSD1306: A project utilizing Adafruit NeoPixel FeatherWing in a practical application
This circuit consists of an Arduino UNO connected to an Adafruit OLED FeatherWing display via I2C communication (SDA and SCL lines). The Arduino is powered through a Vcc source and provides 3.3V and GND connections to the OLED display. The Arduino runs a program to display 'Hello, World!' on the OLED screen.
Cirkit Designer LogoOpen Project in Cirkit Designer
Arduino-Controlled NeoPixel LED Display with Voltage Regulation
Image of KK project: A project utilizing Adafruit NeoPixel FeatherWing in a practical application
This circuit features an Arduino 101 controlling multiple individually addressable Adafruit NeoPixel LED rings, with power regulation and decoupling provided by 7805 voltage regulators and electrolytic capacitors, all powered by a 12V battery.
Cirkit Designer LogoOpen Project in Cirkit Designer
Arduino Nano Controlled Sound and Light Effects System with NeoPixel LEDs
Image of Proton Pack: A project utilizing Adafruit NeoPixel FeatherWing in a practical application
This circuit features an Arduino Nano microcontroller connected to a series of WS2812B LEDs, Adafruit NeoPixel Jewels, and Sticks, forming an addressable LED array. The Arduino controls the LED patterns and sequences, and interfaces with an Adafruit Audio FX Mini Sound Board for audio playback, which is amplified by an Adafruit PAM8302 amplifier connected to piezo speakers. The circuit includes toggle and push switches for user interaction, and uses a lipo battery with MP1584EN power regulators for power management. The embedded code on the Arduino facilitates complex lighting effects and sound playback, responding to switch states and button presses to create an interactive experience.
Cirkit Designer LogoOpen Project in Cirkit Designer

Explore Projects Built with Adafruit NeoPixel FeatherWing

Use Cirkit Designer to design, explore, and prototype these projects online. Some projects support real-time simulation. Click "Open Project" to start designing instantly!
Image of FloraTest: A project utilizing Adafruit NeoPixel FeatherWing in a practical application
Battery-Powered Adafruit Flora RGB NeoPixel Light Show
This circuit consists of an Adafruit Flora v3 microcontroller connected to a Breadboard-friendly RGB Smart NeoPixel and powered by a 3xAAA battery pack. The microcontroller runs code to control the NeoPixel, displaying various colors and patterns.
Cirkit Designer LogoOpen Project in Cirkit Designer
Image of ARDUINO_SSD1306: A project utilizing Adafruit NeoPixel FeatherWing in a practical application
Arduino UNO and OLED FeatherWing Display: Battery-Powered Hello World Project
This circuit consists of an Arduino UNO connected to an Adafruit OLED FeatherWing display via I2C communication (SDA and SCL lines). The Arduino is powered through a Vcc source and provides 3.3V and GND connections to the OLED display. The Arduino runs a program to display 'Hello, World!' on the OLED screen.
Cirkit Designer LogoOpen Project in Cirkit Designer
Image of KK project: A project utilizing Adafruit NeoPixel FeatherWing in a practical application
Arduino-Controlled NeoPixel LED Display with Voltage Regulation
This circuit features an Arduino 101 controlling multiple individually addressable Adafruit NeoPixel LED rings, with power regulation and decoupling provided by 7805 voltage regulators and electrolytic capacitors, all powered by a 12V battery.
Cirkit Designer LogoOpen Project in Cirkit Designer
Image of Proton Pack: A project utilizing Adafruit NeoPixel FeatherWing in a practical application
Arduino Nano Controlled Sound and Light Effects System with NeoPixel LEDs
This circuit features an Arduino Nano microcontroller connected to a series of WS2812B LEDs, Adafruit NeoPixel Jewels, and Sticks, forming an addressable LED array. The Arduino controls the LED patterns and sequences, and interfaces with an Adafruit Audio FX Mini Sound Board for audio playback, which is amplified by an Adafruit PAM8302 amplifier connected to piezo speakers. The circuit includes toggle and push switches for user interaction, and uses a lipo battery with MP1584EN power regulators for power management. The embedded code on the Arduino facilitates complex lighting effects and sound playback, responding to switch states and button presses to create an interactive experience.
Cirkit Designer LogoOpen Project in Cirkit Designer

Common Applications and Use Cases

  • Wearable electronics
  • Decorative lighting
  • Signal indicators
  • Interactive art installations
  • Educational projects teaching electronics and programming

Technical Specifications

Key Technical Details

  • Operating Voltage: 3.3V to 5V
  • Number of LEDs: 4x8 matrix, 32 total NeoPixels
  • Communication: Single-wire digital interface
  • Maximum Current Draw: ~60mA per LED at full brightness

Pin Configuration and Descriptions

Pin Description
GND Ground connection
VBAT Power supply (3.3V to 5V)
DIN Data input from microcontroller
DOUT Data output for chaining additional NeoPixel devices

Usage Instructions

How to Use the Component in a Circuit

  1. Powering the FeatherWing: Connect the VBAT pin to a 3.3V to 5V power supply. Ensure that your power supply can handle the maximum current draw if all LEDs are at full brightness.
  2. Data Connection: Connect the DIN pin to a digital output pin on your microcontroller.
  3. Ground Connection: Connect the GND pin to the ground on your microcontroller.

Important Considerations and Best Practices

  • Always use a current-limiting resistor (about 300-500 Ohms) on the DIN pin to protect the NeoPixels.
  • Include a large capacitor (1000µF, 6.3V or higher) across the power supply pins to prevent initial onrush of current from damaging the LEDs.
  • Avoid powering the NeoPixels at full brightness for extended periods to prevent overheating.
  • When chaining multiple NeoPixel devices, ensure that the power supply can handle the increased current draw.

Example Code for Arduino UNO

#include <Adafruit_NeoPixel.h>

#define PIN            6 // The pin connected to the NeoPixels
#define NUMPIXELS      32 // Number of NeoPixels in the FeatherWing

// Create an instance of the Adafruit_NeoPixel class called "pixels"
Adafruit_NeoPixel pixels(NUMPIXELS, PIN, NEO_GRB + NEO_KHZ800);

void setup() {
  pixels.begin(); // Initialize the NeoPixel library.
}

void loop() {
  for(int i=0; i<NUMPIXELS; i++) {
    pixels.setPixelColor(i, pixels.Color(0,150,0)); // Moderately bright green color.
    pixels.show(); // This sends the updated pixel color to the hardware.
    delay(500); // A half-second delay between each pixel set.
    pixels.setPixelColor(i, pixels.Color(0,0,0)); // Turn off the pixel.
  }
}

Ensure that the Adafruit NeoPixel library is installed in your Arduino IDE before uploading this code to your Arduino UNO.

Troubleshooting and FAQs

Common Issues

  • LEDs not lighting up: Check connections and ensure the power supply is adequate.
  • Flickering LEDs: This may be due to a poor power supply or insufficient decoupling. Ensure capacitors are correctly installed.
  • Incorrect colors: Verify that the data line is connected to the correct pin and that the code matches the type of NeoPixel being used.

Solutions and Tips for Troubleshooting

  • Double-check wiring, especially the ground connection.
  • Use a multimeter to verify that the power supply is delivering the correct voltage.
  • Reduce the brightness in your code to lower the current draw if the power supply is inadequate.
  • Ensure that the Arduino library for NeoPixel is up to date.

FAQs

Q: Can I use a 3.3V logic level with the NeoPixel FeatherWing?

A: Yes, the NeoPixel FeatherWing can typically understand 3.3V logic; however, for reliability, especially with longer wires, a logic level converter is recommended.

Q: How many NeoPixel FeatherWings can I chain together?

A: This depends on your power supply's capacity. Each NeoPixel can draw up to 60mA, so calculate your requirements accordingly.

Q: Can I cut the FeatherWing to fit a smaller space?

A: No, the FeatherWing is not designed to be cut. Doing so may damage the board and the NeoPixels.