Cirkit Designer Logo
Cirkit Designer
Your all-in-one circuit design IDE
Home / 
Component Documentation

How to Use Nicla Voice: Examples, Pinouts, and Specs

Image of Nicla Voice
Cirkit Designer LogoDesign with Nicla Voice in Cirkit Designer

Introduction

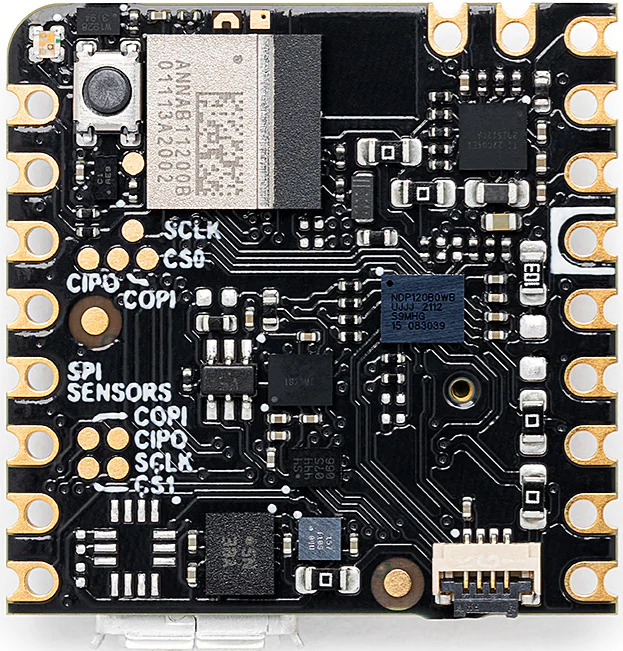
The Nicla Voice is a compact, low-power microcontroller board developed by Arduino, designed specifically for voice recognition and audio processing applications. It integrates built-in microphones, a speaker interface, and supports advanced audio processing algorithms. This makes it an excellent choice for IoT projects requiring voice interaction, such as smart home devices, voice-controlled assistants, and audio-based monitoring systems.

Explore Projects Built with Nicla Voice

Use Cirkit Designer to design, explore, and prototype these projects online. Some projects support real-time simulation. Click "Open Project" to start designing instantly!
Arduino Nano Controlled Clap-Activated Sound and Light System
Image of Clap-Back: A project utilizing Nicla Voice in a practical application
This circuit features an Arduino Nano interfaced with an Adafruit Audio FX Mini Sound Board, a SparkFun Electret Microphone Breakout, a TIP120 Darlington Transistor controlling a 12V Power LED, and a loudspeaker. The Arduino processes audio signals from the microphone to detect claps and toggles the LED accordingly, while also sending signals to the sound board to play audio tracks through the loudspeaker based on the clap pattern. The circuit is powered by a 12V power supply, with the Arduino and sound board receiving regulated voltage from the supply.
Cirkit Designer LogoOpen Project in Cirkit Designer
Arduino UNO Based Voice-Controlled Bluetooth Interface with OLED Display
Image of skripsi: A project utilizing Nicla Voice in a practical application
This circuit features an Arduino UNO microcontroller interfaced with a voice recognition module for audio input commands, an HC-05 Bluetooth module for wireless communication, and a 0.96" OLED display for visual output. The Arduino is programmed to handle inputs and outputs, with the voice recognition module connected to digital pins for serial communication, and the OLED display connected via I2C to the analog pins A4 (SDA) and A5 (SCL). The Bluetooth module is also connected to the Arduino's serial pins for remote data exchange.
Cirkit Designer LogoOpen Project in Cirkit Designer
ESP32-Powered Voice-Controlled LED Lighting System
Image of ALEXA PROTOTYPE: A project utilizing Nicla Voice in a practical application
This is a voice-activated lighting system powered by a 12V battery, featuring two ESP32 microcontrollers for voice processing and light control. It includes an INMP441 microphone for audio input, a toggle switch for user interaction, and various LEDs for visual feedback. The system is designed to recognize specific voice commands to control the state of the LEDs.
Cirkit Designer LogoOpen Project in Cirkit Designer
Arduino Nano-Controlled Motion-Activated Sound and Light System
Image of no led: A project utilizing Nicla Voice in a practical application
This circuit is an interactive multimedia system featuring audio input via a microphone amplifier, audio output through a DFPlayer MINI and loudspeaker, motion detection using a PIR sensor, and visual feedback with an RGB LED strip. The Arduino Nano serves as the central controller, interfacing with the audio and motion modules, and driving the LED strip.
Cirkit Designer LogoOpen Project in Cirkit Designer

Explore Projects Built with Nicla Voice

Use Cirkit Designer to design, explore, and prototype these projects online. Some projects support real-time simulation. Click "Open Project" to start designing instantly!
Image of Clap-Back: A project utilizing Nicla Voice in a practical application
Arduino Nano Controlled Clap-Activated Sound and Light System
This circuit features an Arduino Nano interfaced with an Adafruit Audio FX Mini Sound Board, a SparkFun Electret Microphone Breakout, a TIP120 Darlington Transistor controlling a 12V Power LED, and a loudspeaker. The Arduino processes audio signals from the microphone to detect claps and toggles the LED accordingly, while also sending signals to the sound board to play audio tracks through the loudspeaker based on the clap pattern. The circuit is powered by a 12V power supply, with the Arduino and sound board receiving regulated voltage from the supply.
Cirkit Designer LogoOpen Project in Cirkit Designer
Image of skripsi: A project utilizing Nicla Voice in a practical application
Arduino UNO Based Voice-Controlled Bluetooth Interface with OLED Display
This circuit features an Arduino UNO microcontroller interfaced with a voice recognition module for audio input commands, an HC-05 Bluetooth module for wireless communication, and a 0.96" OLED display for visual output. The Arduino is programmed to handle inputs and outputs, with the voice recognition module connected to digital pins for serial communication, and the OLED display connected via I2C to the analog pins A4 (SDA) and A5 (SCL). The Bluetooth module is also connected to the Arduino's serial pins for remote data exchange.
Cirkit Designer LogoOpen Project in Cirkit Designer
Image of ALEXA PROTOTYPE: A project utilizing Nicla Voice in a practical application
ESP32-Powered Voice-Controlled LED Lighting System
This is a voice-activated lighting system powered by a 12V battery, featuring two ESP32 microcontrollers for voice processing and light control. It includes an INMP441 microphone for audio input, a toggle switch for user interaction, and various LEDs for visual feedback. The system is designed to recognize specific voice commands to control the state of the LEDs.
Cirkit Designer LogoOpen Project in Cirkit Designer
Image of no led: A project utilizing Nicla Voice in a practical application
Arduino Nano-Controlled Motion-Activated Sound and Light System
This circuit is an interactive multimedia system featuring audio input via a microphone amplifier, audio output through a DFPlayer MINI and loudspeaker, motion detection using a PIR sensor, and visual feedback with an RGB LED strip. The Arduino Nano serves as the central controller, interfacing with the audio and motion modules, and driving the LED strip.
Cirkit Designer LogoOpen Project in Cirkit Designer

Common Applications

  • Voice-controlled IoT devices
  • Smart home automation
  • Audio-based environmental monitoring
  • Speech-to-text systems
  • Wearable devices with voice interaction capabilities

Technical Specifications

Key Technical Details

Parameter Specification
Microcontroller nRF52832 (ARM Cortex-M4, 64 MHz)
Audio Input Dual built-in digital microphones
Audio Output Speaker interface (I2S)
Connectivity Bluetooth Low Energy (BLE)
Power Supply Voltage 3.3V - 5V
Operating Current ~10 mA (typical)
Flash Memory 512 KB
RAM 64 KB
Dimensions 22.86 mm x 22.86 mm
Operating Temperature Range -40°C to 85°C

Pin Configuration and Descriptions

Pin Name Type Description
1 VIN Power Input Main power input (3.3V - 5V)
2 GND Ground Ground connection
3 SDA I2C Data I2C data line for communication
4 SCL I2C Clock I2C clock line for communication
5 TX UART TX UART transmit pin for serial communication
6 RX UART RX UART receive pin for serial communication
7 GPIO Digital I/O General-purpose input/output pin
8 I2S_SD I2S Data I2S serial data line for audio output
9 I2S_WS I2S Word Select I2S word select line for audio output
10 I2S_SCK I2S Clock I2S clock line for audio output

Usage Instructions

How to Use the Nicla Voice in a Circuit

  1. Powering the Board: Connect the VIN pin to a 3.3V or 5V power source and the GND pin to ground.
  2. Audio Input: The board's built-in microphones are ready to capture audio without additional components.
  3. Audio Output: Connect an external I2S-compatible speaker to the I2S_SD, I2S_WS, and I2S_SCK pins for audio playback.
  4. Communication: Use the I2C or UART pins to interface with other microcontrollers or sensors.
  5. Programming: The Nicla Voice can be programmed using the Arduino IDE. Ensure the correct board and port are selected in the IDE.

Important Considerations

  • Power Supply: Ensure a stable power supply to avoid noise in audio processing.
  • Microphone Placement: Avoid placing the board near noisy components to ensure clear audio input.
  • BLE Connectivity: For Bluetooth applications, ensure the device is within the recommended range (typically 10-15 meters).
  • Firmware Updates: Regularly update the firmware to access the latest features and improvements.

Example Code for Arduino UNO Integration

Below is an example of how to use the Nicla Voice with an Arduino UNO to capture audio data and send it via serial communication:

#include <Wire.h> // Include the I2C library for communication

void setup() {
  Serial.begin(9600); // Initialize serial communication at 9600 baud
  Wire.begin();       // Initialize I2C communication

  // Print a message to indicate setup is complete
  Serial.println("Nicla Voice is ready for audio processing.");
}

void loop() {
  // Example: Simulate capturing audio data
  int audioData = analogRead(A0); // Read audio data from an analog pin

  // Send the audio data over serial communication
  Serial.print("Audio Data: ");
  Serial.println(audioData);

  delay(100); // Add a delay to simulate processing time
}

Note: Replace analogRead(A0) with the appropriate method to capture audio data from the Nicla Voice's microphones.

Troubleshooting and FAQs

Common Issues and Solutions

  1. No Audio Output:

    • Ensure the I2S-compatible speaker is correctly connected to the I2S pins.
    • Verify that the speaker is powered and functional.
  2. Microphone Not Capturing Audio:

    • Check for physical obstructions near the microphones.
    • Ensure the board is powered and the firmware is correctly configured.
  3. BLE Connectivity Issues:

    • Ensure the device is within the recommended range.
    • Restart the board and retry pairing.
  4. Board Not Detected in Arduino IDE:

    • Verify that the correct board and port are selected in the IDE.
    • Ensure the USB cable is functional and properly connected.

FAQs

Q: Can the Nicla Voice process audio locally?
A: Yes, the Nicla Voice supports on-board audio processing using its ARM Cortex-M4 microcontroller.

Q: Is the Nicla Voice compatible with other Arduino boards?
A: Yes, it can communicate with other Arduino boards via I2C, UART, or BLE.

Q: What is the maximum range for BLE connectivity?
A: The typical range is 10-15 meters, depending on environmental factors.

Q: Can I use the Nicla Voice for real-time voice recognition?
A: Yes, the board is designed for real-time voice recognition and supports various audio processing algorithms.