How to Use SX1262 LoRa Node: Examples, Pinouts, and Specs
Introduction
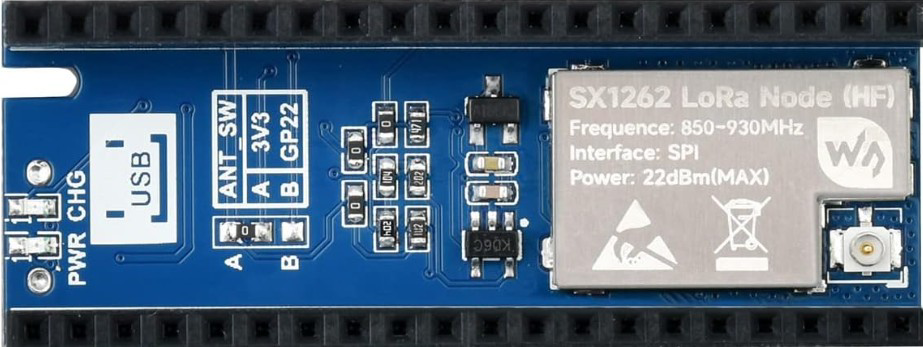
The SX1262 LoRa Node, manufactured by Waveshare, is a low-power, long-range wireless communication module that leverages LoRa (Long Range) technology. It operates in sub-GHz frequency bands and is specifically designed for low data rate transmissions. This makes it an excellent choice for Internet of Things (IoT) applications, particularly in scenarios where devices are battery-operated and located in remote areas.
Explore Projects Built with SX1262 LoRa Node
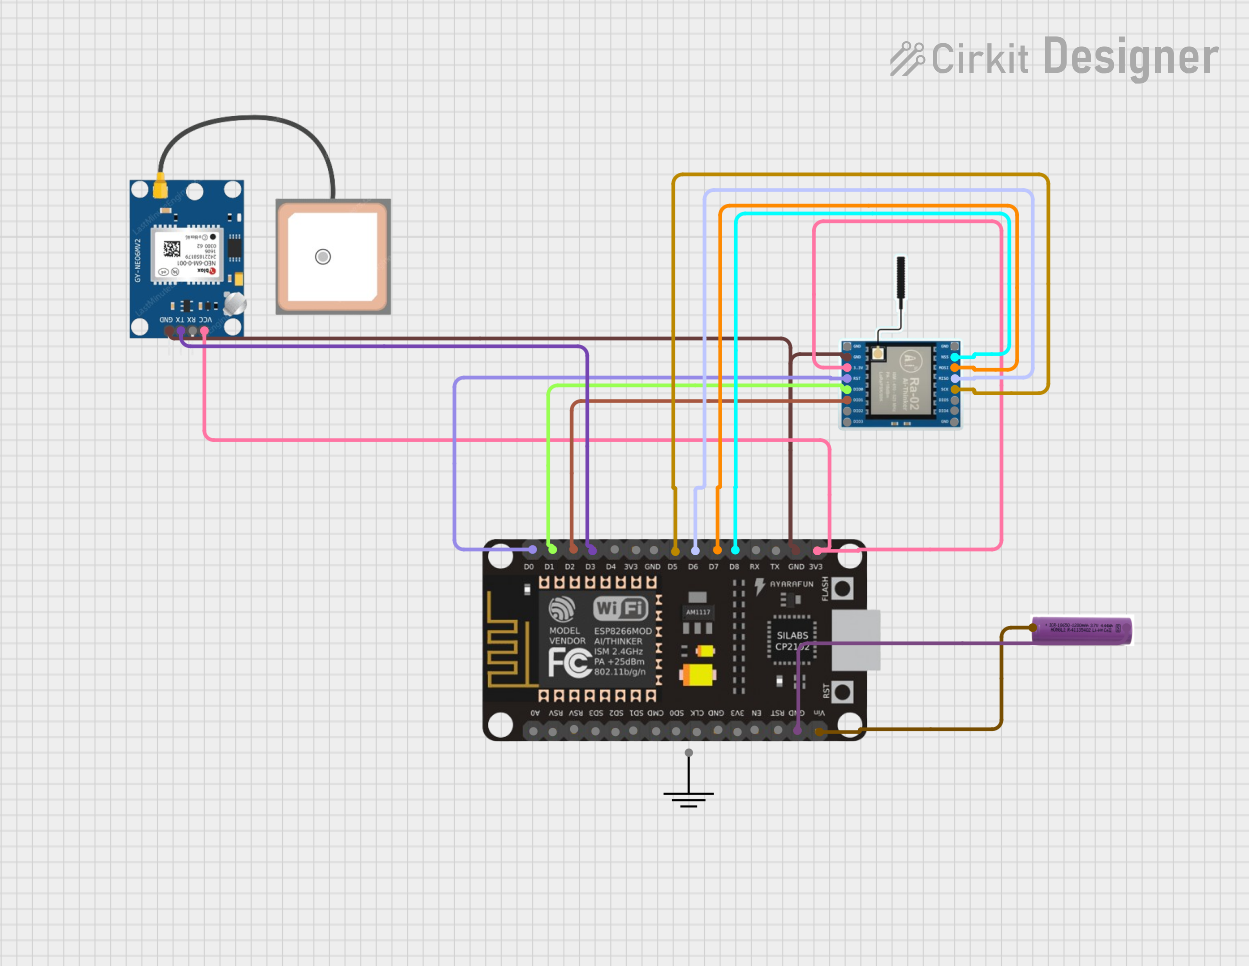
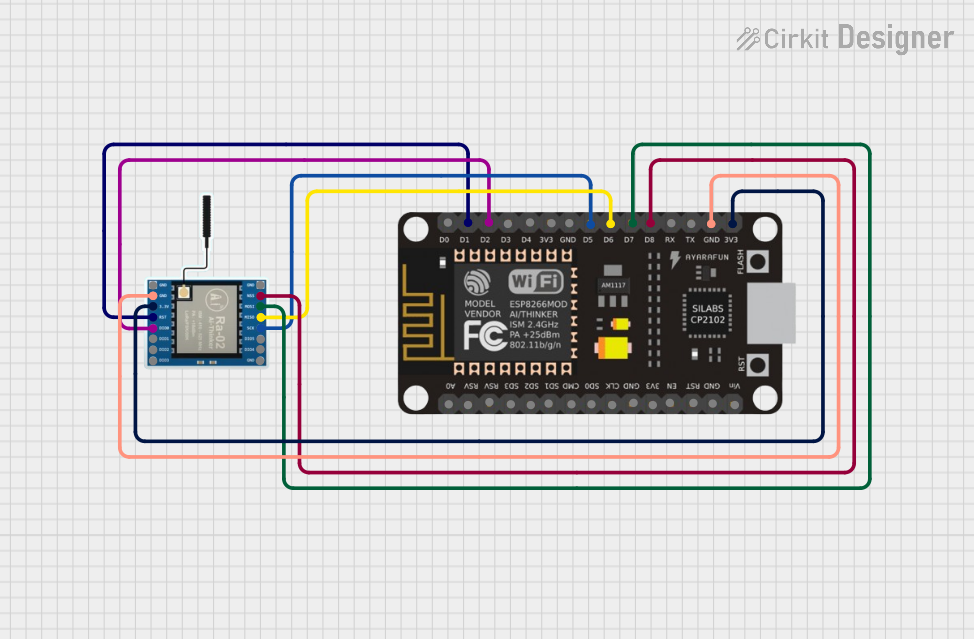

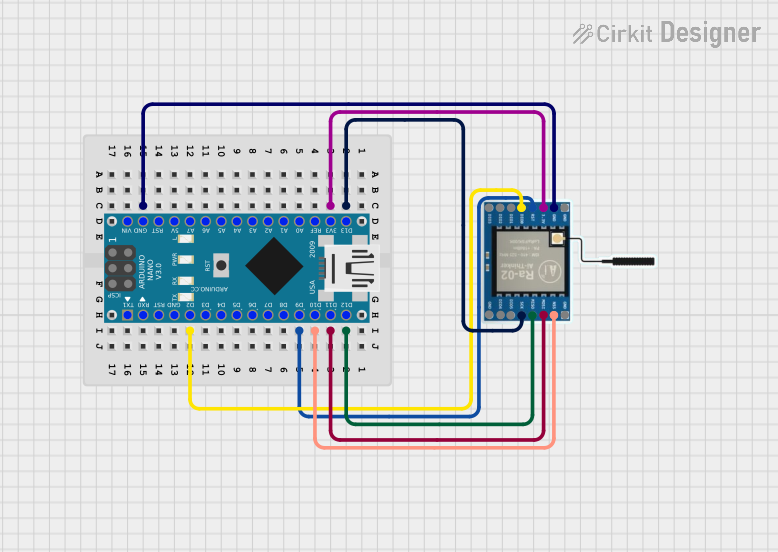
Explore Projects Built with SX1262 LoRa Node
Common Applications and Use Cases
- Smart agriculture (e.g., soil moisture sensors, weather stations)
- Industrial IoT (e.g., equipment monitoring, predictive maintenance)
- Smart cities (e.g., parking sensors, waste management)
- Asset tracking and geolocation
- Environmental monitoring (e.g., air quality sensors, water level monitoring)
Technical Specifications
The SX1262 LoRa Node is built to provide reliable and efficient communication over long distances while consuming minimal power. Below are its key technical details:
Key Technical Details
| Parameter | Specification |
|---|---|
| Frequency Range | 868 MHz / 915 MHz (configurable) |
| Modulation | LoRa, FSK |
| Output Power | Up to +22 dBm |
| Sensitivity | -148 dBm |
| Data Rate | 0.018 kbps to 62.5 kbps |
| Supply Voltage | 1.8V to 3.7V |
| Current Consumption | 4.2 mA (Rx), 15.5 mA (Tx @ +22 dBm) |
| Communication Interface | SPI |
| Operating Temperature | -40°C to +85°C |
| Dimensions | 24 mm x 24 mm |
Pin Configuration and Descriptions
The SX1262 LoRa Node has a standard pinout for easy integration into circuits. Below is the pin configuration:
| Pin Number | Pin Name | Description |
|---|---|---|
| 1 | GND | Ground connection |
| 2 | VCC | Power supply input (1.8V to 3.7V) |
| 3 | MISO | SPI Master-In-Slave-Out (data output from the module) |
| 4 | MOSI | SPI Master-Out-Slave-In (data input to the module) |
| 5 | SCK | SPI Clock |
| 6 | NSS | SPI Chip Select (active low) |
| 7 | DIO1 | Digital I/O pin 1 (used for interrupts or status signaling) |
| 8 | DIO2 | Digital I/O pin 2 (optional, configurable for specific functions) |
| 9 | RESET | Reset pin (active low) |
| 10 | ANT | Antenna connection |
Usage Instructions
The SX1262 LoRa Node is straightforward to use in a circuit, but proper configuration and best practices are essential for optimal performance.
How to Use the Component in a Circuit
- Power Supply: Connect the VCC pin to a stable power source (1.8V to 3.7V) and GND to the ground.
- SPI Communication: Connect the SPI pins (MISO, MOSI, SCK, NSS) to the corresponding SPI pins on your microcontroller.
- Antenna: Attach a suitable antenna to the ANT pin for proper signal transmission and reception.
- Reset: Use the RESET pin to initialize the module during startup or after a fault.
- Digital I/O: Configure DIO1 and DIO2 as needed for interrupts or status monitoring.
Important Considerations and Best Practices
- Antenna Selection: Use an antenna tuned to the operating frequency (868 MHz or 915 MHz) for maximum range and efficiency.
- Power Supply: Ensure a clean and stable power supply to avoid communication errors.
- SPI Configuration: Set the SPI clock speed and mode according to the module's requirements (SPI Mode 0 is recommended).
- Regulatory Compliance: Ensure compliance with local regulations for sub-GHz frequency usage.
- Environmental Factors: Place the module in an area with minimal obstructions for better signal propagation.
Example Code for Arduino UNO
Below is an example of how to interface the SX1262 LoRa Node with an Arduino UNO using the SPI library:
#include <SPI.h>

// Pin definitions for SX1262 LoRa Node
#define NSS_PIN 10    // SPI Chip Select
#define RESET_PIN 9   // Reset pin
#define DIO1_PIN 2    // Digital I/O pin 1

void setup() {
  // Initialize serial communication for debugging
  Serial.begin(9600);
  while (!Serial);

  // Initialize SPI
  SPI.begin();
  pinMode(NSS_PIN, OUTPUT);
  pinMode(RESET_PIN, OUTPUT);
  pinMode(DIO1_PIN, INPUT);

  // Reset the SX1262 module
  digitalWrite(RESET_PIN, LOW);
  delay(10); // Hold reset for 10ms
  digitalWrite(RESET_PIN, HIGH);
  delay(100); // Wait for the module to initialize

  Serial.println("SX1262 LoRa Node initialized.");
}

void loop() {
  // Example: Send a command to the SX1262 module
  digitalWrite(NSS_PIN, LOW); // Select the module
  SPI.transfer(0x01);         // Example command (replace with actual command)
  digitalWrite(NSS_PIN, HIGH); // Deselect the module

  delay(1000); // Wait for 1 second
}
Notes:
- Replace the
SPI.transfer(0x01)command with actual commands based on the SX1262 datasheet. - Use a suitable LoRa library (e.g., RadioLib) for advanced functionality like sending and receiving packets.
Troubleshooting and FAQs
Common Issues and Solutions
No Communication with the Module
- Cause: Incorrect SPI wiring or configuration.
- Solution: Double-check the SPI connections and ensure the SPI clock speed and mode are correctly set.
Poor Signal Range
- Cause: Improper antenna or environmental interference.
- Solution: Use a high-quality antenna tuned to the operating frequency and minimize obstructions.
High Power Consumption
- Cause: Module operating in high-power mode unnecessarily.
- Solution: Configure the module for low-power mode during idle periods.
Module Not Responding After Reset
- Cause: Insufficient reset duration or power instability.
- Solution: Ensure the reset pin is held low for at least 10ms and verify the power supply.
FAQs
Q: Can the SX1262 LoRa Node be used with 5V microcontrollers?
A: No, the SX1262 operates at 1.8V to 3.7V. Use a level shifter to interface with 5V microcontrollers.
Q: What is the maximum communication range of the SX1262?
A: The range depends on environmental factors but can reach up to 10 km in open areas with a proper antenna.
Q: Does the module support bidirectional communication?
A: Yes, the SX1262 supports both transmitting and receiving data using LoRa modulation.
Q: How do I change the operating frequency?
A: The operating frequency can be configured via SPI commands. Refer to the SX1262 datasheet for details.
This concludes the documentation for the SX1262 LoRa Node. For further assistance, consult the Waveshare product manual or contact technical support.