How to Use HX711 4 digit Display Electronic Scale Pressure Module: Examples, Pinouts, and Specs
Introduction
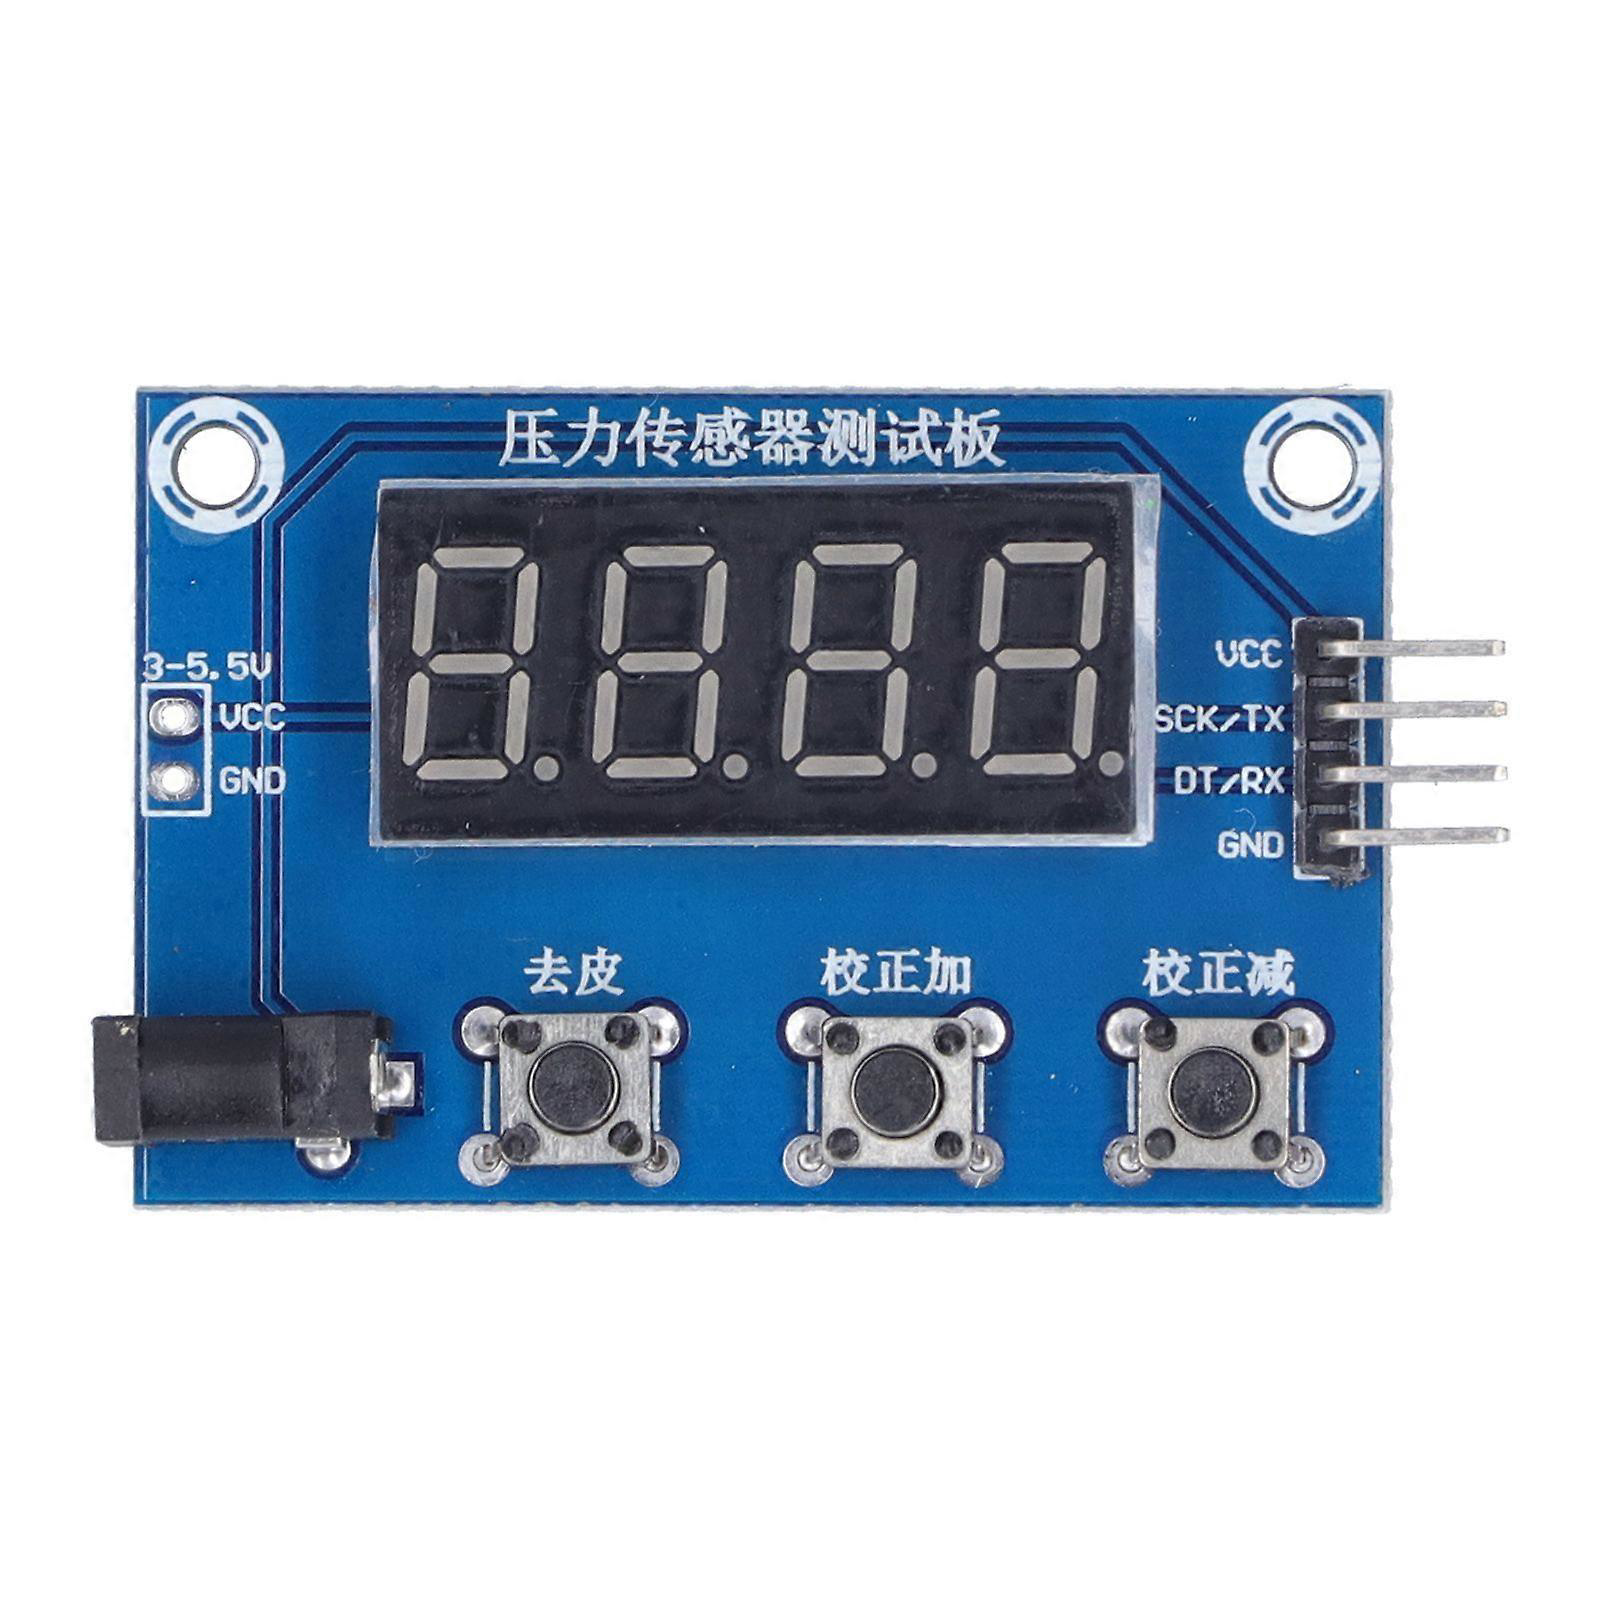
The HX711 4-Digit Display Electronic Scale Pressure Module is a versatile and cost-effective component designed for weight measurement applications. It integrates the HX711 precision 24-bit analog-to-digital converter (ADC) with a 4-digit 7-segment display, making it ideal for building electronic scales, pressure measurement systems, and other load cell-based applications. This module simplifies the process of interfacing load cells with microcontrollers, providing accurate and stable readings.
Explore Projects Built with HX711 4 digit Display Electronic Scale Pressure Module

Explore Projects Built with HX711 4 digit Display Electronic Scale Pressure Module
Common Applications and Use Cases
- Digital weighing scales
- Pressure measurement systems
- DIY weight measurement projects
- Industrial load monitoring
- Educational and prototyping purposes
Technical Specifications
Key Technical Details
| Parameter | Specification |
|---|---|
| Manufacturer | Generic |
| Manufacturer Part ID | DWBC_HD_10567 |
| ADC Chip | HX711 |
| Display Type | 4-digit 7-segment LED display |
| Operating Voltage | 5V DC |
| Operating Current | ≤ 50mA |
| Load Cell Compatibility | 1-4 strain gauge load cells (10kΩ-1kΩ) |
| ADC Resolution | 24-bit |
| Communication Protocol | Serial (Clock and Data pins) |
| Dimensions | 50mm x 30mm x 15mm |
Pin Configuration and Descriptions
HX711 Module Pins
| Pin Name | Description |
|---|---|
| VCC | Power supply input (5V DC) |
| GND | Ground connection |
| DT | Data output pin for serial communication |
| SCK | Clock input pin for serial communication |
| E+ | Positive excitation voltage for the load cell |
| E- | Negative excitation voltage for the load cell |
| A+ | Positive signal input from the load cell |
| A- | Negative signal input from the load cell |
4-Digit Display Pins
| Pin Name | Description |
|---|---|
| VCC | Power supply input (5V DC) |
| GND | Ground connection |
| DIO | Data input/output pin for controlling the display |
| CLK | Clock input pin for controlling the display |
Usage Instructions
How to Use the Component in a Circuit
- Power the Module: Connect the
VCCpin to a 5V DC power source and theGNDpin to ground. - Connect the Load Cell: Attach the load cell wires to the
E+,E-,A+, andA-pins. Ensure proper polarity and secure connections. - Interface with Microcontroller:
- Connect the
DTandSCKpins of the HX711 to the corresponding GPIO pins on your microcontroller. - Connect the
DIOandCLKpins of the 4-digit display to separate GPIO pins.
- Connect the
- Write Code: Use a microcontroller (e.g., Arduino UNO) to read data from the HX711 and display it on the 4-digit display.
Important Considerations and Best Practices
- Load Cell Calibration: Calibrate the load cell to ensure accurate weight measurements. This involves determining the scale factor and offset.
- Stable Power Supply: Use a stable 5V power source to avoid fluctuations in readings.
- Noise Reduction: Place the module away from high-frequency noise sources and use shielded cables for the load cell.
- Mounting: Securely mount the load cell to prevent mechanical vibrations or misalignment.
Example Code for Arduino UNO
Below is an example Arduino sketch to interface the HX711 module and display weight on the 4-digit display.
#include "HX711.h" // Include HX711 library for ADC communication
#include "TM1637Display.h" // Include TM1637 library for 4-digit display

// Pin definitions for HX711
#define DT_PIN 3  // Data pin connected to HX711 DT
#define SCK_PIN 2 // Clock pin connected to HX711 SCK

// Pin definitions for 4-digit display
#define CLK_PIN 4  // Clock pin for TM1637 display
#define DIO_PIN 5  // Data pin for TM1637 display

HX711 scale; // Create an HX711 object
TM1637Display display(CLK_PIN, DIO_PIN); // Create a TM1637 display object

void setup() {
  Serial.begin(9600); // Initialize serial communication for debugging
  scale.begin(DT_PIN, SCK_PIN); // Initialize HX711 with DT and SCK pins
  display.setBrightness(0x0F); // Set display brightness to maximum

  // Perform load cell calibration (adjust these values as needed)
  scale.set_scale(2280.f); // Set scale factor (calibration value)
  scale.tare(); // Reset the scale to zero
}

void loop() {
  // Read weight from HX711
  float weight = scale.get_units(10); // Average 10 readings for stability

  // Display weight on the 4-digit display
  display.showNumberDec(weight, false, 4, 0);

  // Print weight to the serial monitor for debugging
  Serial.print("Weight: ");
  Serial.print(weight);
  Serial.println(" kg");

  delay(500); // Wait for 500ms before the next reading
}
Troubleshooting and FAQs
Common Issues and Solutions
No Display Output:
- Ensure the
VCCandGNDpins are properly connected to a 5V power source. - Verify the connections to the
DIOandCLKpins of the display.
- Ensure the
Inaccurate Weight Readings:
- Perform proper load cell calibration using known weights.
- Check for loose or incorrect connections to the load cell.
Fluctuating Readings:
- Use a stable power supply and avoid electrical noise sources.
- Ensure the load cell is securely mounted and not subject to vibrations.
No Communication with HX711:
- Verify the connections to the
DTandSCKpins. - Ensure the HX711 library is correctly installed in your Arduino IDE.
- Verify the connections to the
FAQs
Q: Can I use this module with a 3.3V microcontroller?
A: The HX711 operates at 5V, but its data pins are 3.3V logic compatible. However, the 4-digit display requires 5V logic, so a level shifter may be needed for 3.3V microcontrollers.
Q: How do I calibrate the load cell?
A: Use a known weight to determine the scale factor. Adjust the set_scale() value in the code until the readings match the known weight.
Q: Can I connect multiple load cells to this module?
A: Yes, you can connect up to 4 load cells in a Wheatstone bridge configuration, provided their combined resistance is within the module's specifications.
Q: What is the maximum weight this module can measure?
A: The maximum weight depends on the load cell's capacity. Ensure the load cell's rating matches your application requirements.