How to Use Heat Controller: Examples, Pinouts, and Specs
Introduction
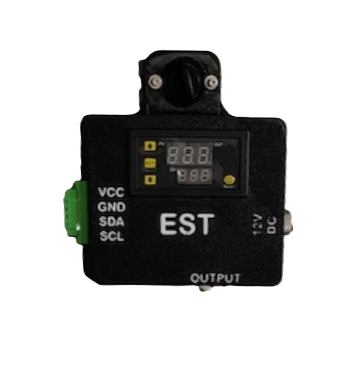
The Heat Controller is an electronic device designed to regulate temperature in a circuit or system. By maintaining optimal thermal conditions, it ensures the efficient operation of components and prevents overheating, which can lead to damage or reduced performance. Heat Controllers are commonly used in power electronics, industrial machinery, HVAC systems, and embedded systems requiring precise thermal management.
Explore Projects Built with Heat Controller


Explore Projects Built with Heat Controller
Common Applications and Use Cases
- Power supply units to prevent overheating of transformers and regulators.
- Industrial equipment for maintaining safe operating temperatures.
- HVAC systems for controlling heating elements.
- Embedded systems to regulate temperature-sensitive components like microcontrollers or sensors.
Technical Specifications
Below are the key technical details and pin configuration for the Heat Controller:
Key Technical Details
| Parameter | Value |
|---|---|
| Operating Voltage | 5V to 24V DC |
| Maximum Current | 10A |
| Temperature Range | -40°C to 125°C |
| Control Method | PWM (Pulse Width Modulation) |
| Temperature Sensor Type | NTC Thermistor or PT100 |
| Output Type | Relay or MOSFET |
| Accuracy | ±1°C |
Pin Configuration and Descriptions
| Pin Number | Pin Name | Description |
|---|---|---|
| 1 | VCC | Power supply input (5V to 24V DC). |
| 2 | GND | Ground connection. |
| 3 | TEMP_IN | Input for the temperature sensor (e.g., NTC or PT100). |
| 4 | CONTROL | PWM input for controlling the heat regulation. |
| 5 | OUTPUT | Output to the heating element or cooling system (Relay or MOSFET control). |
Usage Instructions
How to Use the Heat Controller in a Circuit
- Power Supply: Connect the VCC pin to a DC power source (5V to 24V) and the GND pin to the ground.
- Temperature Sensor: Attach the appropriate temperature sensor (e.g., NTC thermistor or PT100) to the TEMP_IN pin. Ensure proper placement of the sensor for accurate temperature readings.
- Control Signal: Provide a PWM signal to the CONTROL pin to adjust the heating or cooling output. The duty cycle of the PWM signal determines the level of heat regulation.
- Output Connection: Connect the OUTPUT pin to the heating element or cooling system. Ensure the connected load does not exceed the maximum current rating (10A).
Important Considerations and Best Practices
- Sensor Placement: Place the temperature sensor close to the component or area being monitored for accurate readings.
- Power Supply: Use a stable DC power source within the specified voltage range to avoid damage to the Heat Controller.
- Load Protection: If the load exceeds the maximum current rating, use an external relay or MOSFET to handle the higher current.
- PWM Signal: Ensure the PWM signal frequency is compatible with the Heat Controller for smooth operation.
- Heat Dissipation: If the Heat Controller itself generates heat, consider adding a heatsink or cooling fan.
Example: Using the Heat Controller with an Arduino UNO
Below is an example of how to use the Heat Controller with an Arduino UNO to regulate temperature:
// Example code to control a Heat Controller using Arduino UNO
// Ensure the temperature sensor is connected to the TEMP_IN pin
// and the heating element is connected to the OUTPUT pin.

const int pwmPin = 9; // PWM pin connected to the CONTROL pin of the Heat Controller
const int tempSensorPin = A0; // Analog pin connected to the temperature sensor
const int targetTemp = 30; // Target temperature in degrees Celsius

void setup() {
  pinMode(pwmPin, OUTPUT); // Set the PWM pin as output
  Serial.begin(9600); // Initialize serial communication for debugging
}

void loop() {
  int sensorValue = analogRead(tempSensorPin); // Read the temperature sensor value
  float voltage = sensorValue * (5.0 / 1023.0); // Convert to voltage
  float temperature = (voltage - 0.5) * 100.0; // Convert to temperature (example for LM35)

  Serial.print("Temperature: ");
  Serial.print(temperature);
  Serial.println(" °C");

  if (temperature < targetTemp) {
    analogWrite(pwmPin, 255); // Full power to the heating element
  } else {
    analogWrite(pwmPin, 0); // Turn off the heating element
  }

  delay(1000); // Wait for 1 second before the next reading
}
Troubleshooting and FAQs
Common Issues and Solutions
No Output from the Heat Controller
- Cause: Incorrect wiring or insufficient power supply.
- Solution: Verify all connections and ensure the power supply voltage is within the specified range.
Inaccurate Temperature Readings
- Cause: Poor sensor placement or faulty sensor.
- Solution: Ensure the sensor is properly placed and functioning. Replace the sensor if necessary.
Overheating of the Heat Controller
- Cause: Excessive current draw or inadequate cooling.
- Solution: Check the load current and ensure it does not exceed the maximum rating. Add a heatsink or cooling fan if needed.
PWM Signal Not Working
- Cause: Incorrect PWM frequency or duty cycle.
- Solution: Verify the PWM signal frequency and adjust the duty cycle as required.
FAQs
Q: Can I use a different temperature sensor with the Heat Controller?
A: Yes, as long as the sensor is compatible with the TEMP_IN pin and provides the required signal type (e.g., analog voltage or resistance).
Q: What happens if the load exceeds the maximum current rating?
A: Exceeding the current rating can damage the Heat Controller. Use an external relay or MOSFET to handle higher currents.
Q: Is the Heat Controller suitable for cooling systems?
A: Yes, the Heat Controller can regulate cooling systems by controlling fans or other cooling elements.
Q: Can I use the Heat Controller with an AC power source?
A: No, the Heat Controller is designed for DC power sources only. Use a DC power supply within the specified voltage range.