Cirkit Designer Logo
Cirkit Designer
Your all-in-one circuit design IDE
Home / 
Component Documentation

How to Use Adafruit Metro M4 Express: Examples, Pinouts, and Specs

Image of Adafruit Metro M4 Express
Cirkit Designer LogoDesign with Adafruit Metro M4 Express in Cirkit Designer

Introduction

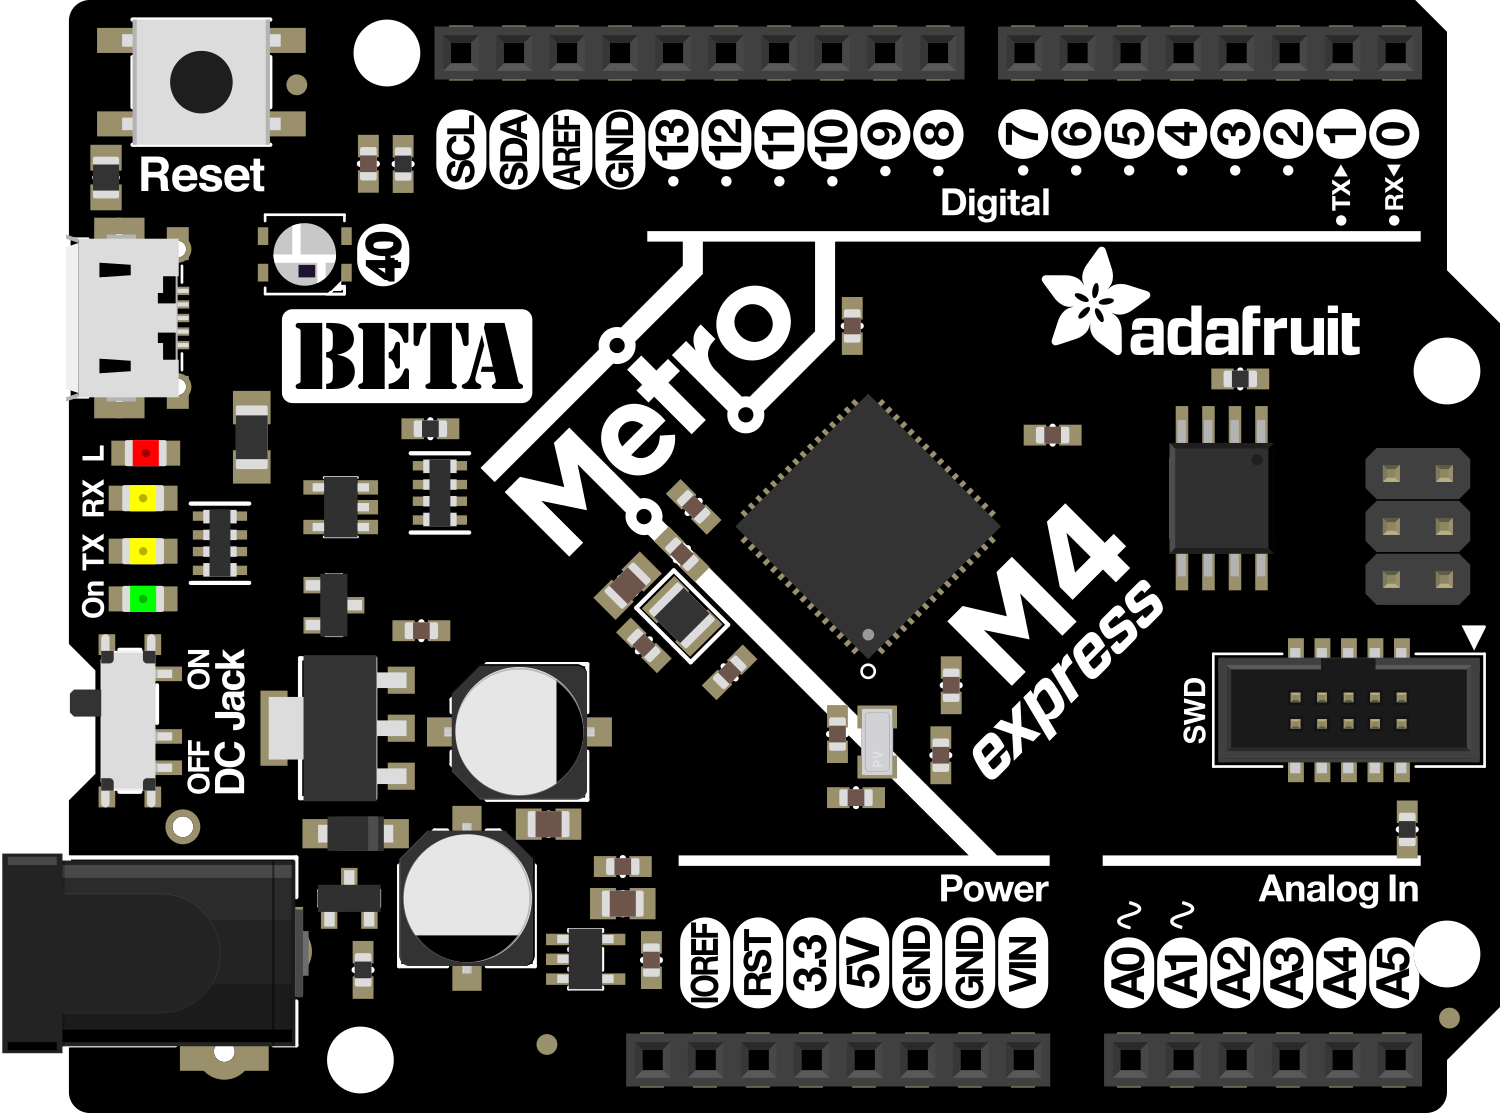
The Adafruit Metro M4 Express is a feature-rich development board designed for makers and hobbyists who require a robust platform for building electronic projects. Based on the Microchip ATSAMD51 microcontroller, this board is compatible with a vast array of sensors and actuators, making it ideal for applications ranging from simple LED blinkers to complex robotics.

Explore Projects Built with Adafruit Metro M4 Express

Use Cirkit Designer to design, explore, and prototype these projects online. Some projects support real-time simulation. Click "Open Project" to start designing instantly!
Solar-Powered Environmental Data Logger with Adafruit Feather M0 Express
Image of Lake Thoreau Monitoring Station: A project utilizing Adafruit Metro M4 Express in a practical application
This circuit is designed for environmental data collection and logging, utilizing an Adafruit Feather M0 Express microcontroller as the central processing unit. It interfaces with a BME280 sensor for atmospheric temperature, humidity, and pressure measurements, an SGP30 sensor for monitoring air quality (eCO2 and TVOC), and a STEMMA soil sensor for detecting soil moisture and temperature. The system is powered by a solar panel and a 3.7v LiPo battery, managed by an Adafruit BQ24074 Solar-DC-USB Lipo Charger, and provides easy access to the microcontroller's connections through an Adafruit Terminal Breakout FeatherWing.
Cirkit Designer LogoOpen Project in Cirkit Designer
Raspberry Pi 4B-Based Multi-Sensor Interface Hub with GPS and GSM
Image of Rocket: A project utilizing Adafruit Metro M4 Express in a practical application
This circuit features a Raspberry Pi 4B interfaced with an IMX296 color global shutter camera, a Neo 6M GPS module, an Adafruit BMP388 barometric pressure sensor, an MPU-6050 accelerometer/gyroscope, and a Sim800l GSM module for cellular connectivity. Power management is handled by an MT3608 boost converter, which steps up the voltage from a Lipo battery, with a resettable fuse PTC and a 1N4007 diode for protection. The Adafruit Perma-Proto HAT is used for organizing connections and interfacing the sensors and modules with the Raspberry Pi via I2C and GPIO pins.
Cirkit Designer LogoOpen Project in Cirkit Designer
ATmega328P-Based Sensor Hub with OLED Display and LIDAR
Image of TILTPCB: A project utilizing Adafruit Metro M4 Express in a practical application
This circuit features an Mtiny Uno ATmega328P microcontroller as its central processing unit, interfacing with a variety of sensors and peripherals. It includes a 0.96" OLED display and an MPU6050 accelerometer/gyroscope for user interface and motion sensing, respectively. The circuit also integrates a TF LUNA LIDAR for distance measurement, a DHT11 sensor for temperature and humidity readings, and uses a 9V battery with a 7805 voltage regulator for power management. Communication with a computer for programming and data exchange is facilitated by an Adafruit FTDI Friend module.
Cirkit Designer LogoOpen Project in Cirkit Designer
Adafruit ItsyBitsy M4 Dual GC9A01 Display Animated Eyes
Image of Eyes: A project utilizing Adafruit Metro M4 Express in a practical application
This circuit features an Adafruit ItsyBitsy M4 microcontroller connected to two GC9A01 displays. The microcontroller drives the displays to render animated eyes, with the code handling eye movements, blinks, and iris scaling. The displays share common control signals, and the microcontroller coordinates their operation to create synchronized visual effects.
Cirkit Designer LogoOpen Project in Cirkit Designer

Explore Projects Built with Adafruit Metro M4 Express

Use Cirkit Designer to design, explore, and prototype these projects online. Some projects support real-time simulation. Click "Open Project" to start designing instantly!
Image of Lake Thoreau Monitoring Station: A project utilizing Adafruit Metro M4 Express in a practical application
Solar-Powered Environmental Data Logger with Adafruit Feather M0 Express
This circuit is designed for environmental data collection and logging, utilizing an Adafruit Feather M0 Express microcontroller as the central processing unit. It interfaces with a BME280 sensor for atmospheric temperature, humidity, and pressure measurements, an SGP30 sensor for monitoring air quality (eCO2 and TVOC), and a STEMMA soil sensor for detecting soil moisture and temperature. The system is powered by a solar panel and a 3.7v LiPo battery, managed by an Adafruit BQ24074 Solar-DC-USB Lipo Charger, and provides easy access to the microcontroller's connections through an Adafruit Terminal Breakout FeatherWing.
Cirkit Designer LogoOpen Project in Cirkit Designer
Image of Rocket: A project utilizing Adafruit Metro M4 Express in a practical application
Raspberry Pi 4B-Based Multi-Sensor Interface Hub with GPS and GSM
This circuit features a Raspberry Pi 4B interfaced with an IMX296 color global shutter camera, a Neo 6M GPS module, an Adafruit BMP388 barometric pressure sensor, an MPU-6050 accelerometer/gyroscope, and a Sim800l GSM module for cellular connectivity. Power management is handled by an MT3608 boost converter, which steps up the voltage from a Lipo battery, with a resettable fuse PTC and a 1N4007 diode for protection. The Adafruit Perma-Proto HAT is used for organizing connections and interfacing the sensors and modules with the Raspberry Pi via I2C and GPIO pins.
Cirkit Designer LogoOpen Project in Cirkit Designer
Image of TILTPCB: A project utilizing Adafruit Metro M4 Express in a practical application
ATmega328P-Based Sensor Hub with OLED Display and LIDAR
This circuit features an Mtiny Uno ATmega328P microcontroller as its central processing unit, interfacing with a variety of sensors and peripherals. It includes a 0.96" OLED display and an MPU6050 accelerometer/gyroscope for user interface and motion sensing, respectively. The circuit also integrates a TF LUNA LIDAR for distance measurement, a DHT11 sensor for temperature and humidity readings, and uses a 9V battery with a 7805 voltage regulator for power management. Communication with a computer for programming and data exchange is facilitated by an Adafruit FTDI Friend module.
Cirkit Designer LogoOpen Project in Cirkit Designer
Image of Eyes: A project utilizing Adafruit Metro M4 Express in a practical application
Adafruit ItsyBitsy M4 Dual GC9A01 Display Animated Eyes
This circuit features an Adafruit ItsyBitsy M4 microcontroller connected to two GC9A01 displays. The microcontroller drives the displays to render animated eyes, with the code handling eye movements, blinks, and iris scaling. The displays share common control signals, and the microcontroller coordinates their operation to create synchronized visual effects.
Cirkit Designer LogoOpen Project in Cirkit Designer

Common Applications and Use Cases

  • Prototyping IoT devices
  • Educational purposes for learning electronics and programming
  • DIY home automation systems
  • Wearable electronics
  • Custom controllers for robotics
  • Data logging and sensor monitoring

Technical Specifications

The Adafruit Metro M4 Express is equipped with a multitude of technical features that provide flexibility and power for various projects.

Key Technical Details

  • Microcontroller: ATSAMD51J19
  • Clock Speed: 120 MHz
  • Flash Memory: 512 KB
  • RAM: 192 KB
  • Digital I/O Pins: 25
  • PWM Channels: 12
  • Analog Input Pins: 6 (12-bit ADC)
  • Analog Output Pins: 1 (10-bit DAC)
  • Operating Voltage: 3.3V
  • Input Voltage (recommended): 7-9V
  • Input Voltage (limits): 6-12V
  • Interfaces: I2C, SPI, UART
  • USB Connectivity: Native USB support

Pin Configuration and Descriptions

Pin Number Function Description
1 GND Ground
2 VIN Input voltage to the board
3-5 Analog In Analog input pins
6-17 Digital I/O Digital input/output pins
18-19 I2C (SDA, SCL) I2C data & clock lines
20-21 SPI (MISO, MOSI, SCK) SPI communication lines
22-23 UART (RX, TX) UART communication lines
24 5V Regulated 5V output
25 3V3 Regulated 3.3V output

Usage Instructions

How to Use the Component in a Circuit

  1. Powering the Board: Connect a 7-9V power supply to the VIN and GND pins, or power the board via the USB connection.
  2. Connecting I/O Devices: Attach sensors, actuators, or other peripherals to the digital and analog pins as required by your project.
  3. Programming the Board: Use the Arduino IDE or other compatible software to write and upload code to the Metro M4 Express.

Important Considerations and Best Practices

  • Always ensure that the power supply voltage is within the specified limits to prevent damage.
  • When connecting external components, make sure they are compatible with the board's operating voltage (3.3V logic level).
  • Avoid drawing more than 20 mA from any I/O pin.
  • Use external power sources when driving high-current devices like motors or high-power LEDs.

Example Code for Arduino UNO

// Blink an LED connected to pin 13

void setup() {
  pinMode(13, OUTPUT); // Set pin 13 as an output
}

void loop() {
  digitalWrite(13, HIGH);   // Turn the LED on
  delay(1000);              // Wait for a second
  digitalWrite(13, LOW);    // Turn the LED off
  delay(1000);              // Wait for a second
}

Troubleshooting and FAQs

Common Issues

  • Board not recognized by computer: Ensure the USB cable is properly connected and the board is powered on. Try a different USB port or cable if necessary.
  • Sketch not uploading: Check for correct board and port selection in the Arduino IDE. Ensure the bootloader is not corrupted.
  • I/O pin not functioning: Verify that the pin is not being used by another peripheral and is configured correctly in your code.

Solutions and Tips for Troubleshooting

  • If the board is not recognized, press the reset button twice quickly to enter bootloader mode.
  • For I/O issues, use a multimeter to check for continuity and correct voltage levels.
  • Consult the Adafruit forums and online resources for community support and additional troubleshooting advice.

FAQs

Q: Can I power the Metro M4 Express with a battery? A: Yes, you can use a battery within the input voltage limits (6-12V).

Q: Is the Metro M4 Express compatible with all Arduino shields? A: While many shields will work, some may not be compatible due to differences in voltage levels or pin assignments. Always check shield specifications.

Q: How do I use the onboard DAC? A: The DAC can be used to output analog voltages. Use the analogWrite() function in your code to control the DAC pin.

For further assistance, Adafruit provides extensive documentation and a supportive community forum to help you with your Metro M4 Express projects.