Cirkit Designer Logo
Cirkit Designer
Your all-in-one circuit design IDE
Home / 
Component Documentation

How to Use Respeaker 2-Mics Pi HAT V2.0: Examples, Pinouts, and Specs

Image of Respeaker 2-Mics Pi HAT V2.0
Cirkit Designer LogoDesign with Respeaker 2-Mics Pi HAT V2.0 in Cirkit Designer

Introduction

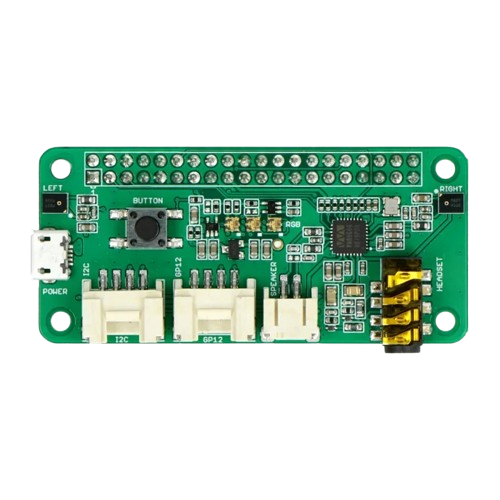
The Respeaker 2-Mics Pi HAT V2.0, developed by Seeed Studio, is a hardware add-on designed for Raspberry Pi boards. It features two high-quality microphones optimized for voice recognition and audio processing. This HAT (Hardware Attached on Top) is ideal for building voice-controlled applications, sound detection systems, and audio recording projects. Its compact design and plug-and-play compatibility make it a popular choice for developers working on voice assistant projects or IoT devices.

Explore Projects Built with Respeaker 2-Mics Pi HAT V2.0

Use Cirkit Designer to design, explore, and prototype these projects online. Some projects support real-time simulation. Click "Open Project" to start designing instantly!
Raspberry Pi Zero-Based Audio Visualizer with OLED Display and INMP441 Microphone
Image of HEART_SOUND: A project utilizing Respeaker 2-Mics Pi HAT V2.0 in a practical application
This circuit features a Raspberry Pi Zero connected to an INMP441 MEMS microphone and a 1.3" OLED display. The Raspberry Pi Zero communicates with the OLED display via I2C (using GPIO2 for SDA and GPIO3 for SCL), and it interfaces with the INMP441 microphone using I2S (with GPIO4 for SCK, GPIO9 for L/R selection, ID_SD for SD, and GPIO12 for WS). The circuit is designed for audio input through the microphone and visual output on the OLED display, likely for applications such as sound visualization or audio monitoring.
Cirkit Designer LogoOpen Project in Cirkit Designer
Raspberry Pi 4B-Based GPS and GSM Tracking System with Audio Feedback
Image of unlimited range: A project utilizing Respeaker 2-Mics Pi HAT V2.0 in a practical application
This circuit features a Raspberry Pi 4B as the central processing unit, interfaced with a GPS NEO-6M V2 module for location tracking and an Adafruit FONA 808 Shield for cellular communication. It includes a PAM8406 5V Digital Audio Amplifier connected to an Adafruit STEMMA Speaker for audio output, and a Condenser Microphone connected to the FONA 808 for audio input. Power management is handled by a 12V battery connected to a voltage regulator that steps down the voltage to 5V and 3V required by the various components.
Cirkit Designer LogoOpen Project in Cirkit Designer
Raspberry Pi 4B-Based Smart Surveillance System with Audio Capture and Ultrasonic Sensing
Image of pranav: A project utilizing Respeaker 2-Mics Pi HAT V2.0 in a practical application
This circuit features a Raspberry Pi 4B as the central controller, interfacing with a variety of peripherals. It includes a PAM8406 digital audio amplifier connected to a speaker for audio output, an Adafruit MAX9814 microphone amplifier for audio input, and a TTL Serial JPEG Camera for image capture. Additionally, an HC-SR04 ultrasonic sensor is connected for distance measurement. The Raspberry Pi manages these components and likely processes audio, image, and distance data for applications such as a smart assistant or security system.
Cirkit Designer LogoOpen Project in Cirkit Designer
Raspberry Pi Pico-Based Smart Weather Station with Audio Feedback and Multiple Sensors
Image of Nexus Pico: A project utilizing Respeaker 2-Mics Pi HAT V2.0 in a practical application
This circuit features a Raspberry Pi Pico microcontroller interfaced with various sensors and modules, including a BME/BMP280 for environmental sensing, an INMP441 microphone, a MAX31865 RTD-to-digital converter, a VL53L0X distance sensor, and a Hall sensor. Additionally, it includes an Adafruit MAX98357A DAC connected to a loudspeaker for audio output. The microcontroller manages data acquisition and processing from these sensors and controls the audio output.
Cirkit Designer LogoOpen Project in Cirkit Designer

Explore Projects Built with Respeaker 2-Mics Pi HAT V2.0

Use Cirkit Designer to design, explore, and prototype these projects online. Some projects support real-time simulation. Click "Open Project" to start designing instantly!
Image of HEART_SOUND: A project utilizing Respeaker 2-Mics Pi HAT V2.0 in a practical application
Raspberry Pi Zero-Based Audio Visualizer with OLED Display and INMP441 Microphone
This circuit features a Raspberry Pi Zero connected to an INMP441 MEMS microphone and a 1.3" OLED display. The Raspberry Pi Zero communicates with the OLED display via I2C (using GPIO2 for SDA and GPIO3 for SCL), and it interfaces with the INMP441 microphone using I2S (with GPIO4 for SCK, GPIO9 for L/R selection, ID_SD for SD, and GPIO12 for WS). The circuit is designed for audio input through the microphone and visual output on the OLED display, likely for applications such as sound visualization or audio monitoring.
Cirkit Designer LogoOpen Project in Cirkit Designer
Image of unlimited range: A project utilizing Respeaker 2-Mics Pi HAT V2.0 in a practical application
Raspberry Pi 4B-Based GPS and GSM Tracking System with Audio Feedback
This circuit features a Raspberry Pi 4B as the central processing unit, interfaced with a GPS NEO-6M V2 module for location tracking and an Adafruit FONA 808 Shield for cellular communication. It includes a PAM8406 5V Digital Audio Amplifier connected to an Adafruit STEMMA Speaker for audio output, and a Condenser Microphone connected to the FONA 808 for audio input. Power management is handled by a 12V battery connected to a voltage regulator that steps down the voltage to 5V and 3V required by the various components.
Cirkit Designer LogoOpen Project in Cirkit Designer
Image of pranav: A project utilizing Respeaker 2-Mics Pi HAT V2.0 in a practical application
Raspberry Pi 4B-Based Smart Surveillance System with Audio Capture and Ultrasonic Sensing
This circuit features a Raspberry Pi 4B as the central controller, interfacing with a variety of peripherals. It includes a PAM8406 digital audio amplifier connected to a speaker for audio output, an Adafruit MAX9814 microphone amplifier for audio input, and a TTL Serial JPEG Camera for image capture. Additionally, an HC-SR04 ultrasonic sensor is connected for distance measurement. The Raspberry Pi manages these components and likely processes audio, image, and distance data for applications such as a smart assistant or security system.
Cirkit Designer LogoOpen Project in Cirkit Designer
Image of Nexus Pico: A project utilizing Respeaker 2-Mics Pi HAT V2.0 in a practical application
Raspberry Pi Pico-Based Smart Weather Station with Audio Feedback and Multiple Sensors
This circuit features a Raspberry Pi Pico microcontroller interfaced with various sensors and modules, including a BME/BMP280 for environmental sensing, an INMP441 microphone, a MAX31865 RTD-to-digital converter, a VL53L0X distance sensor, and a Hall sensor. Additionally, it includes an Adafruit MAX98357A DAC connected to a loudspeaker for audio output. The microcontroller manages data acquisition and processing from these sensors and controls the audio output.
Cirkit Designer LogoOpen Project in Cirkit Designer

Common Applications and Use Cases

  • Voice-controlled assistants (e.g., Alexa, Google Assistant)
  • Sound localization and detection systems
  • Audio recording and processing
  • Smart home automation
  • IoT projects requiring voice input

Technical Specifications

The Respeaker 2-Mics Pi HAT V2.0 is designed to work seamlessly with Raspberry Pi boards. Below are its key technical details:

Key Technical Details

  • Microphone Type: Two MEMS microphones
  • Audio Processing: Supports voice activity detection (VAD)
  • Interface: I2S (Inter-IC Sound)
  • Power Supply: Powered via Raspberry Pi GPIO header
  • Dimensions: 65mm x 30mm
  • Operating Voltage: 3.3V (via GPIO)
  • Compatibility: Raspberry Pi 4, 3B+, 3B, Zero, Zero W, and other models with a 40-pin GPIO header

Pin Configuration and Descriptions

The Respeaker 2-Mics Pi HAT V2.0 connects directly to the Raspberry Pi's 40-pin GPIO header. Below is the pin configuration:

Pin Name Description
1 3.3V Power supply for the HAT
2 5V Power supply for the Raspberry Pi
3 I2C SDA I2C data line for communication
5 I2C SCL I2C clock line for communication
12 I2S BCLK Bit clock for I2S audio interface
35 I2S LRCLK Left-right clock for I2S audio interface
40 I2S DIN Data input for I2S audio interface
Other Ground (GND) Common ground connection

Usage Instructions

How to Use the Component in a Circuit

  1. Attach the HAT: Align the Respeaker 2-Mics Pi HAT V2.0 with the Raspberry Pi's 40-pin GPIO header and press it down gently to ensure a secure connection.
  2. Install Required Software:
    • Boot up your Raspberry Pi with an operating system (e.g., Raspberry Pi OS).
    • Open a terminal and update the system:
      sudo apt update && sudo apt upgrade
      
    • Install the necessary drivers and libraries for the HAT:
      sudo apt install git
      git clone https://github.com/respeaker/seeed-voicecard.git
      cd seeed-voicecard
      sudo ./install.sh
      
    • Reboot the Raspberry Pi to apply changes:
      sudo reboot
      
  3. Test the Microphones:
    • After rebooting, verify the microphones are working by recording audio:
      arecord -D hw:1,0 -f cd test.wav
      
    • Play back the recorded audio:
      aplay test.wav
      

Important Considerations and Best Practices

  • Ensure the HAT is properly aligned with the GPIO header to avoid damaging the pins.
  • Use a compatible Raspberry Pi power supply to ensure stable operation.
  • Avoid placing the HAT in environments with excessive noise or vibration for accurate voice recognition.
  • Regularly update the software and drivers to maintain compatibility with the latest Raspberry Pi OS.

Example Code for Raspberry Pi

Below is an example Python script to capture audio using the Respeaker 2-Mics Pi HAT V2.0:

import os

Record audio using arecord command

The '-D hw:1,0' specifies the hardware device for the microphone

The '-f cd' sets the format to CD quality (16-bit, 44.1kHz, stereo)

os.system("arecord -D hw:1,0 -f cd -d 5 test.wav")

print("Audio recording complete. Playing back the recorded audio...")

Play back the recorded audio using aplay command

os.system("aplay test.wav")


Troubleshooting and FAQs

Common Issues and Solutions

  1. Microphones Not Detected:

    • Cause: Drivers not installed or improperly configured.
    • Solution: Reinstall the drivers using the installation script:
      cd seeed-voicecard
      sudo ./install.sh
      
  2. No Audio Output During Playback:

    • Cause: Incorrect audio output device selected.
    • Solution: Use the alsamixer command to configure the audio output device.
  3. Poor Audio Quality:

    • Cause: Environmental noise or incorrect microphone placement.
    • Solution: Place the HAT in a quieter environment and ensure the microphones are unobstructed.
  4. HAT Not Powering On:

    • Cause: Improper connection to the GPIO header.
    • Solution: Recheck the alignment of the HAT with the GPIO pins.

FAQs

  • Q: Can I use this HAT with Raspberry Pi Zero?

    • A: Yes, the Respeaker 2-Mics Pi HAT V2.0 is compatible with Raspberry Pi Zero and Zero W.
  • Q: Does this HAT support stereo recording?

    • A: No, the two microphones are used for beamforming and noise reduction, not stereo recording.
  • Q: Can I use this HAT for real-time voice recognition?

    • A: Yes, it is optimized for real-time voice recognition when paired with appropriate software.
  • Q: How do I update the firmware for the HAT?

    • A: The HAT does not require firmware updates. Ensure the drivers and software are up to date instead.

This concludes the documentation for the Respeaker 2-Mics Pi HAT V2.0. For further assistance, refer to the official Seeed Studio documentation or community forums.