How to Use Disyuntor diferencial: Examples, Pinouts, and Specs
Introduction
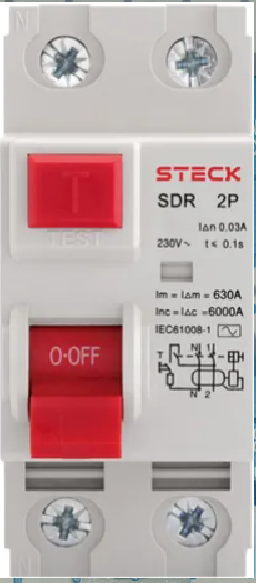
The Disyuntor Diferencial DD25A by Schneider is a differential circuit breaker designed to detect earth leakage currents and disconnect the circuit to prevent electric shock and fire hazards. It is an essential safety device in electrical installations, ensuring protection for both people and equipment.
Explore Projects Built with Disyuntor diferencial


Explore Projects Built with Disyuntor diferencial
Common Applications and Use Cases
- Residential and commercial electrical installations
- Protection against electric shock caused by ground faults
- Prevention of fire hazards due to insulation failures
- Industrial environments requiring enhanced safety measures
Technical Specifications
The following table outlines the key technical details of the DD25A:
| Parameter | Value |
|---|---|
| Manufacturer | Schneider |
| Part ID | DD25A |
| Rated Current (In) | 25 A |
| Rated Voltage (Un) | 230/400 V AC |
| Sensitivity (ΔIn) | 30 mA |
| Frequency | 50/60 Hz |
| Number of Poles | 2P (Double Pole) |
| Breaking Capacity | 6 kA |
| Type | AC (detects sinusoidal AC leakage) |
| Mounting | DIN Rail |
| Operating Temperature Range | -25°C to +40°C |
| Standards Compliance | IEC/EN 61008-1 |
Pin Configuration and Descriptions
The DD25A is a two-pole device with the following terminal configuration:
| Terminal | Description |
|---|---|
| L (Line In) | Connects to the live input from the power source. |
| N (Neutral In) | Connects to the neutral input from the power source. |
| L (Line Out) | Connects to the live output to the load. |
| N (Neutral Out) | Connects to the neutral output to the load. |
Usage Instructions
How to Use the DD25A in a Circuit
- Mounting: Securely install the DD25A on a standard DIN rail in the distribution board.
- Wiring:
- Connect the live input wire to the L (Line In) terminal.
- Connect the neutral input wire to the N (Neutral In) terminal.
- Connect the live output wire to the L (Line Out) terminal.
- Connect the neutral output wire to the N (Neutral Out) terminal.
- Testing:
- After installation, press the Test Button (T) on the device to ensure proper functionality. The breaker should trip immediately.
- Resetting:
- If the breaker trips, identify and resolve the fault before resetting the device by flipping the switch back to the "ON" position.
Important Considerations and Best Practices
- Ensure the rated current and voltage of the DD25A match the requirements of your circuit.
- Regularly test the device using the built-in test button to verify its functionality.
- Avoid overloading the circuit, as this may cause nuisance tripping.
- Ensure proper grounding of the electrical system for optimal performance.
- Do not bypass or tamper with the device, as this compromises safety.
Example: Connecting to an Arduino UNO
While the DD25A is not directly interfaced with microcontrollers like the Arduino UNO, it can be used in conjunction with an Arduino-based monitoring system to detect tripping events. Below is an example of how to monitor the state of the DD25A using an Arduino:
// Example code to monitor the state of the DD25A using an Arduino UNO
// This assumes a digital input pin is connected to the output of the DD25A

const int breakerPin = 2; // Pin connected to the output of the DD25A
const int ledPin = 13;    // Built-in LED to indicate breaker status

void setup() {
  pinMode(breakerPin, INPUT_PULLUP); // Configure breakerPin as input with pull-up
  pinMode(ledPin, OUTPUT);           // Configure LED pin as output
  Serial.begin(9600);                // Initialize serial communication
}

void loop() {
  int breakerState = digitalRead(breakerPin); // Read the state of the DD25A

  if (breakerState == HIGH) {
    // Breaker is in the "ON" position
    digitalWrite(ledPin, HIGH); // Turn on the LED
    Serial.println("Breaker is ON");
  } else {
    // Breaker is tripped or "OFF"
    digitalWrite(ledPin, LOW);  // Turn off the LED
    Serial.println("Breaker is OFF or Tripped");
  }

  delay(500); // Wait for 500ms before checking again
}
Troubleshooting and FAQs
Common Issues and Solutions
| Issue | Possible Cause | Solution |
|---|---|---|
| Breaker trips frequently | Overloaded circuit or ground fault | Reduce the load or check for insulation faults. |
| Test button does not trip the breaker | Faulty device or improper wiring | Verify wiring and replace the device if needed. |
| Breaker does not reset after tripping | Persistent fault in the circuit | Identify and resolve the fault before resetting. |
| Nuisance tripping | Electrical noise or transient currents | Use a breaker with higher sensitivity if appropriate. |
FAQs
Can the DD25A be used in a three-phase system?
- Yes, the DD25A can be used in a three-phase system, but only for the protection of a single-phase load.
How often should the test button be used?
- It is recommended to test the device monthly to ensure proper functionality.
What happens if the DD25A is installed incorrectly?
- Incorrect installation may result in the device failing to trip during a fault, compromising safety. Always follow the wiring instructions carefully.
Can the DD25A protect against overcurrent?
- No, the DD25A is designed to detect earth leakage currents. Use a separate overcurrent protection device (e.g., MCB) for overcurrent protection.