How to Use Mikroe R Click: Examples, Pinouts, and Specs
Introduction
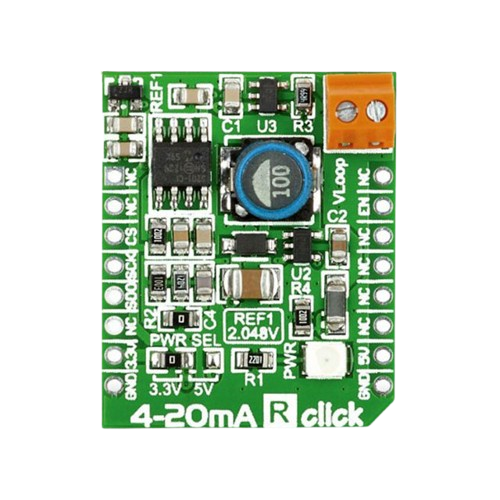
The Mikroe R Click (Manufacturer Part ID: MIKROE-1387) is a compact development board designed for rapid prototyping and testing of various applications. Manufactured by MikroElektronika, this versatile board integrates a range of sensors and interfaces, making it ideal for Internet of Things (IoT) projects, embedded systems, and other electronics applications. Its small form factor and compatibility with MikroElektronika's mikroBUS™ standard ensure seamless integration into a wide variety of development environments.
Explore Projects Built with Mikroe R Click


Explore Projects Built with Mikroe R Click
Common Applications and Use Cases
- IoT device prototyping
- Environmental monitoring systems
- Industrial automation
- Smart home applications
- Educational and research projects
Technical Specifications
Key Technical Details
| Parameter | Specification |
|---|---|
| Manufacturer | MikroElektronika |
| Part ID | MIKROE-1387 |
| Interface | mikroBUS™ (SPI, I2C, UART, GPIO) |
| Operating Voltage | 3.3V or 5V (selectable via onboard jumper) |
| Dimensions | 28.6mm x 25.4mm |
| Sensors/Features | Integrated sensors and GPIO pins for prototyping |
| Compatibility | Compatible with all mikroBUS™-enabled systems |
Pin Configuration and Descriptions
The Mikroe R Click uses the mikroBUS™ standard pinout. Below is the pin configuration:
| Pin Name | Pin Type | Description |
|---|---|---|
| AN | Analog Input | General-purpose analog input |
| RST | Digital Input | Reset pin for connected peripherals |
| CS | Digital Input | Chip Select for SPI communication |
| SCK | Digital Input | SPI Clock |
| MISO | Digital Output | SPI Master-In-Slave-Out |
| MOSI | Digital Input | SPI Master-Out-Slave-In |
| PWM | Digital Output | Pulse Width Modulation output |
| INT | Digital Output | Interrupt signal output |
| RX | Digital Input | UART Receive |
| TX | Digital Output | UART Transmit |
| SCL | Digital Input | I2C Clock |
| SDA | Digital Input | I2C Data |
| 3.3V | Power | 3.3V power supply |
| 5V | Power | 5V power supply |
| GND | Ground | Ground connection |
Usage Instructions
How to Use the Mikroe R Click in a Circuit
- Power Supply: Ensure the Mikroe R Click is powered using either 3.3V or 5V, depending on your system's requirements. Use the onboard jumper to select the appropriate voltage.
- Interface Selection: Connect the Mikroe R Click to a mikroBUS™ socket on your development board. Depending on your application, configure the communication interface (SPI, I2C, or UART).
- Sensor/Peripheral Access: Utilize the onboard sensors and GPIO pins for your specific application. Refer to the datasheet for detailed sensor functionality.
- Programming: Write code to communicate with the Mikroe R Click using your chosen interface. Libraries for MikroElektronika Click boards are available for various platforms, including Arduino and MikroC.
Important Considerations and Best Practices
- Voltage Selection: Always ensure the correct voltage is selected using the onboard jumper to avoid damaging the board or connected peripherals.
- Pin Mapping: Double-check the pin mapping of your development board to ensure proper connections.
- Library Support: Use MikroElektronika's official libraries for easier integration and faster development.
- Static Protection: Handle the board with care to avoid damage from electrostatic discharge (ESD).
Example Code for Arduino UNO
Below is an example of how to interface the Mikroe R Click with an Arduino UNO using the I2C interface:
#include <Wire.h> // Include the Wire library for I2C communication

#define DEVICE_ADDRESS 0x48 // Replace with the Mikroe R Click I2C address

void setup() {
  Wire.begin(); // Initialize I2C communication
  Serial.begin(9600); // Initialize serial communication for debugging

  // Send a test command to the Mikroe R Click
  Wire.beginTransmission(DEVICE_ADDRESS);
  Wire.write(0x00); // Example command (replace with actual command)
  Wire.endTransmission();

  Serial.println("Mikroe R Click initialized.");
}

void loop() {
  Wire.requestFrom(DEVICE_ADDRESS, 2); // Request 2 bytes of data from the device

  if (Wire.available() == 2) {
    int data = Wire.read() << 8 | Wire.read(); // Read and combine two bytes
    Serial.print("Sensor Data: ");
    Serial.println(data); // Print the received data
  }

  delay(1000); // Wait for 1 second before the next read
}
Notes:
- Replace
DEVICE_ADDRESSand commands with the actual values for your specific application. - Ensure the Mikroe R Click is properly connected to the Arduino UNO's I2C pins (SDA to A4, SCL to A5).
Troubleshooting and FAQs
Common Issues and Solutions
No Communication with the Board
- Cause: Incorrect interface selection or wiring.
- Solution: Verify the interface (SPI, I2C, or UART) and ensure proper connections.
Incorrect Voltage Selection
- Cause: Onboard jumper set to the wrong voltage.
- Solution: Check and adjust the jumper to match your system's voltage requirements.
Unstable Readings
- Cause: Noise or interference in the circuit.
- Solution: Use proper decoupling capacitors and ensure a clean power supply.
Library Compatibility Issues
- Cause: Using outdated or incompatible libraries.
- Solution: Download the latest libraries from MikroElektronika's official website.
FAQs
Q: Can the Mikroe R Click be used with platforms other than Arduino?
A: Yes, the Mikroe R Click is compatible with any platform that supports the mikroBUS™ standard, including MikroElektronika's development boards and other microcontroller platforms.
Q: Where can I find example code and libraries?
A: Example code and libraries are available on MikroElektronika's official website and GitHub repositories.
Q: How do I know which interface to use?
A: The choice of interface (SPI, I2C, or UART) depends on your application and the capabilities of your development board. Refer to the Mikroe R Click datasheet for detailed interface information.
Q: What is the maximum operating temperature for the Mikroe R Click?
A: Refer to the Mikroe R Click datasheet for detailed environmental specifications, including operating temperature ranges.