Cirkit Designer
Your all-in-one circuit design IDE
Home /
Component Documentation
How to Use Bateria Lipo 3s: Examples, Pinouts, and Specs
Introduction
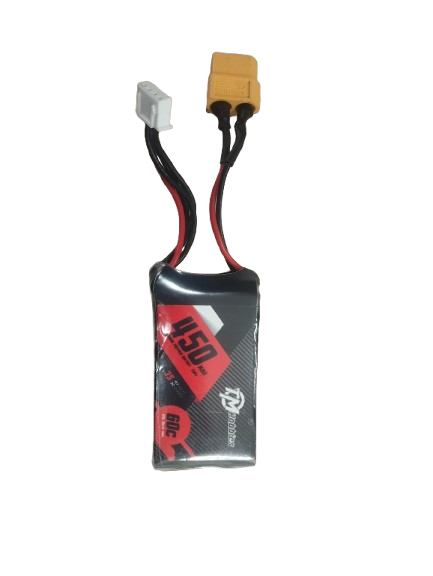
- The Bateria Lipo 3s is a Lithium Polymer (LiPo) battery with three cells connected in series, providing a nominal voltage of 11.1V. Each cell typically has a nominal voltage of 3.7V, resulting in the combined voltage of 11.1V.
- This battery is widely used in applications requiring lightweight, high-capacity, and high-discharge power sources, such as RC vehicles, drones, robotics, and portable electronics.
Explore Projects Built with Bateria Lipo 3s
Battery-Powered 18650 Li-ion Charger with USB Output and Adjustable Voltage Regulator

This circuit is a battery management and power supply system that uses three 3.7V batteries connected to a 3S 10A Li-ion 18650 Charger Protection Board Module for balanced charging and protection. The system includes a TP4056 Battery Charging Protection Module for additional charging safety, a Step Up Boost Power Converter to regulate and boost the voltage, and a USB regulator to provide a stable 5V output, controlled by a push switch.
3S 18650 Battery Pack with Protection Board for Safe Charging
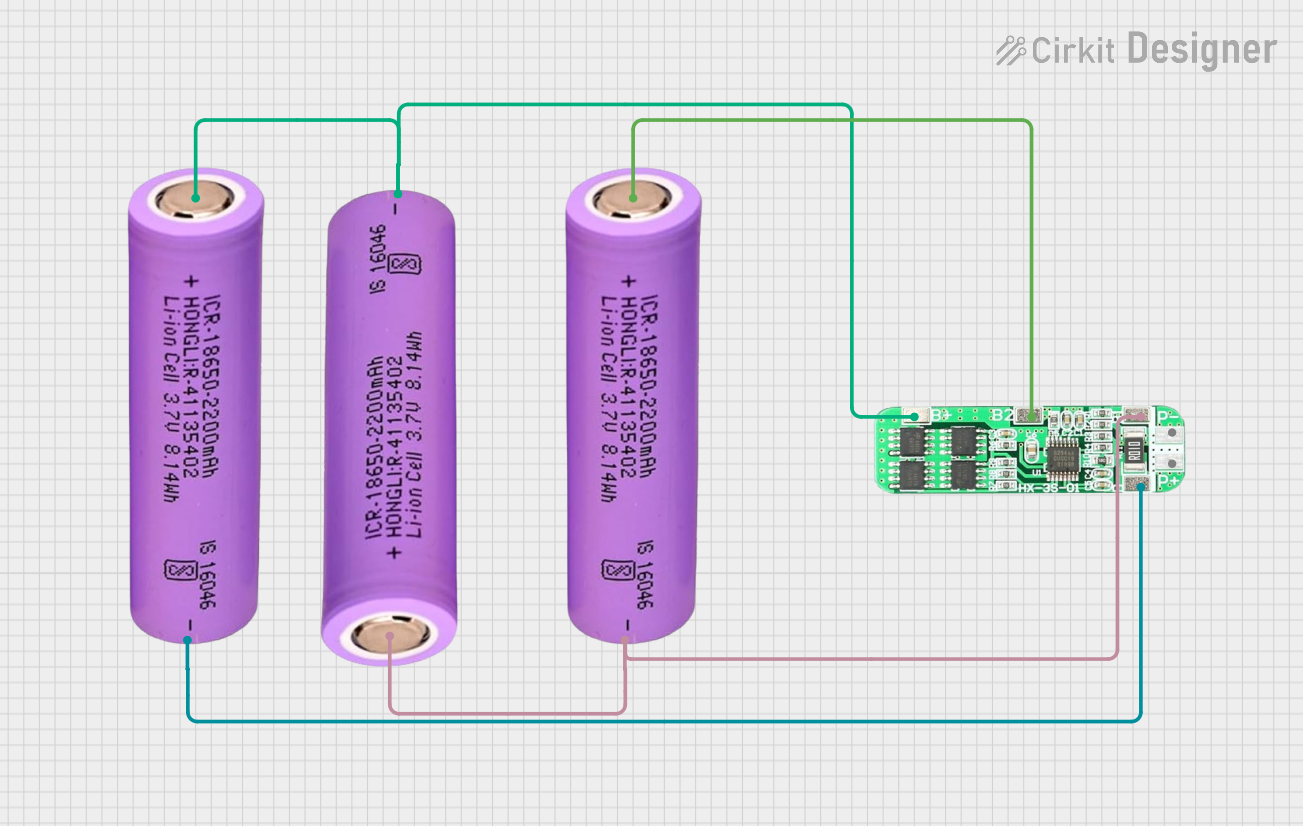
This circuit consists of three 18650 batteries connected in series to a 3S 10A Li-ion 18650 Charger Protection Board Module. The protection board manages the charging and discharging of the battery pack, ensuring safe operation by balancing the cells and providing overcharge, over-discharge, and short-circuit protection.
Battery-Powered UPS System with Waveshare UPS 3S and Solar Charger

This circuit is a power management system that integrates a 12V power supply, a solar charger power bank, and multiple Li-ion batteries to provide a stable power output. The Waveshare UPS 3S manages the input from the power sources and batteries, ensuring continuous power delivery. The MRB045 module is used to interface the solar charger with the rest of the system.
Battery-Powered Arduino and ESP32 Controlled Servo System with BMS and TP4056 Charging
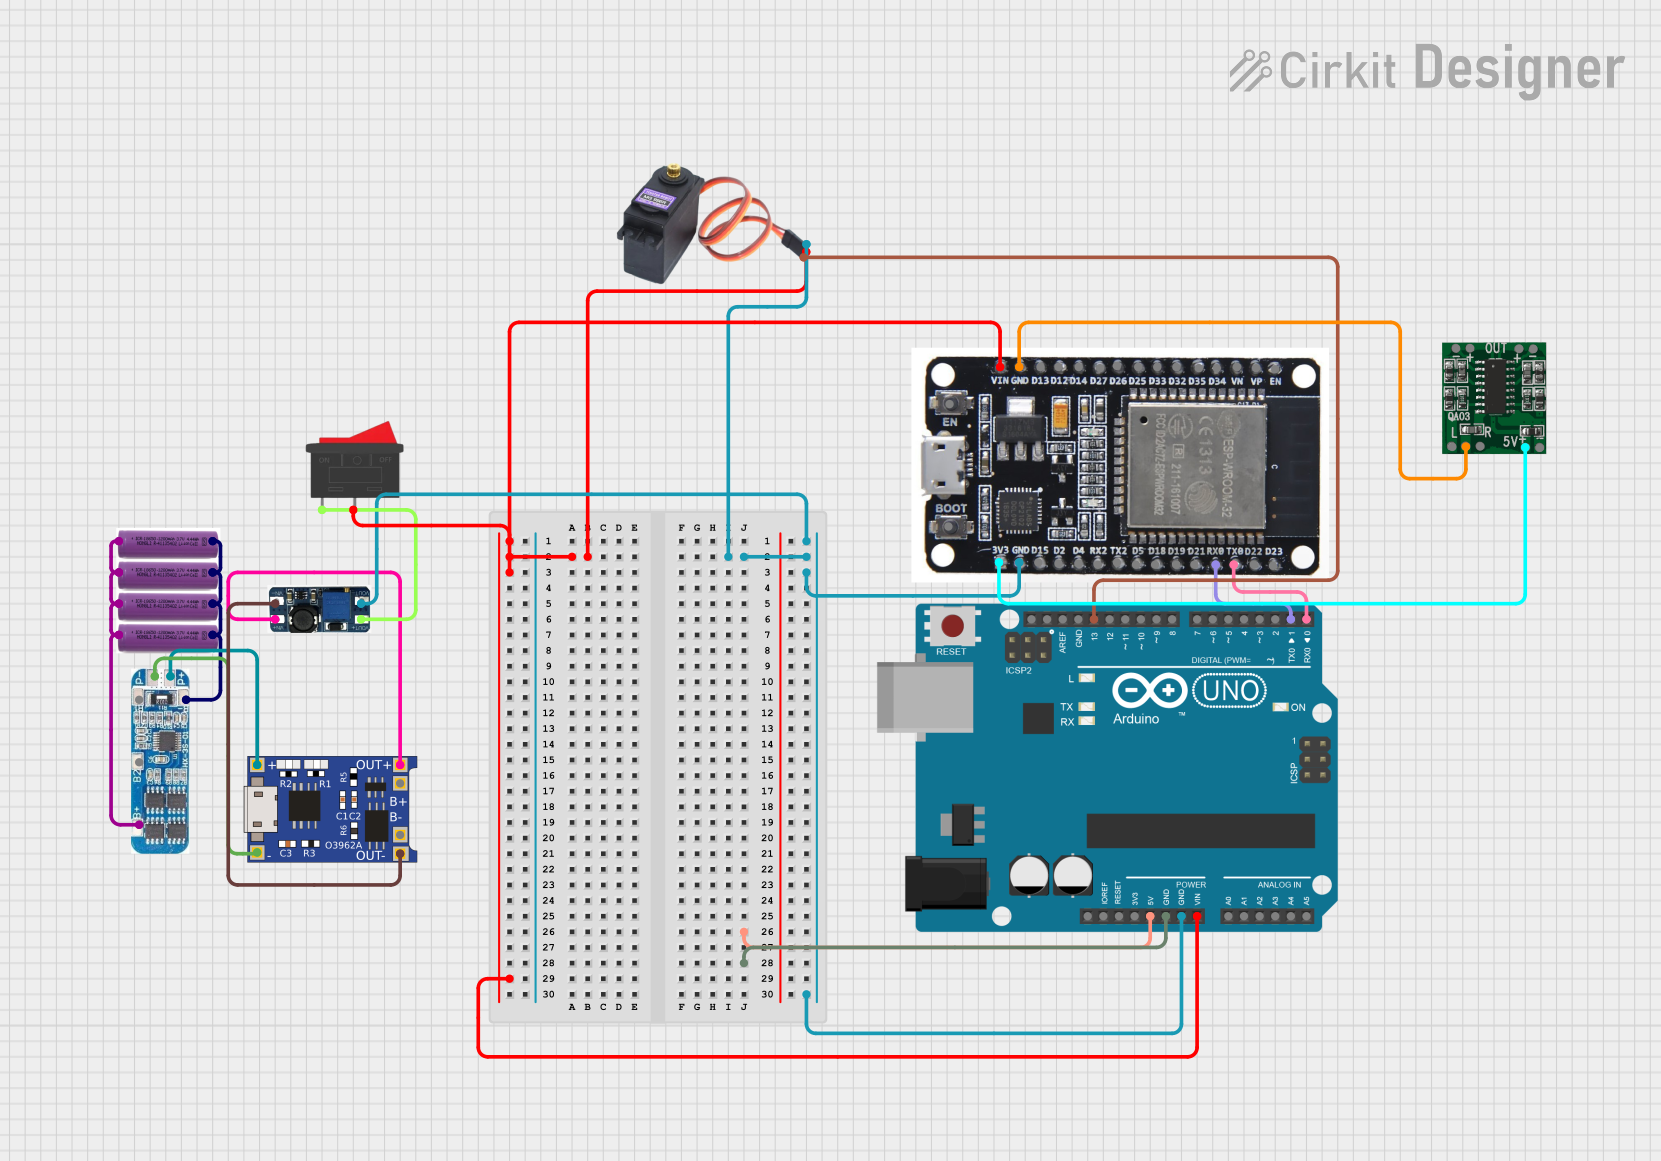
This circuit integrates multiple 3.7V batteries managed by a Battery Management System (BMS) and charged via a TP4056 module. It powers an Arduino UNO, an ESP32, a DC-DC boost converter, and a servo motor, with the Arduino controlling the servo and communicating with the ESP32.
Explore Projects Built with Bateria Lipo 3s
Battery-Powered 18650 Li-ion Charger with USB Output and Adjustable Voltage Regulator
This circuit is a battery management and power supply system that uses three 3.7V batteries connected to a 3S 10A Li-ion 18650 Charger Protection Board Module for balanced charging and protection. The system includes a TP4056 Battery Charging Protection Module for additional charging safety, a Step Up Boost Power Converter to regulate and boost the voltage, and a USB regulator to provide a stable 5V output, controlled by a push switch.
3S 18650 Battery Pack with Protection Board for Safe Charging
This circuit consists of three 18650 batteries connected in series to a 3S 10A Li-ion 18650 Charger Protection Board Module. The protection board manages the charging and discharging of the battery pack, ensuring safe operation by balancing the cells and providing overcharge, over-discharge, and short-circuit protection.
Battery-Powered UPS System with Waveshare UPS 3S and Solar Charger
This circuit is a power management system that integrates a 12V power supply, a solar charger power bank, and multiple Li-ion batteries to provide a stable power output. The Waveshare UPS 3S manages the input from the power sources and batteries, ensuring continuous power delivery. The MRB045 module is used to interface the solar charger with the rest of the system.
Battery-Powered Arduino and ESP32 Controlled Servo System with BMS and TP4056 Charging
This circuit integrates multiple 3.7V batteries managed by a Battery Management System (BMS) and charged via a TP4056 module. It powers an Arduino UNO, an ESP32, a DC-DC boost converter, and a servo motor, with the Arduino controlling the servo and communicating with the ESP32.
Technical Specifications
- Nominal Voltage: 11.1V (3.7V per cell)
- Fully Charged Voltage: 12.6V (4.2V per cell)
- Discharge Cutoff Voltage: 9.0V (3.0V per cell)
- Capacity: Varies by model (e.g., 1000mAh, 2200mAh, 5000mAh)
- Discharge Rate (C-Rating): Typically ranges from 20C to 100C
- Connector Types: XT60, Deans, JST, or other connectors depending on the model
- Balance Connector: JST-XH (commonly used for balancing the cells during charging)
- Weight: Varies by capacity (e.g., ~150g for 2200mAh)
- Dimensions: Varies by model (e.g., ~105mm x 35mm x 25mm for 2200mAh)
Pin Configuration and Descriptions
Main Power Connector (e.g., XT60)
| Pin Name | Description |
|---|---|
| Positive | Positive terminal (+11.1V) |
| Negative | Negative terminal (Ground) |
Balance Connector (JST-XH)
| Pin Number | Description |
|---|---|
| 1 | Negative terminal of Cell 1 |
| 2 | Positive terminal of Cell 1 |
| 3 | Positive terminal of Cell 2 |
| 4 | Positive terminal of Cell 3 |
Usage Instructions
Charging the Battery:
- Use a LiPo-compatible balance charger to charge the battery.
- Set the charger to the correct cell count (3S) and capacity (e.g., 2200mAh).
- Ensure the charging current does not exceed the recommended value (typically 1C, where 1C = battery capacity in amps).
- Always connect the balance connector to the charger to ensure all cells are charged evenly.
Connecting to a Circuit:
- Connect the main power connector (e.g., XT60) to the load or device.
- Ensure the polarity matches (positive to positive, negative to negative).
- Use a voltage alarm or battery monitor to avoid over-discharging the battery.
Important Considerations:
- Never discharge the battery below 9.0V (3.0V per cell) to prevent damage.
- Avoid puncturing, short-circuiting, or exposing the battery to high temperatures.
- Store the battery at a storage voltage of ~11.4V (3.8V per cell) when not in use for extended periods.
Using with Arduino UNO:
- The Bateria Lipo 3s can power an Arduino UNO via the VIN pin or DC barrel jack.
- Use a voltage regulator or step-down converter if the load requires a lower voltage (e.g., 5V or 3.3V).
Example Arduino code to monitor battery voltage:
const int batteryPin = A0; // Analog pin connected to battery voltage divider const float voltageDividerRatio = 11.0; // Adjust based on resistor values used const float referenceVoltage = 5.0; // Arduino reference voltage (5V for UNO) void setup() { Serial.begin(9600); // Initialize serial communication } void loop() { int rawValue = analogRead(batteryPin); // Read analog value float batteryVoltage = (rawValue / 1023.0) * referenceVoltage * voltageDividerRatio; // Print the battery voltage to the Serial Monitor Serial.print("Battery Voltage: "); Serial.print(batteryVoltage); Serial.println(" V"); delay(1000); // Wait for 1 second before the next reading }- Use a voltage divider circuit to scale down the battery voltage to a safe range for the Arduino's analog input (0-5V).
Troubleshooting and FAQs
Common Issues
Battery Not Charging:
- Cause: Incorrect charger settings or damaged balance connector.
- Solution: Verify the charger is set to 3S mode and check all connections.
Battery Swelling:
- Cause: Overcharging, over-discharging, or physical damage.
- Solution: Stop using the battery immediately and dispose of it safely.
Device Shuts Down Prematurely:
- Cause: Battery voltage dropped below the cutoff threshold.
- Solution: Use a voltage alarm or monitor to prevent over-discharge.
Uneven Cell Voltages:
- Cause: Cells are out of balance due to improper charging.
- Solution: Use a balance charger to equalize the cell voltages.
FAQs
Can I use a 3S LiPo battery with a 12V device?
- Yes, but ensure the device can handle the voltage range of 9.0V to 12.6V.
How do I safely dispose of a damaged LiPo battery?
- Discharge the battery completely, submerge it in saltwater for 24 hours, and take it to a recycling center.
What is the maximum safe discharge rate for my battery?
- Check the C-rating on the battery label. Multiply the C-rating by the capacity to get the maximum discharge current (e.g., 2200mAh × 20C = 44A).
How long can I store a LiPo battery?
- Store the battery at a storage voltage (~11.4V for 3S) in a cool, dry place. Avoid storing fully charged or fully discharged batteries for extended periods.