Cirkit Designer
Your all-in-one circuit design IDE
Home /
Component Documentation
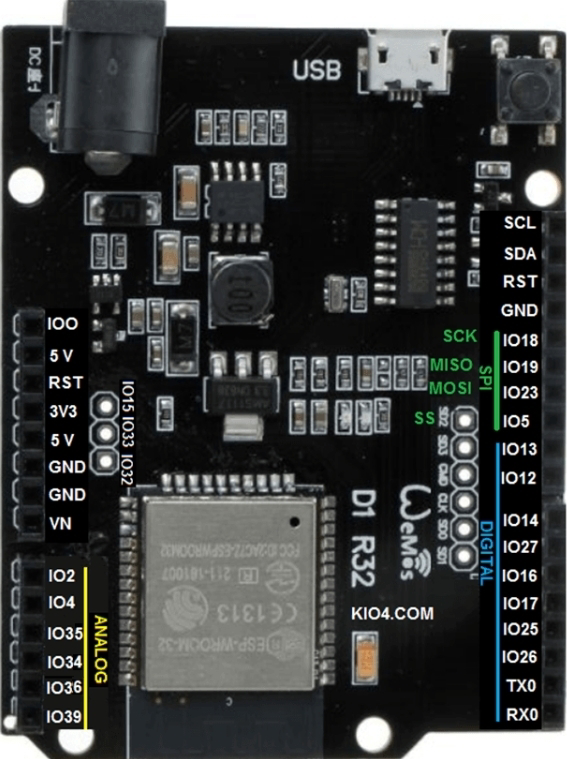
How to Use Wemos D1 R32: Examples, Pinouts, and Specs
Introduction
The Wemos D1 R32 is a versatile microcontroller board based on the powerful ESP32 chip. It offers both Wi-Fi and Bluetooth connectivity, making it an excellent choice for a wide range of IoT and embedded applications. The board is compatible with the Arduino IDE, which simplifies the development process for both beginners and experienced users.
Explore Projects Built with Wemos D1 R32
Wi-Fi Controlled RGB LED Strip with Battery Management System
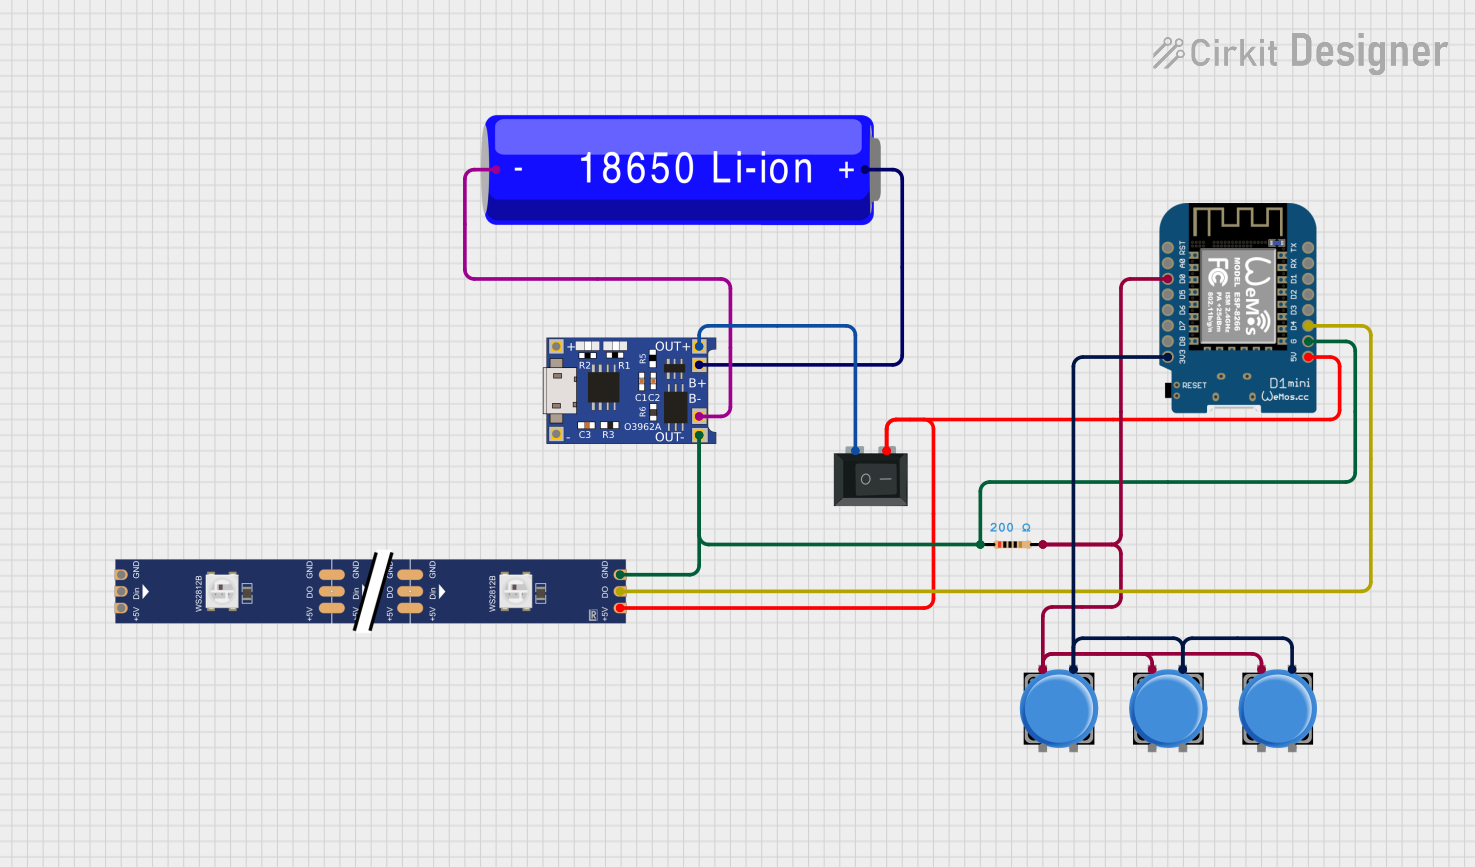
This circuit features a Wemos D1 Mini microcontroller powered by a 18650 Li-ion battery through a TP4056 charging module, with power control managed by a rocker switch. The Wemos D1 Mini controls a WS2812 RGB LED strip, with the data line connected to the D4 pin and power lines controlled by the switch. Multiple pushbuttons are connected to the D0 pin through a resistor, likely for user input to control the LED strip or other functions in the microcontroller's code.
I2C-Controlled OLED Display with External EEPROM and Interactive Pushbuttons

This is a microcontroller-based interactive device featuring a Wemos D1 Mini, an OLED display, external EEPROM, and an I/O expander. It includes user input buttons and status LEDs, with potential MIDI interface capabilities.
Battery-Powered Wi-Fi Temperature and Humidity Monitor with Wemos D1 Mini and DHT22
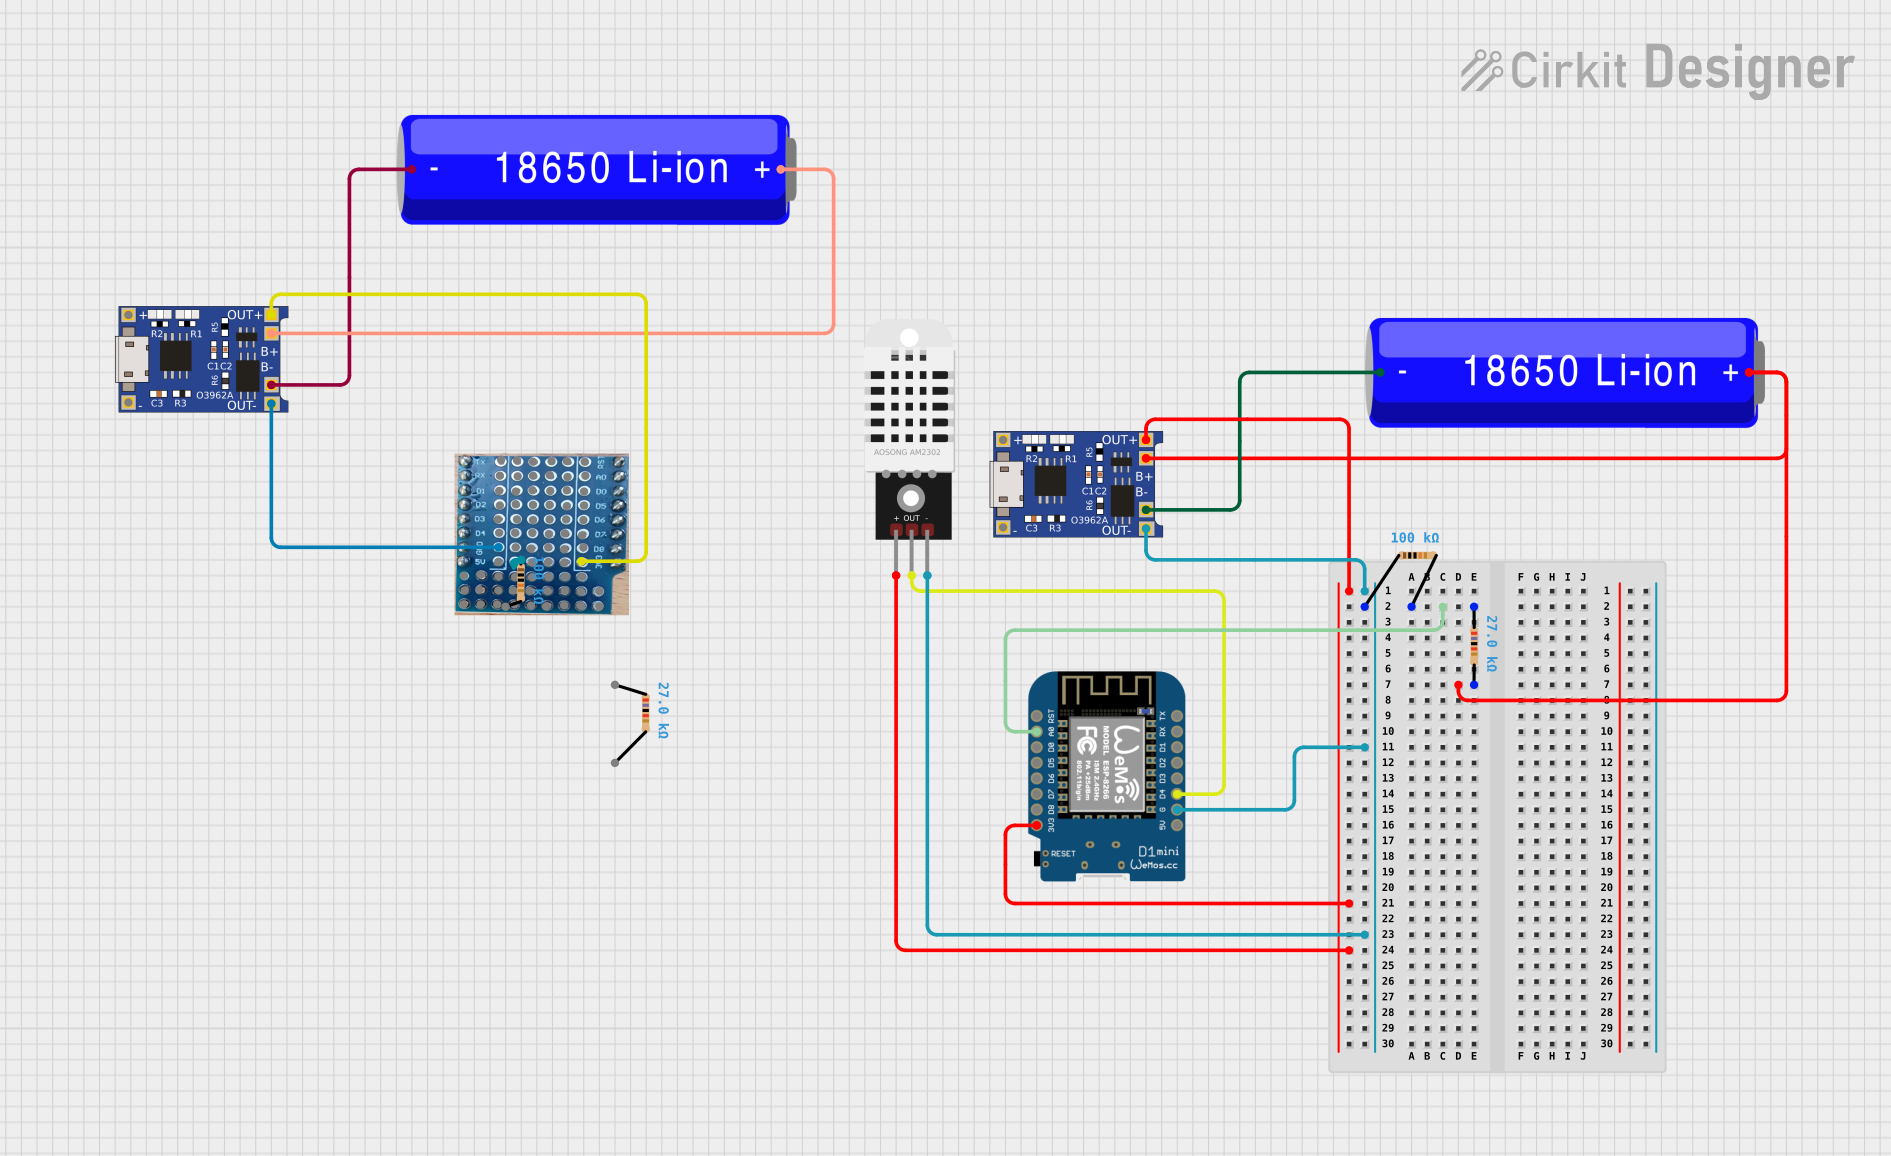
This circuit appears to be a sensor node with a DHT22 temperature and humidity sensor interfaced with a Wemos D1 Mini microcontroller. The Wemos D1 Mini is powered by a 18650 Li-ion battery, which is charged and protected by a TP4056 charging module. The sensor's data output is connected to the D4 pin of the Wemos D1 Mini for digital signal processing, and voltage dividers made of resistors are likely used for level shifting or pull-up/pull-down purposes.
Wi-Fi Controlled Weather Station with Wemos D1 Mini and OLED Display
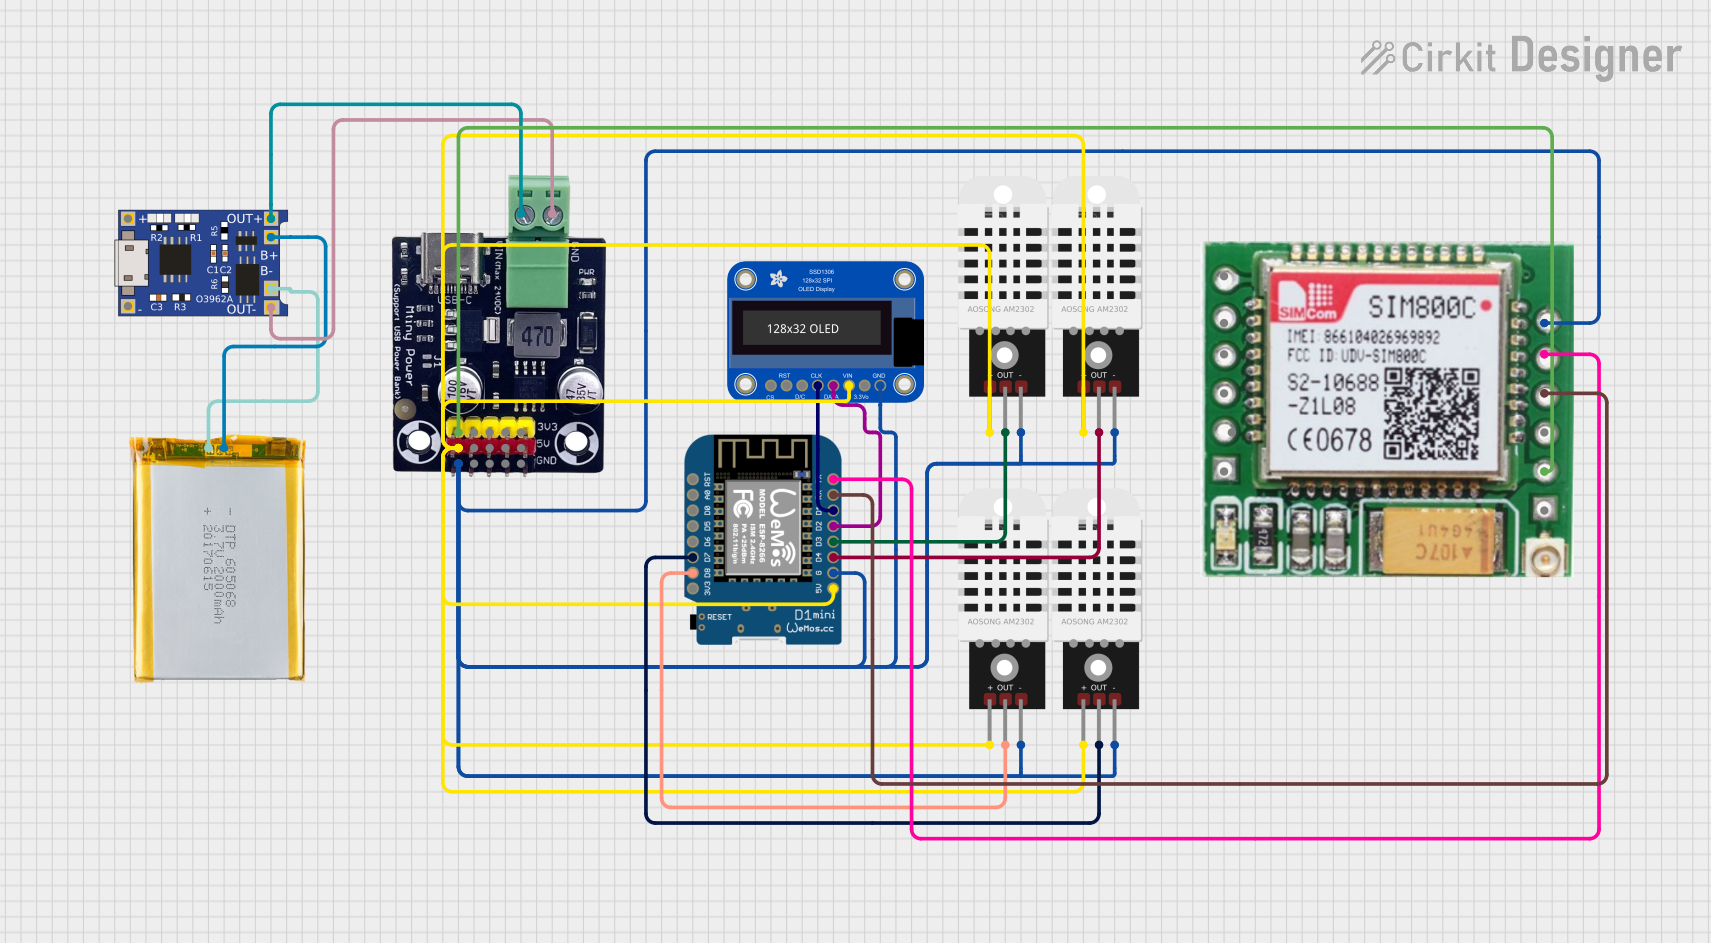
This circuit is a weather monitoring system that uses a Wemos D1 Mini microcontroller to read temperature and humidity data from four DHT22 sensors and display the information on an Adafruit OLED screen. The data is also transmitted via WiFi to an MQTT server for remote monitoring. The system is powered by a 2000mAh battery, which is managed by a TP4056 charging module and a Mtiny Power module.
Explore Projects Built with Wemos D1 R32
Wi-Fi Controlled RGB LED Strip with Battery Management System
This circuit features a Wemos D1 Mini microcontroller powered by a 18650 Li-ion battery through a TP4056 charging module, with power control managed by a rocker switch. The Wemos D1 Mini controls a WS2812 RGB LED strip, with the data line connected to the D4 pin and power lines controlled by the switch. Multiple pushbuttons are connected to the D0 pin through a resistor, likely for user input to control the LED strip or other functions in the microcontroller's code.
I2C-Controlled OLED Display with External EEPROM and Interactive Pushbuttons
This is a microcontroller-based interactive device featuring a Wemos D1 Mini, an OLED display, external EEPROM, and an I/O expander. It includes user input buttons and status LEDs, with potential MIDI interface capabilities.
Battery-Powered Wi-Fi Temperature and Humidity Monitor with Wemos D1 Mini and DHT22
This circuit appears to be a sensor node with a DHT22 temperature and humidity sensor interfaced with a Wemos D1 Mini microcontroller. The Wemos D1 Mini is powered by a 18650 Li-ion battery, which is charged and protected by a TP4056 charging module. The sensor's data output is connected to the D4 pin of the Wemos D1 Mini for digital signal processing, and voltage dividers made of resistors are likely used for level shifting or pull-up/pull-down purposes.
Wi-Fi Controlled Weather Station with Wemos D1 Mini and OLED Display
This circuit is a weather monitoring system that uses a Wemos D1 Mini microcontroller to read temperature and humidity data from four DHT22 sensors and display the information on an Adafruit OLED screen. The data is also transmitted via WiFi to an MQTT server for remote monitoring. The system is powered by a 2000mAh battery, which is managed by a TP4056 charging module and a Mtiny Power module.
Common Applications and Use Cases
- Home automation systems
- Wireless sensor networks
- Remote data logging
- IoT devices
- Robotics
- Wearable technology
Technical Specifications
Key Technical Details
| Specification | Value |
|---|---|
| Microcontroller | ESP32 |
| Operating Voltage | 3.3V |
| Input Voltage | 7-12V |
| Digital I/O Pins | 34 |
| Analog Input Pins | 16 |
| Flash Memory | 4MB |
| SRAM | 520KB |
| Clock Speed | 240 MHz |
| Wi-Fi | 802.11 b/g/n |
| Bluetooth | v4.2 BR/EDR and BLE |
| Dimensions | 68.6mm x 53.4mm |
Pin Configuration and Descriptions
| Pin Number | Pin Name | Description |
|---|---|---|
| 1 | 3V3 | 3.3V Power Output |
| 2 | GND | Ground |
| 3 | VIN | Input Voltage (7-12V) |
| 4 | D0 | GPIO16 |
| 5 | D1 | GPIO5 |
| 6 | D2 | GPIO4 |
| 7 | D3 | GPIO0 |
| 8 | D4 | GPIO2 |
| 9 | D5 | GPIO14 |
| 10 | D6 | GPIO12 |
| 11 | D7 | GPIO13 |
| 12 | D8 | GPIO15 |
| 13 | D9 | GPIO3 (RX) |
| 14 | D10 | GPIO1 (TX) |
| 15 | D11 | GPIO9 |
| 16 | D12 | GPIO10 |
| 17 | A0 | ADC1_CH0 |
| 18 | A1 | ADC1_CH1 |
| 19 | A2 | ADC1_CH2 |
| 20 | A3 | ADC1_CH3 |
| 21 | A4 | ADC1_CH4 |
| 22 | A5 | ADC1_CH5 |
| 23 | A6 | ADC1_CH6 |
| 24 | A7 | ADC1_CH7 |
| 25 | A8 | ADC1_CH8 |
| 26 | A9 | ADC1_CH9 |
| 27 | A10 | ADC1_CH10 |
| 28 | A11 | ADC1_CH11 |
| 29 | A12 | ADC1_CH12 |
| 30 | A13 | ADC1_CH13 |
| 31 | A14 | ADC1_CH14 |
| 32 | A15 | ADC1_CH15 |
| 33 | SDA | I2C Data |
| 34 | SCL | I2C Clock |
Usage Instructions
How to Use the Component in a Circuit
Powering the Board:
- Connect the VIN pin to a 7-12V power source.
- Alternatively, you can power the board via the micro-USB port.
Connecting to Wi-Fi:
- Use the built-in Wi-Fi capabilities of the ESP32 to connect to a network.
- Example code for connecting to Wi-Fi is provided below.
Programming the Board:
- Install the ESP32 board package in the Arduino IDE.
- Select "Wemos D1 R32" from the board manager.
- Write your code and upload it to the board via the micro-USB port.
Important Considerations and Best Practices
- Voltage Levels: Ensure that all connected components operate at 3.3V to avoid damaging the board.
- Pin Usage: Be mindful of the pin configuration and avoid using reserved pins for other purposes.
- Heat Management: The ESP32 can get warm during operation. Ensure adequate ventilation or cooling if necessary.
Example Code: Connecting to Wi-Fi
#include <WiFi.h>

// Replace with your network credentials
const char* ssid = "your_SSID";
const char* password = "your_PASSWORD";

void setup() {
  Serial.begin(115200);
  delay(10);

  // Connect to Wi-Fi network
  Serial.println();
  Serial.print("Connecting to ");
  Serial.println(ssid);

  WiFi.begin(ssid, password);

  while (WiFi.status() != WL_CONNECTED) {
    delay(500);
    Serial.print(".");
  }

  Serial.println("");
  Serial.println("WiFi connected.");
  Serial.println("IP address: ");
  Serial.println(WiFi.localIP());
}

void loop() {
  // Your code here
}
Troubleshooting and FAQs
Common Issues Users Might Face
Board Not Connecting to Wi-Fi:
- Ensure the SSID and password are correct.
- Check if the Wi-Fi network is within range.
- Restart the board and try again.
Upload Errors in Arduino IDE:
- Verify that the correct board and port are selected.
- Ensure the ESP32 board package is installed.
- Check the USB cable and connection.
Board Not Powering On:
- Confirm the power source is within the specified range (7-12V).
- Check the connections to the VIN and GND pins.
Solutions and Tips for Troubleshooting
- Serial Monitor: Use the Serial Monitor in the Arduino IDE to debug and view error messages.
- Reset Button: Press the reset button on the board to restart it.
- Firmware Update: Ensure the ESP32 firmware is up to date for optimal performance.
By following this documentation, you should be able to effectively utilize the Wemos D1 R32 in your projects. Whether you're a beginner or an experienced user, this board offers a robust platform for developing a wide range of IoT and embedded applications.