How to Use PiSugar 3: Examples, Pinouts, and Specs
Introduction
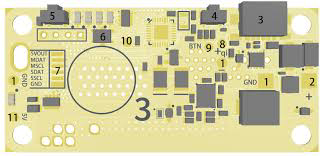
The PiSugar 3 is a compact and versatile power management board designed specifically for Raspberry Pi devices. Manufactured by Raspberry Pi, this component integrates a rechargeable battery solution, enabling portable and uninterrupted operation of Raspberry Pi boards. It features advanced power monitoring, safe shutdown capabilities, and a user-friendly design, making it an ideal choice for mobile and embedded Raspberry Pi projects.
Explore Projects Built with PiSugar 3


Explore Projects Built with PiSugar 3
Common Applications and Use Cases
- Portable Raspberry Pi projects (e.g., handheld gaming consoles, IoT devices)
- Uninterruptible Power Supply (UPS) for Raspberry Pi
- Battery-powered robotics and automation systems
- Educational and prototyping projects requiring mobility
- Safe shutdown and power management for critical applications
Technical Specifications
The following table outlines the key technical details of the PiSugar 3:
| Parameter | Specification |
|---|---|
| Manufacturer | Raspberry Pi |
| Part ID | Sugar 3 |
| Input Voltage | 5V (via USB-C) |
| Output Voltage | 5V (regulated for Raspberry Pi) |
| Battery Capacity | Varies (depending on the model, typically 1200mAh–5000mAh) |
| Charging Current | Up to 2A |
| Output Current | Up to 3A |
| Communication Interface | I2C (for power monitoring and control) |
| Dimensions | Compact, designed to fit Raspberry Pi models |
| Safety Features | Overcharge protection, over-discharge protection, short-circuit protection |
Pin Configuration and Descriptions
The PiSugar 3 connects to the Raspberry Pi via GPIO pins and USB-C. Below is the pin configuration:
| Pin | Name | Description |
|---|---|---|
| 1 | 5V Power Out | Supplies regulated 5V power to the Raspberry Pi |
| 2 | GND | Ground connection |
| 3 | SDA (I2C) | Data line for I2C communication |
| 4 | SCL (I2C) | Clock line for I2C communication |
| USB-C | Power Input | Used for charging the battery and powering the board |
Usage Instructions
How to Use the PiSugar 3 in a Circuit
Physical Installation:
- Attach the PiSugar 3 to the back of your Raspberry Pi using the provided mounting hardware.
- Ensure the GPIO pins are properly aligned and connected.
Powering the Raspberry Pi:
- Connect a USB-C cable to the PiSugar 3 to charge the battery.
- Once charged, the PiSugar 3 will provide uninterrupted 5V power to the Raspberry Pi.
I2C Communication:
- Enable I2C on your Raspberry Pi by running
sudo raspi-configand navigating to "Interfacing Options > I2C". - Use the I2C interface to monitor battery status and control power management features.
- Enable I2C on your Raspberry Pi by running
Safe Shutdown:
- The PiSugar 3 includes a safe shutdown feature to prevent data corruption. Configure the shutdown script provided by the manufacturer to enable this functionality.
Important Considerations and Best Practices
- Battery Selection: Ensure the battery capacity meets the power requirements of your Raspberry Pi and connected peripherals.
- Ventilation: Avoid overheating by providing adequate ventilation, especially during high current draw.
- Firmware Updates: Check for firmware updates from the manufacturer to ensure compatibility and access to new features.
- I2C Address Conflicts: If using other I2C devices, ensure there are no address conflicts with the PiSugar 3.
Example Code for Arduino UNO (I2C Communication)
If you are using the PiSugar 3 with an Arduino UNO for power monitoring, you can use the following example code:
#include <Wire.h> // Include the Wire library for I2C communication

#define PISUGAR_I2C_ADDRESS 0x75 // Default I2C address for PiSugar 3

void setup() {
  Wire.begin(); // Initialize I2C communication
  Serial.begin(9600); // Start serial communication for debugging

  Serial.println("PiSugar 3 Power Monitoring Example");
}

void loop() {
  Wire.beginTransmission(PISUGAR_I2C_ADDRESS); // Start communication with PiSugar 3
  Wire.write(0x01); // Request battery percentage (example command)
  Wire.endTransmission();

  Wire.requestFrom(PISUGAR_I2C_ADDRESS, 1); // Request 1 byte of data
  if (Wire.available()) {
    int batteryPercentage = Wire.read(); // Read the battery percentage
    Serial.print("Battery Percentage: ");
    Serial.print(batteryPercentage);
    Serial.println("%");
  }

  delay(1000); // Wait 1 second before the next reading
}
Note: Replace the I2C address or commands if they differ for your specific PiSugar 3 model. Refer to the manufacturer's documentation for detailed command sets.
Troubleshooting and FAQs
Common Issues and Solutions
Raspberry Pi Not Powering On:
- Cause: Insufficient battery charge or loose GPIO connection.
- Solution: Ensure the battery is charged and the GPIO pins are securely connected.
I2C Communication Fails:
- Cause: I2C not enabled or address conflict.
- Solution: Enable I2C in the Raspberry Pi configuration and check for address conflicts with other devices.
Battery Drains Quickly:
- Cause: High power consumption by peripherals or low-capacity battery.
- Solution: Use a higher-capacity battery or reduce the power consumption of connected devices.
Overheating:
- Cause: Prolonged high current draw or poor ventilation.
- Solution: Improve ventilation and avoid exceeding the maximum current rating.
FAQs
Q: Can I use the PiSugar 3 with Raspberry Pi Zero?
- A: Yes, the PiSugar 3 is compatible with Raspberry Pi Zero and other models.
Q: How do I check the battery status?
- A: Use the I2C interface to query the battery percentage and voltage. Refer to the example code above.
Q: Is the PiSugar 3 safe for 24/7 operation?
- A: Yes, the PiSugar 3 includes safety features like overcharge and over-discharge protection, making it suitable for continuous operation.
Q: Can I replace the battery?
- A: Yes, the battery is replaceable. Ensure the replacement battery matches the specifications provided by the manufacturer.
This concludes the documentation for the PiSugar 3. For further assistance, refer to the official Raspberry Pi documentation or contact the manufacturer.