Cirkit Designer Logo
Cirkit Designer
Your all-in-one circuit design IDE
Home / 
Component Documentation

How to Use Contator Metaltex 24v: Examples, Pinouts, and Specs

Image of Contator Metaltex 24v
Cirkit Designer LogoDesign with Contator Metaltex 24v in Cirkit Designer

Introduction

The Metaltex Ct32-b0-322 is a 24V contactor designed for switching electrical circuits in industrial and commercial applications. This component enables the control of high-power devices, such as motors, heaters, and lighting systems, using a low-power control signal. Its robust design ensures reliable operation in demanding environments, making it a popular choice for automation and control systems.

Explore Projects Built with Contator Metaltex 24v

Use Cirkit Designer to design, explore, and prototype these projects online. Some projects support real-time simulation. Click "Open Project" to start designing instantly!
240V to 12V Power Conversion Circuit with Stopkontak
Image of daya PLN: A project utilizing Contator Metaltex 24v in a practical application
This circuit converts a 240V AC power source to a 12V DC output using a 12V adapter. The 240V AC power source is connected to a stopkontak, which then supplies the 12V adapter with the necessary AC voltage to produce a 12V DC output.
Cirkit Designer LogoOpen Project in Cirkit Designer
Industrial Power Distribution and Safety Control System
Image of Control Diagram: A project utilizing Contator Metaltex 24v in a practical application
This circuit is designed for power distribution and safety control in an industrial setting. It features a main isolator and circuit breaker for power management, multiple PSUs for 5V, 12V, and 24V outputs, and a safety relay system that interfaces with E-stop buttons and a start switch to control a main contactor, ensuring safe operation and emergency power cut-off capabilities.
Cirkit Designer LogoOpen Project in Cirkit Designer
Modular Power Distribution System with Multiple SMPS Units and 120V Outlet
Image of Cellion-Tesla: A project utilizing Contator Metaltex 24v in a practical application
This circuit is designed to convert 240V AC power to both 12V and 24V DC outputs using multiple SMPS units. Terminal blocks are used to organize and distribute the power, while a 120V outlet provides additional AC power access. The circuit is likely used for powering various electronic devices that require different voltage levels.
Cirkit Designer LogoOpen Project in Cirkit Designer
ESP32-Based Smart Energy Monitoring and Control System
Image of SMART SOCKET: A project utilizing Contator Metaltex 24v in a practical application
This circuit is designed to monitor AC voltage and current using ZMPT101B and ZMCT103C sensors, respectively, with an ESP32 microcontroller processing the sensor outputs. The XL4015 step-down module regulates the power supply to provide a stable voltage to the sensors, the ESP32, and an LCD I2C display. The ESP32 controls a 4-channel relay module for switching AC loads, and the system's operation can be interacted with via the LCD display and a push switch.
Cirkit Designer LogoOpen Project in Cirkit Designer

Explore Projects Built with Contator Metaltex 24v

Use Cirkit Designer to design, explore, and prototype these projects online. Some projects support real-time simulation. Click "Open Project" to start designing instantly!
Image of daya PLN: A project utilizing Contator Metaltex 24v in a practical application
240V to 12V Power Conversion Circuit with Stopkontak
This circuit converts a 240V AC power source to a 12V DC output using a 12V adapter. The 240V AC power source is connected to a stopkontak, which then supplies the 12V adapter with the necessary AC voltage to produce a 12V DC output.
Cirkit Designer LogoOpen Project in Cirkit Designer
Image of Control Diagram: A project utilizing Contator Metaltex 24v in a practical application
Industrial Power Distribution and Safety Control System
This circuit is designed for power distribution and safety control in an industrial setting. It features a main isolator and circuit breaker for power management, multiple PSUs for 5V, 12V, and 24V outputs, and a safety relay system that interfaces with E-stop buttons and a start switch to control a main contactor, ensuring safe operation and emergency power cut-off capabilities.
Cirkit Designer LogoOpen Project in Cirkit Designer
Image of Cellion-Tesla: A project utilizing Contator Metaltex 24v in a practical application
Modular Power Distribution System with Multiple SMPS Units and 120V Outlet
This circuit is designed to convert 240V AC power to both 12V and 24V DC outputs using multiple SMPS units. Terminal blocks are used to organize and distribute the power, while a 120V outlet provides additional AC power access. The circuit is likely used for powering various electronic devices that require different voltage levels.
Cirkit Designer LogoOpen Project in Cirkit Designer
Image of SMART SOCKET: A project utilizing Contator Metaltex 24v in a practical application
ESP32-Based Smart Energy Monitoring and Control System
This circuit is designed to monitor AC voltage and current using ZMPT101B and ZMCT103C sensors, respectively, with an ESP32 microcontroller processing the sensor outputs. The XL4015 step-down module regulates the power supply to provide a stable voltage to the sensors, the ESP32, and an LCD I2C display. The ESP32 controls a 4-channel relay module for switching AC loads, and the system's operation can be interacted with via the LCD display and a push switch.
Cirkit Designer LogoOpen Project in Cirkit Designer

Common Applications

  • Industrial motor control
  • HVAC systems
  • Lighting control in commercial buildings
  • Automation systems
  • Power distribution panels

Technical Specifications

Key Technical Details

Parameter Value
Manufacturer Metaltex
Part Number Ct32-b0-322
Coil Voltage 24V DC
Rated Current 32A
Number of Poles 3 (Three-phase)
Contact Configuration Normally Open (NO)
Operating Temperature -25°C to +55°C
Insulation Voltage 690V AC
Mechanical Durability 10 million operations
Electrical Durability 1 million operations
Mounting Type DIN Rail or Panel Mount
Dimensions 45mm x 75mm x 85mm
Weight 250g

Pin Configuration and Descriptions

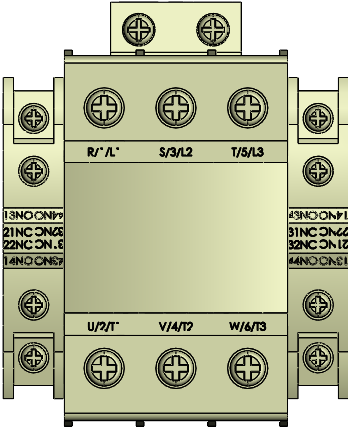
The Metaltex Ct32-b0-322 contactor has the following terminal layout:

Power Terminals

Terminal Label Description
L1, L2, L3 Input terminals for three-phase AC
T1, T2, T3 Output terminals for three-phase AC

Control Terminals

Terminal Label Description
A1 Positive terminal for 24V DC coil
A2 Negative terminal for 24V DC coil

Usage Instructions

How to Use the Contactor in a Circuit

  1. Power Connections:

    • Connect the three-phase AC power supply to the input terminals (L1, L2, L3).
    • Connect the load (e.g., motor, heater) to the output terminals (T1, T2, T3).
  2. Control Circuit:

    • Connect a 24V DC power source to the control terminals (A1 and A2).
    • Use a low-power control switch or relay to energize the coil.
  3. Mounting:

    • Secure the contactor to a DIN rail or panel using the provided mounting slots.
  4. Testing:

    • After wiring, test the circuit by applying the control signal to ensure the contactor operates as expected.

Important Considerations

  • Ensure the coil voltage matches the specified 24V DC to avoid damage.
  • Verify that the load current does not exceed the rated 32A.
  • Use proper insulation and grounding to prevent electrical hazards.
  • Avoid exposing the contactor to extreme temperatures or moisture.

Example: Controlling the Contactor with an Arduino UNO

The Metaltex Ct32-b0-322 can be controlled using an Arduino UNO. Below is an example circuit and code:

Circuit Setup

  • Connect the A1 terminal of the contactor to a digital output pin on the Arduino (e.g., pin 7) through a transistor and a flyback diode.
  • Connect the A2 terminal to the ground (GND) of the Arduino.
  • Use an external 24V DC power supply for the contactor coil.

Arduino Code

// Define the pin connected to the contactor
const int contactorPin = 7;

void setup() {
  // Set the contactor pin as an output
  pinMode(contactorPin, OUTPUT);
}

void loop() {
  // Turn the contactor ON
  digitalWrite(contactorPin, HIGH);
  delay(5000); // Keep it ON for 5 seconds

  // Turn the contactor OFF
  digitalWrite(contactorPin, LOW);
  delay(5000); // Keep it OFF for 5 seconds
}

Note: Use a transistor (e.g., NPN) to drive the contactor coil, as the Arduino cannot directly supply the required current. A flyback diode (e.g., 1N4007) across the coil terminals is essential to protect the circuit from voltage spikes.

Troubleshooting and FAQs

Common Issues and Solutions

  1. Contactor Does Not Operate:

    • Cause: Incorrect coil voltage or loose connections.
    • Solution: Verify that the control voltage is 24V DC and check all wiring.
  2. Excessive Heating:

    • Cause: Overloaded contacts or poor ventilation.
    • Solution: Ensure the load current does not exceed 32A and provide adequate airflow.
  3. Chattering Noise:

    • Cause: Insufficient control voltage or unstable power supply.
    • Solution: Check the control voltage and ensure it is stable at 24V DC.
  4. Contacts Stuck in Closed Position:

    • Cause: Welded contacts due to overcurrent.
    • Solution: Replace the contactor and ensure proper circuit protection (e.g., fuses or breakers).

FAQs

Q1: Can the contactor be used with single-phase loads?
A1: Yes, the contactor can be used with single-phase loads by connecting only one pair of input and output terminals (e.g., L1 and T1).

Q2: What is the purpose of the flyback diode in the control circuit?
A2: The flyback diode protects the control circuit from voltage spikes generated when the coil is de-energized.

Q3: Can the contactor be mounted horizontally?
A3: Yes, the contactor can be mounted in any orientation, but ensure proper ventilation.

Q4: Is the contactor suitable for outdoor use?
A4: The contactor is not weatherproof. Use it in a protected enclosure for outdoor applications.