
How to Use Adafruit BMP180: Examples, Pinouts, and Specs
 Design with Adafruit BMP180 in Cirkit Designer
Introduction
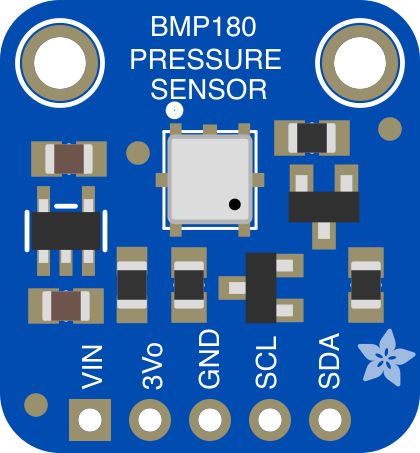
The Adafruit BMP180 (Part ID: 1603) is a high-precision barometric pressure sensor capable of measuring atmospheric pressure and temperature. This sensor is widely used in applications such as weather stations, altimeters, and devices requiring accurate altitude and pressure readings. Its compact size, low power consumption, and I2C communication interface make it an excellent choice for embedded systems and IoT projects.
Explore Projects Built with Adafruit BMP180
 Open Project in Cirkit Designer
 Open Project in Cirkit Designer
 Open Project in Cirkit Designer
 Open Project in Cirkit Designer
Explore Projects Built with Adafruit BMP180
Open Project in Cirkit DesignerOpen Project in Cirkit DesignerOpen Project in Cirkit DesignerOpen Project in Cirkit DesignerCommon Applications
- Weather monitoring systems
- Altimeters for drones and aircraft
- GPS enhancement for altitude data
- Environmental monitoring
- Educational and hobbyist projects
Technical Specifications
The Adafruit BMP180 is designed for precision and ease of use. Below are its key technical details:
Key Specifications
| Parameter | Value |
|---|---|
| Operating Voltage | 1.8V to 3.6V |
| Typical Operating Voltage | 3.3V |
| Operating Current | 12 µA (typical) |
| Communication Interface | I2C (7-bit address: 0x77) |
| Pressure Range | 300 hPa to 1100 hPa |
| Temperature Range | -40°C to +85°C |
| Pressure Resolution | 0.01 hPa (0.1 meters altitude) |
| Temperature Resolution | 0.1°C |
| Dimensions | 13mm x 10mm x 2mm |
Pin Configuration
The BMP180 sensor has four pins for easy integration into your circuit. Below is the pinout:
| Pin Name | Description |
|---|---|
| VIN | Power supply input (1.8V to 3.6V) |
| GND | Ground |
| SCL | I2C clock line |
| SDA | I2C data line |
Usage Instructions
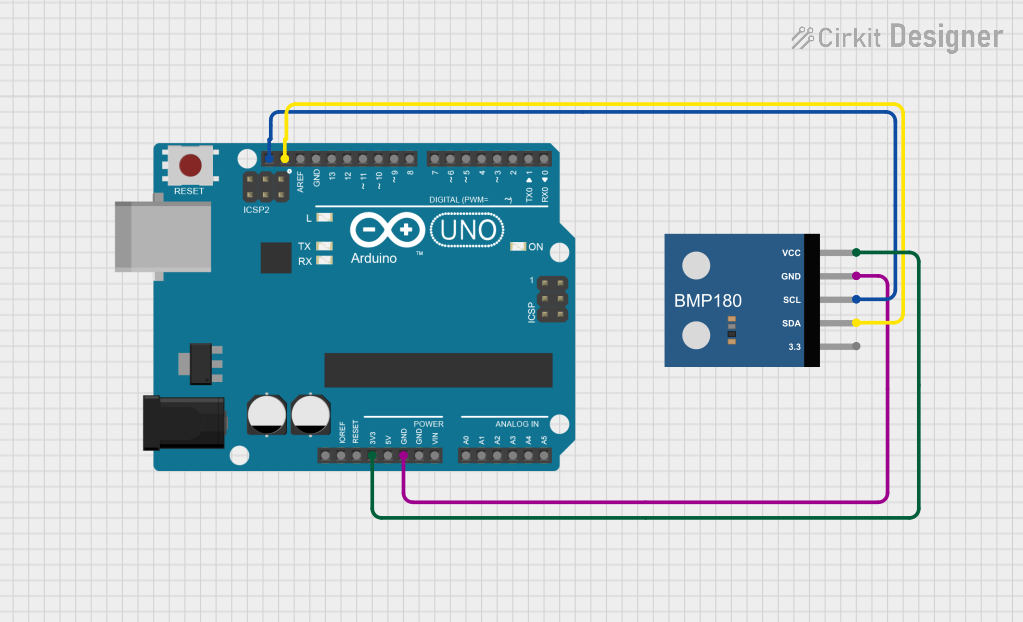
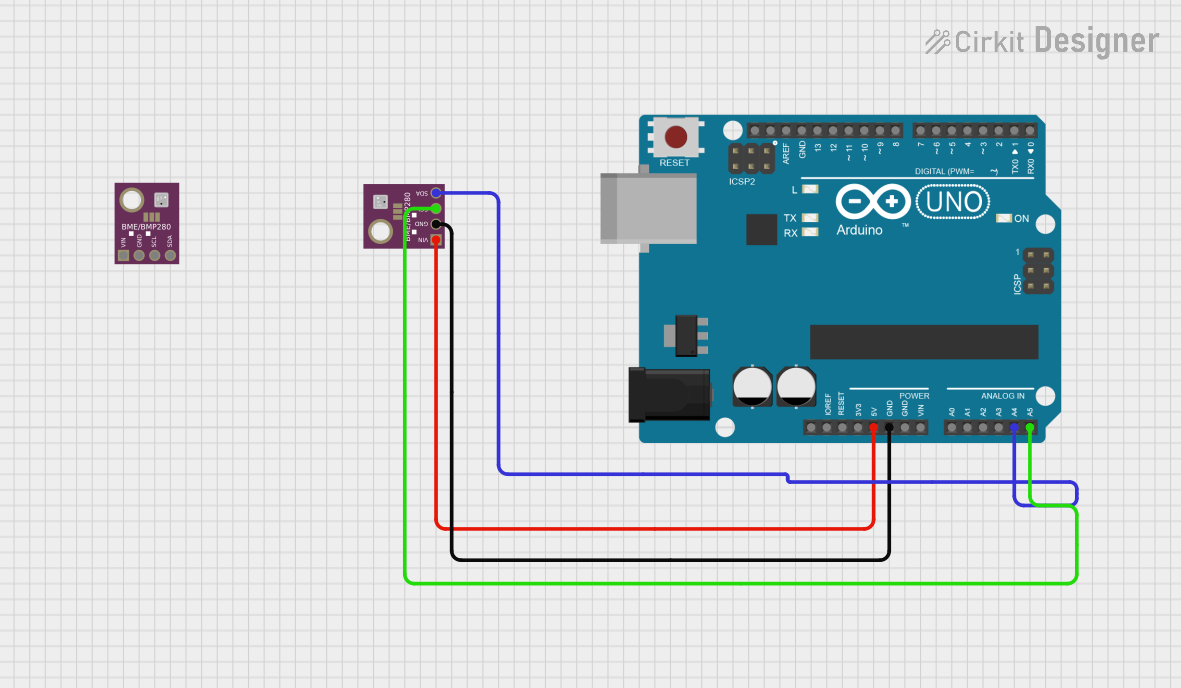
Connecting the BMP180 to an Arduino UNO
To use the BMP180 with an Arduino UNO, follow these steps:
- Connect the VIN pin of the BMP180 to the 3.3V pin on the Arduino.
- Connect the GND pin of the BMP180 to the GND pin on the Arduino.
- Connect the SCL pin of the BMP180 to the A5 pin on the Arduino (I2C clock line).
- Connect the SDA pin of the BMP180 to the A4 pin on the Arduino (I2C data line).
Sample Arduino Code
Below is an example Arduino sketch to read pressure and temperature data from the BMP180:
#include <Wire.h>
#include <Adafruit_Sensor.h>
#include <Adafruit_BMP085_U.h>

// Create an instance of the BMP180 sensor
Adafruit_BMP085_Unified bmp = Adafruit_BMP085_Unified(10085);

void setup() {
  Serial.begin(9600);
  Serial.println("BMP180 Sensor Test");

  // Initialize the sensor
  if (!bmp.begin()) {
    Serial.println("Could not find a valid BMP180 sensor, check wiring!");
    while (1); // Halt execution if sensor is not found
  }
}

void loop() {
  sensors_event_t event;
  bmp.getEvent(&event);

  if (event.pressure) {
    // Display pressure in hPa
    Serial.print("Pressure: ");
    Serial.print(event.pressure);
    Serial.println(" hPa");

    // Calculate and display altitude (assuming sea level pressure = 1013.25 hPa)
    float seaLevelPressure = 1013.25;
    Serial.print("Altitude: ");
    Serial.print(bmp.pressureToAltitude(seaLevelPressure, event.pressure));
    Serial.println(" m");

    // Display temperature
    float temperature;
    bmp.getTemperature(&temperature);
    Serial.print("Temperature: ");
    Serial.print(temperature);
    Serial.println(" °C");
  }

  delay(2000); // Wait 2 seconds before the next reading
}
Important Considerations
- Ensure the BMP180 is powered with a voltage between 1.8V and 3.6V. Exceeding this range may damage the sensor.
- Use pull-up resistors (typically 4.7kΩ) on the I2C lines (SCL and SDA) if they are not already present on your board.
- Avoid exposing the sensor to extreme temperatures or pressures beyond its specified range.
Troubleshooting and FAQs
Common Issues
Sensor not detected by Arduino:
- Verify the wiring connections, especially the I2C lines (SCL and SDA).
- Ensure the I2C address (0x77) matches the one used in your code.
- Check if pull-up resistors are required on the I2C lines.
Incorrect pressure or altitude readings:
- Ensure the sensor is not exposed to rapid temperature changes, as this can affect accuracy.
- Verify the sea level pressure value used in altitude calculations.
Temperature readings are off:
- Confirm that the sensor is not placed near heat sources that could affect its measurements.
FAQs
Q: Can the BMP180 measure altitude directly?
A: The BMP180 calculates altitude based on pressure readings and a reference sea level pressure. It does not measure altitude directly.
Q: What is the maximum cable length for I2C communication?
A: The maximum cable length depends on the pull-up resistor values and the I2C clock speed. For typical setups, keep the cable length under 1 meter to ensure reliable communication.
Q: Can I use the BMP180 with a 5V microcontroller?
A: Yes, but you must use a level shifter or voltage divider to step down the 5V signals to 3.3V for the BMP180.
By following this documentation, you can effectively integrate and use the Adafruit BMP180 in your projects.