How to Use 24GHz mmWave Sensor for XIAO : Examples, Pinouts, and Specs
Introduction
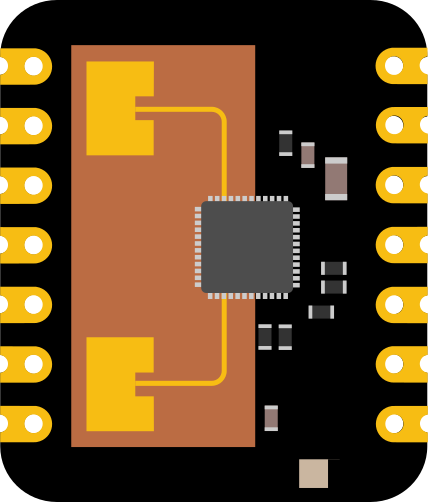
The 24GHz mmWave Sensor for XIAO by Seeed Studio is a compact and highly efficient sensor designed for motion detection and distance measurement. Operating at a frequency of 24GHz, this sensor leverages millimeter-wave technology to provide accurate and reliable data in a variety of environments. Its small form factor makes it an ideal choice for integration with Seeed Studio's XIAO microcontroller platforms, enabling developers to create innovative IoT, robotics, and automation projects.
Explore Projects Built with 24GHz mmWave Sensor for XIAO

Explore Projects Built with 24GHz mmWave Sensor for XIAO
Common Applications and Use Cases
- Motion detection for smart home automation
- Distance measurement in robotics and drones
- Presence detection in security systems
- Gesture recognition for touchless interfaces
- Industrial automation and monitoring
Technical Specifications
The following table outlines the key technical details of the 24GHz mmWave Sensor for XIAO:
| Parameter | Specification |
|---|---|
| Operating Frequency | 24GHz |
| Detection Range | 0.5m to 10m |
| Field of View (FoV) | ±60° |
| Operating Voltage | 3.3V to 5V |
| Operating Current | ≤50mA |
| Communication Interface | UART (default baud rate: 115200 bps) |
| Dimensions | 22mm x 20mm x 6mm |
| Operating Temperature | -40°C to +85°C |
Pin Configuration and Descriptions
The sensor features a 4-pin interface for easy connection to the XIAO microcontroller. The pinout is as follows:
| Pin | Name | Description |
|---|---|---|
| 1 | VCC | Power supply input (3.3V to 5V) |
| 2 | GND | Ground |
| 3 | TX | UART Transmit (data output from sensor) |
| 4 | RX | UART Receive (data input to sensor) |
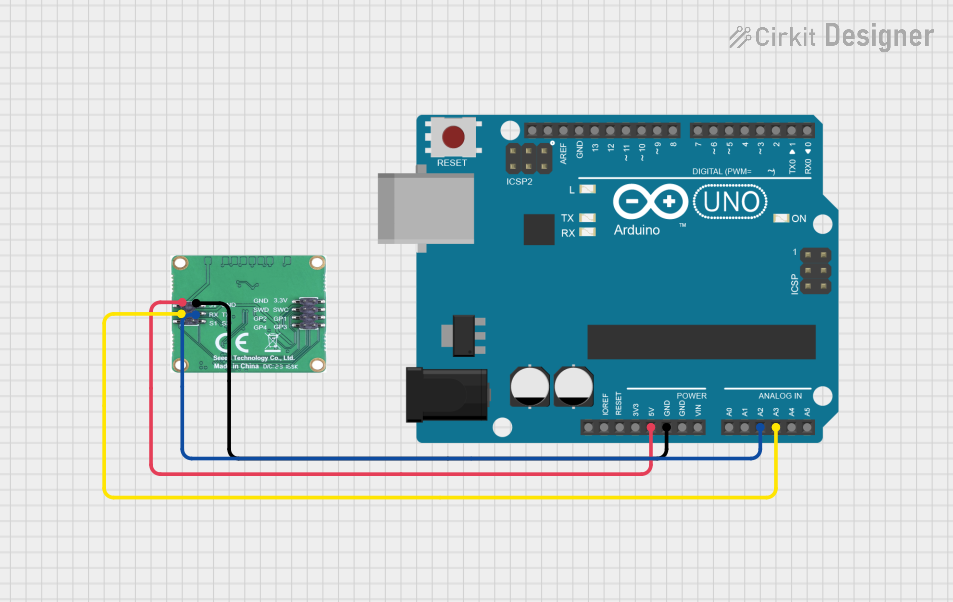
Usage Instructions
How to Use the Sensor in a Circuit
- Power the Sensor: Connect the
VCCpin to a 3.3V or 5V power source and theGNDpin to ground. - Connect to XIAO: Use the
TXandRXpins to establish a UART connection with the XIAO microcontroller. Ensure that theTXpin of the sensor is connected to theRXpin of the XIAO, and vice versa. - Load the Code: Upload the appropriate code to the XIAO microcontroller to initialize the sensor and process the data.
Important Considerations and Best Practices
- Power Supply: Ensure a stable power supply to avoid fluctuations that may affect sensor performance.
- Placement: Mount the sensor in a location free from obstructions to maximize its detection range and accuracy.
- UART Configuration: Verify that the UART baud rate is set to 115200 bps for proper communication.
- Environmental Factors: The sensor is designed to operate in a wide temperature range, but extreme environmental conditions (e.g., heavy rain or dense fog) may impact its performance.
Example Code for Arduino UNO-Compatible XIAO
Below is an example code snippet to interface the 24GHz mmWave Sensor with a XIAO microcontroller:
// Include the SoftwareSerial library for UART communication
#include <SoftwareSerial.h>

// Define the RX and TX pins for the sensor
#define SENSOR_RX 6  // Connect to the TX pin of the sensor
#define SENSOR_TX 7  // Connect to the RX pin of the sensor

// Create a SoftwareSerial object for the sensor
SoftwareSerial mmWaveSerial(SENSOR_RX, SENSOR_TX);

void setup() {
  // Initialize the serial communication for debugging
  Serial.begin(115200);
  // Initialize the sensor's UART communication
  mmWaveSerial.begin(115200);

  Serial.println("24GHz mmWave Sensor Initialized");
}

void loop() {
  // Check if data is available from the sensor
  if (mmWaveSerial.available()) {
    // Read and print the data from the sensor
    String sensorData = mmWaveSerial.readString();
    Serial.println("Sensor Data: " + sensorData);
  }

  delay(100); // Add a small delay to avoid overwhelming the serial buffer
}
Troubleshooting and FAQs
Common Issues and Solutions
No Data Output from the Sensor
- Cause: Incorrect UART connection or baud rate mismatch.
- Solution: Double-check the wiring and ensure the baud rate is set to 115200 bps.
Inconsistent Readings
- Cause: Environmental interference or unstable power supply.
- Solution: Ensure the sensor is placed in a clear area and use a stable power source.
Sensor Not Detected by XIAO
- Cause: Incorrect pin connections or faulty sensor.
- Solution: Verify the pin connections and test the sensor with another microcontroller.
FAQs
Q: Can the sensor detect objects through walls or glass?
A: The sensor can detect objects through certain materials, but dense or metallic barriers may block the signal.Q: Is the sensor compatible with other microcontrollers?
A: Yes, the sensor can be used with other microcontrollers that support UART communication.Q: How can I extend the detection range?
A: The detection range is hardware-limited to 10m. For longer ranges, consider using a different sensor model.
This documentation provides a comprehensive guide to using the 24GHz mmWave Sensor for XIAO. For further assistance, refer to the official Seeed Studio resources or community forums.