How to Use OLED 3``: Examples, Pinouts, and Specs
Introduction
The OLED 3" is a 3-inch Organic Light Emitting Diode display that delivers high-quality color output with excellent contrast and brightness. This display technology is known for its self-emissive pixels, which eliminate the need for a backlight, resulting in thinner, more energy-efficient displays. The OLED 3" is widely used in applications such as smartphones, wearables, embedded systems, and other devices requiring vibrant and sharp visual output.
Common applications include:
- Portable devices like smartwatches and fitness trackers
- Embedded systems for graphical user interfaces (GUIs)
- Consumer electronics such as smartphones and media players
- Industrial control panels and instrumentation displays
Explore Projects Built with OLED 3``


Explore Projects Built with OLED 3``
Technical Specifications
The OLED 3" display is designed to provide high performance and flexibility for various applications. Below are its key technical details:
General Specifications
| Parameter | Value |
|---|---|
| Display Type | OLED (Organic Light Emitting Diode) |
| Screen Size | 3 inches |
| Resolution | 128 x 64 pixels |
| Color Depth | 16-bit (65,536 colors) |
| Interface | SPI/I2C |
| Operating Voltage | 3.3V - 5V |
| Power Consumption | ~0.06W (typical) |
| Viewing Angle | >160° |
| Operating Temperature | -40°C to +85°C |
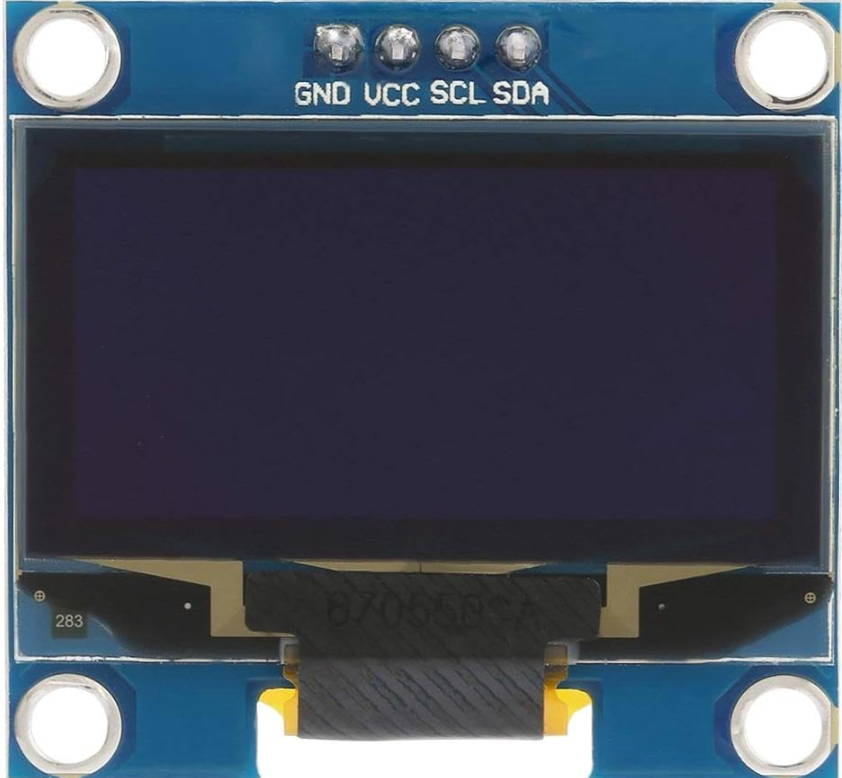
Pin Configuration
The OLED 3" display typically comes with a 7-pin interface. Below is the pinout description:
| Pin Number | Pin Name | Description |
|---|---|---|
| 1 | GND | Ground (0V reference) |
| 2 | VCC | Power supply (3.3V or 5V) |
| 3 | SCL | Serial Clock Line (SPI/I2C clock input) |
| 4 | SDA | Serial Data Line (SPI/I2C data input/output) |
| 5 | RES | Reset pin (active low) |
| 6 | DC | Data/Command control pin |
| 7 | CS | Chip Select (active low) |
Usage Instructions
To use the OLED 3" display in a circuit, follow these steps:
- Power Supply: Connect the
VCCpin to a 3.3V or 5V power source and theGNDpin to ground. - Communication Interface: Choose between SPI or I2C communication. For SPI, connect
SCL,SDA,DC,RES, andCSto the appropriate microcontroller pins. For I2C, connect onlySCLandSDA. - Initialization: Use a compatible library (e.g., Adafruit SSD1306 or U8g2) to initialize the display. Ensure the library settings match the communication protocol and resolution.
- Display Content: Use library functions to draw text, shapes, or images on the screen.
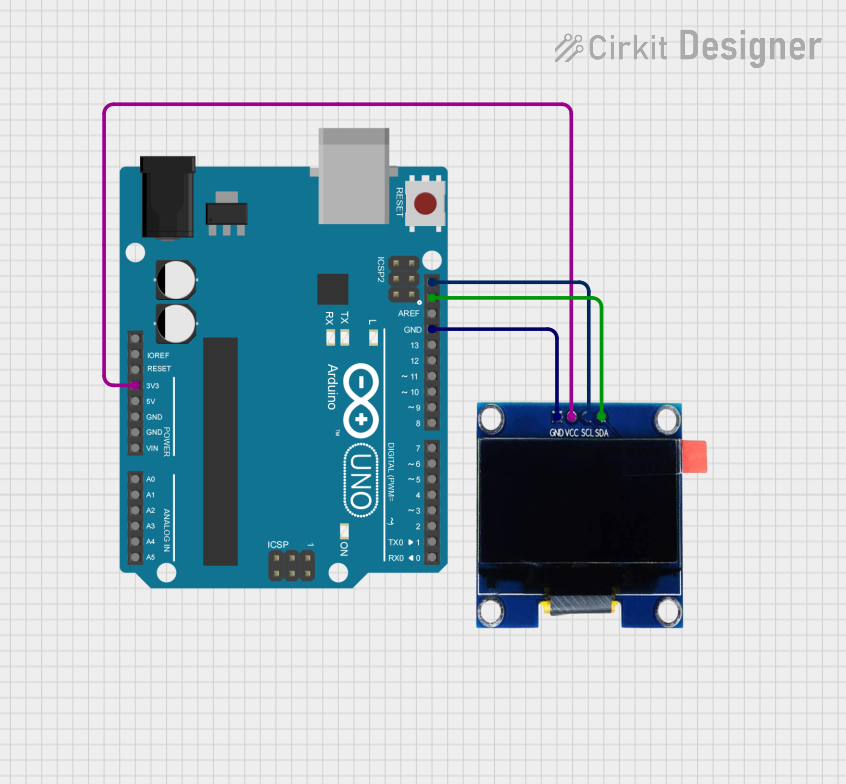
Example: Connecting OLED 3" to Arduino UNO (SPI Mode)
Below is an example of how to connect and program the OLED 3" display with an Arduino UNO using the Adafruit SSD1306 library.
Wiring Diagram
| OLED Pin | Arduino Pin |
|---|---|
| GND | GND |
| VCC | 5V |
| SCL | D13 |
| SDA | D11 |
| RES | D9 |
| DC | D8 |
| CS | D10 |
Arduino Code
#include <Adafruit_GFX.h>      // Core graphics library
#include <Adafruit_SSD1306.h> // OLED driver library

#define SCREEN_WIDTH 128       // OLED display width, in pixels
#define SCREEN_HEIGHT 64       // OLED display height, in pixels

// Declaration for an SSD1306 display connected via SPI
#define OLED_MOSI   11         // Data pin (SDA)
#define OLED_CLK    13         // Clock pin (SCL)
#define OLED_DC     8          // Data/Command pin
#define OLED_CS     10         // Chip Select pin
#define OLED_RESET  9          // Reset pin
Adafruit_SSD1306 display(SCREEN_WIDTH, SCREEN_HEIGHT,
                         OLED_MOSI, OLED_CLK, OLED_DC,
                         OLED_RESET, OLED_CS);

void setup() {
  // Initialize the display
  if (!display.begin(SSD1306_I2C_ADDRESS, OLED_RESET)) {
    Serial.println(F("SSD1306 allocation failed"));
    for (;;); // Don't proceed, loop forever
  }

  display.clearDisplay(); // Clear the buffer
  display.setTextSize(1); // Set text size to 1
  display.setTextColor(SSD1306_WHITE); // Set text color to white
  display.setCursor(0, 0); // Set cursor to top-left corner
  display.println(F("Hello, OLED 3\"!")); // Print text
  display.display(); // Display the text
}

void loop() {
  // Add any additional functionality here
}
Important Considerations
- Voltage Levels: Ensure the power supply voltage matches the display's requirements (3.3V or 5V).
- Library Compatibility: Use a library compatible with the OLED controller (e.g., SSD1306 or SH1106).
- ESD Precautions: Handle the display carefully to avoid electrostatic discharge damage.
Troubleshooting and FAQs
Common Issues
Display Not Turning On:
- Verify the power supply connections (
VCCandGND). - Check if the reset pin (
RES) is properly connected.
- Verify the power supply connections (
No Output on the Screen:
- Ensure the correct communication protocol (SPI/I2C) is selected in the code.
- Double-check the wiring and pin assignments in the code.
Flickering or Distorted Display:
- Verify the power supply is stable and within the specified voltage range.
- Check for loose or faulty connections.
Library Initialization Fails:
- Confirm the correct library is installed and configured for the OLED controller.
- Ensure the resolution (128x64) matches the display's specifications.
FAQs
Q: Can I use the OLED 3" with a 3.3V microcontroller?
A: Yes, the OLED 3" is compatible with both 3.3V and 5V systems.
Q: How do I switch between SPI and I2C modes?
A: Refer to the display's datasheet for instructions on configuring the communication mode. Typically, this involves setting specific pins or jumpers.
Q: Is the OLED 3" sunlight-readable?
A: While the OLED 3" offers excellent brightness and contrast, it may not be fully readable in direct sunlight.
Q: Can I display images on the OLED 3"?
A: Yes, you can display images by converting them into a compatible bitmap format and using library functions to render them.
By following this documentation, you can effectively integrate and use the OLED 3" display in your projects.